
Welcome to today’s blog.
Today I will be showing how to implement multiple file uploads in an Angular web application.
With many web applications the ability to upload multiple files, which can be documents, images, media files (video and audio) is an essential feature of any web interface where the transfer of files from a client browser to a backend server is a requirement.
Before the release of HTML5 we had the disadvantage of using a file upload input control that was restricted to allows only a single file upload. See the following for more details on the multiple input attribute of HTML5.
Many solutions for multiple file uploads required significant investment in time to implement solutions or to utilize third-party components or plug-ins, and most solutions did not cover all browser types.
Explaining the HTML5 Multiple File Input Control
With HTML5 the file type input control allows multiple file uploads. The HTML used is as shown:
<input type="file" id="files" name="files" multiple>
When using the input control with a scripting development tool such as JavaScript or TypeScript the use of the FormData API interface is the cornerstone of how we can implement a file uploader.
For more details on the the Form Data API interface refer to the following.
The FormData interface has widespread support in all popular browsers except Internet Explorer, which will have its support of IE11 from Microsoft discontinued from August 2021.
FormData uses the XMLHttpRequest specification. As part of this specification, when we post a FormData object that contains multiple files to a server, the encoding type will be multipart/form-data.
When multiple files are selected from the input control, they are appended into FormData as File types, with each entry being a key/value pair.
Each File item type is a type of blob, which also includes the following:
- The name of the file
- The size of the file
- The file contents.
When we are selecting files one at a time, we can either use FormData to post one file to the server or build the FormData object’s append() method to build a multi-part encoded request.
The recommended type of encoding type used during the post request will depend on the nature of the form data being posted.
In the case where we post form fields that are strings, the encoding type should be:
application/x-www-form-urlencoded
As we discussed earlier, when at least one of the fields is a File type, the encoding should be:
multipart/form-data
Overview of Multiple File Uploads in Angular
In the example below there are four steps required to upload files:
- Select single or multiple files from the input and
- Set a component variable to the selected files into a FormData object and
- Populate the FormData object with Files from selected folder files and
- Call your API post method using the FormData value as a parameter
Selecting Files
The UI input control is declared as shown:
<input type="file"
    id="upload-files-id"
    name="formFile" multiple
    (change)="fileSelectionChanged($event)"
>
Setting the FormData object
When file selection(s) occur, the following event handler is called:
fileSelectionChanged(event: Event)
{
    this.selectedFiles = [];

    const element = event.currentTarget as HTMLInputElement;
    this.selFiles = element.files;

    let fileList: FileList | null = element.files;
    if (fileList) {
      for (let itm in fileList)
      {
        let item: File = fileList[itm];
        if ((itm.match(/\d+/g) != null) && (!this.selectedFiles.includes(item['name'])))
            this.selectedFiles.push(item['name']);
      }
    }
}
In the above we store the selected files in the selFiles component variable and store the selected file names in a separate component variable selectedFiles.
Populate FormData Object
The population of selected files is achieved as follows:
eventUploadFiles()
{
    this.formData = new FormData();

    if (this.selectedFiles.length)
    {
      for (let i=0 ; i < this.selectedFiles.length ; i++)
      {
        this.formData.append('files', this.selFiles[i],
           this.selFiles[i].name);
      }

      this.fileManagerApi.uploadFiles(this.formData).subscribe(
        res => {
          this.startDownloadFiles.next(true);
        },
        err =>
        {
          this.uploadErrorMessage = err.error.error;
          console.log(this.selectedFiles.length +
" files not uploaded. Error: " + err.error.error);
        }
      );
    }
}
Note: when we append File entries to the FormData object, the file keys will be named “files”. The reason for this is that when we post the FormData to the upload API method, the parameter that receives the files will be any array of type IFormFile and named files. Below is a screenshot of the debugger in the server web API upload method:

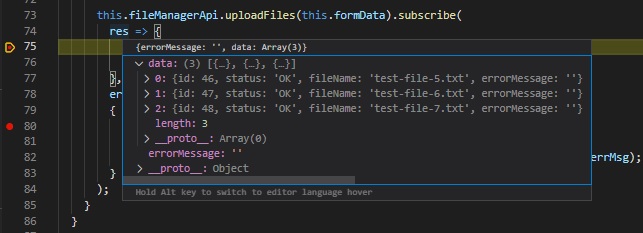
Below is the list of files we see in Chrome debugger:

Notice that the name, type, and size fields within each file within the array of Files correspond to the FileName, ContentType and Length members of the server IFormFile interface API method parameter.
Uploading the Files from a Web API
Within our API service we construct a basic HTTP POST request to push our file contents to the server FileUpload Web API method.
To call the Web API method to upload files we create a small wrapper in Angular to pass in the FormData structure and dispatch the Web API call through the HTTP POST REST call.
uploadFiles(files: FormData): Observable<FileUploadResponse> {
   return this.http.post<FileUploadResponse> (this.baseAPI + '/UploadFiles/',files);
}
Where the file upload response class structure is:
import { FileUploadResponseData } from "./fileUploadResponseData";

export class FileUploadResponse
{
    public Data: FileUploadResponseData[];
    public ErrorMessage: string;
}
And the FileUploadResponseData class structure is:
export class FileUploadResponseData
{
    public Id: number;
    public Status: string;
    public FileName: string;
    public ErrorMessage: string;
}
The purpose behind using the ErrorMessage in each structure is to allow our Web API upload method to set these to meaningful error messages so that the end user can determine if there was a general error before the first file is uploaded (perhaps a network or database access issue) or a localised file upload issue (perhaps the file has exceeded a size limit, or the file name is invalid).
When a successful upload ensures, the following response on the client shows with the successfully uploaded files:
The above details have shown you how to implement a basic, yet useful multiple file upload within an Angular application. There are likely to be other interesting and efficient ways you can implement file uploads and experimentation is encouraged.
For details on how to implement a Web API file uploader, please refer to my previous post here. One of my other posts on responsive user notifications within Angular could be useful when file uploads are complete.
That is all for today’s post.
I hope you found today’s post interesting and informative.
Andrew Halil is a blogger, author and software developer with expertise of many areas in the information technology industry including full-stack web and native cloud based development, test driven development and Devops.

