
Welcome to today’s post.
In today’s post I will be showing how to use Labels with Key-Value pairs from an Azure App Configuration service.
In previous posts I showed how to setup and create key-value pairs from an Azure App Configuration service and configure an ASP.NET Core web application to use them. In addition, I showed how to refresh keys-values modified from an Azure App Configuration service within an ASP.NET Core application.
In today’s post I will show how to create key-value pairs within an Azure App Configuration service and how to configure an ASP.NET Core web application to use them.
You might ask why labels are included as a property of key-value pairs when creating them within the Azure App Configuration service. The answer to this lies in the flexibility in being able to partition application configurations that vary across different development environments, user types, or even security groups. This allows us to separate application settings so that deployments of the application across different environments can share centralized configuration settings.
In the first section, I will show how to create and associate environment labels to Azure App Configuration keys and values.
Using Azure App Configurations to Partition Development Environments
An example would be the partitioning of development environments from development, testing, user acceptance testing, staging and production. Each environment in this case would be represented by a label such as “development”, “testing” in each key-value definition. We can also define other keys-values for each label for the application versions, themes, service settings and so on. In the context of DevOps pipelines, each label that stores each environment corresponds to each stage in a DevOps pipeline and can be filtered within the application to retrieve the settings applicable for the current environment.
As we will see, multiple configuration key-value pairs can share the same label. This allows us to select and user multiple settings values for the same label within our application.
I will create some key-value configuration pairs that include the three labels “Dev”, “Test” and “Prod”. These labels will be defined across two different keys, which will be used for a user interface theme and the application environment.
The keys I enter into the configuration service are below:
| Key | Value | Label |
| BookLoanApp:Settings:HeadingColour | Blue | Dev |
| BookLoanApp:Settings:HeadingColour | Green | Test |
| BookLoanApp:Settings:HeadingColour | Red | Prod |
| BookLoanApp:Settings:EnvironmentName | Development | Dev |
| BookLoanApp:Settings:EnvironmentName | Test | Test |
| BookLoanApp:Settings:EnvironmentName | Production | Prod |
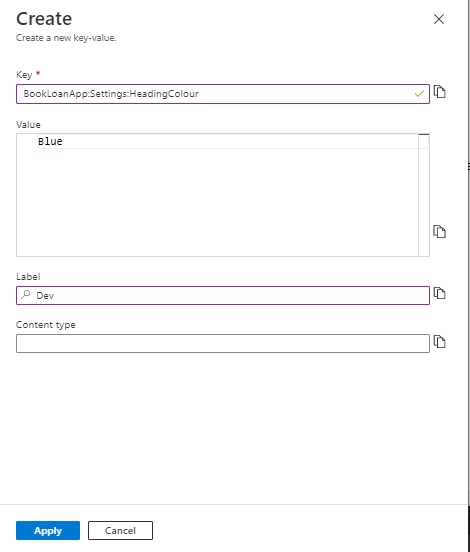
In the Configuration Explorer key-value pairs when created include the Label property, which allow us to partition configurations for the same configuration key. The dialog for the first key creation is shown below:
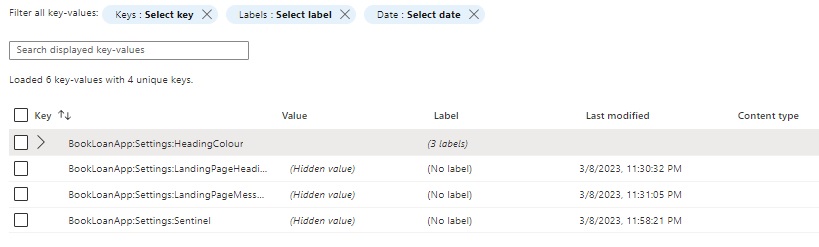
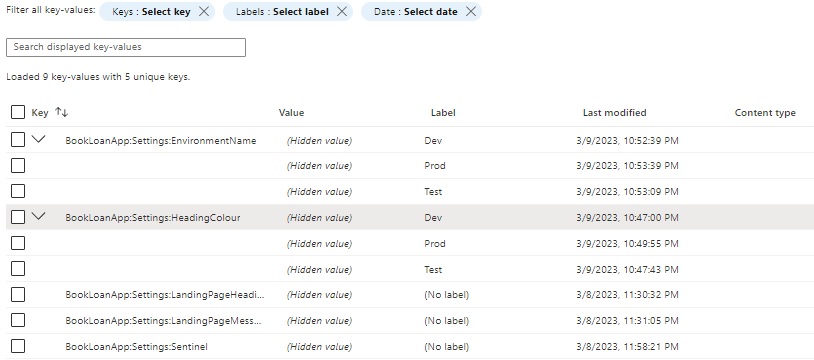
After adding the first three labelled key-values, you will notice the labelled configuration key-value pairs are grouped under the same key as shown with the unlabelled keys shown separately.
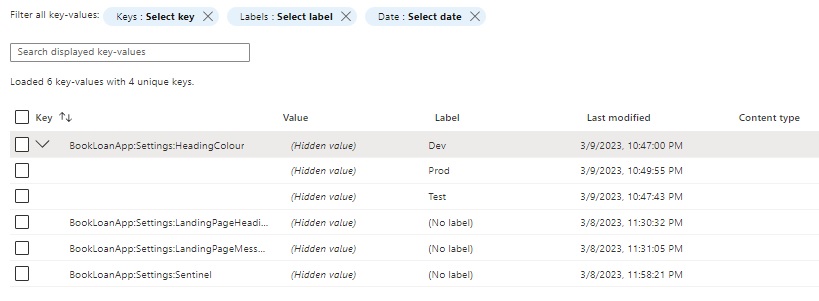
When we expand the grouped labelled keys, we will see the number of key-value pairs under the same key as shown:
When we select keys from within our application without a label filter (the null filter), all unlabelled key-value pairs would be selected as shown in the following debug breakpoint:

In the next section I will show how the settings keys and values are retrieved from the Azure App Configuration resource through the configuration startup in a .NET Core application.
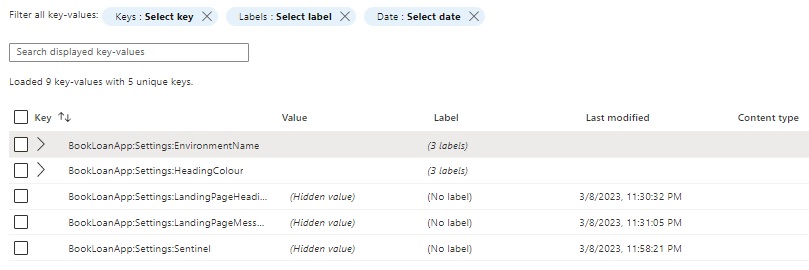
After creating the remaining three labelled key-value pairs with a different configuration key, we will see 5 sets of selectable key-value pairs in the grid.
What we will see later is that we can select one key-value pair for a given label filter. If we selected with the “Dev” filter, this would give us two key-value pairs selected from the labelled entries within the two unique configuration keys.
In the next section, I will show how to retrieve the labels, keys and values from the Azure App Configuration resource by reading them from within the application’s startup.
Using Azure App Configuration Labels in a .NET Core Web Application
In this section, I will show how the filtered settings associated with an environment label defined in the Azure App Configuration resource are loaded and periodically refreshed into the application settings keys and values.
In the application, I will start with a sample configuration that is initially set to the local development settings.
In this case I set the application environment to “Dev” in the local application settings as shown:
"AppSettings": {
    "AppLocation": "Remote",
    "AppEnvironment": "Dev",
    "AppConfigConnection": "..."
}
Following on from the previous post, I have added extra properties to accommodate the additional labelled configuration settings values as shown:
namespace BookLoanWebApp.Models
{
    public sealed class AppConfiguration : IAppConfiguration
    {
        public AppConfiguration() { }
        public string HeadingColour { get; set; }
        public string EnvironmentName { get; set; }
        public string LandingPageHeading { get; set; }
        public string LandingPageMessage { get; set; }
    }
}
In Program.cs, from the CreateHostBuilder() method we read in the endpoint from the local configuration, connect to the remote configuration service to retrieve the unlabelled keys and labelled keys for the “Dev” development environment. We only do this is when the application location is set to “Remote”:
public static IHostBuilder CreateHostBuilder(string[] args) =>
Host.CreateDefaultBuilder(args)
    .ConfigureWebHostDefaults(webBuilder =>
    {
       	webBuilder.ConfigureAppConfiguration(config =>
        {
            IConfiguration settings = config.Build();
            string connectionString = settings.GetValue<string>(
                "AppSettings:AppConfigConnection");
            string environmentString = settings.GetValue<string>(
                "AppSettings:AppEnvironment");
            string appLocationString = settings.GetValue<string>(
                "AppSettings:AppLocation");

            if (appLocationString == "Remote")
            {
                config.AddAzureAppConfiguration(options =>
                {
                    options.Connect(connectionString)
                        // Load selected keys starting with `BookLoanApp:` and have no label
                        .Select("BookLoanApp:*", LabelFilter.Null)
                        // Load keys with label for current environment
                        .Select("BookLoanApp:*", environmentString)
                        // Configure to reload configuration if the registered sentinel key is modified
                        .ConfigureRefresh(refreshOptions =>
                            refreshOptions.Register("BookLoanApp:Settings:Sentinel", refreshAll: true)
                                .SetCacheExpiration(new System.TimeSpan(0, 5, 0))
                        );
                });
            }
        });
        webBuilder.UseStartup<Startup>();
    });
The startup class with ConfigureServices() shows the remote configuration provider is not added to the service collection unless we have configured the application remotely:
public void ConfigureServices(IServiceCollection services)
{
    services.AddControllersWithViews();
    services.AddRazorPages().AddRazorRuntimeCompilation();
    if (Configuration.GetValue<string>("AppSettings:AppLocation") == "Remote")
        services.AddAzureAppConfiguration();

    // Bind configuration "BookLoanApp:Settings" section to the AppConfiguration object
    services.Configure<AppConfiguration>(Configuration.GetSection("BookLoanApp:Settings"));
}
Likewise, with Configure(), we include the remote configuration middleware only when we have configured the application remotely:
public void Configure(IApplicationBuilder app, IWebHostEnvironment env)
{
    if (env.IsDevelopment())
    {
        app.UseDeveloperExceptionPage();
    }
    else
    {
        app.UseExceptionHandler("/Home/Error");
        app.UseHsts();
    }

    if (Configuration.GetValue<string>("AppSettings:AppLocation") == "Remote")
       app.UseAzureAppConfiguration();

    app.UseHttpsRedirection();
    app.UseStaticFiles();
    app.UseRouting();
    app.UseAuthorization();

    app.UseEndpoints(endpoints =>
    {
        endpoints.MapControllerRoute(
            name: "default",
            pattern: "{controller=Home}/{action=Index}/{id?}");
        });
    }
}
In the next section, I will show how loaded Azure app configurations are injected within application components.
Injecting Azure App Configuration Settings into Application Components
In the previous section, I will showed how the configuration settings that are defined within an Azure App Configuration resource were loaded into a web application’s configuration settings using labels and filters from within the AddAzureAppConfiguration() middleware.
In this section, I will show how the loaded configurations are injected into web pages and controllers using the familiar IOptionsSnapshot pattern.
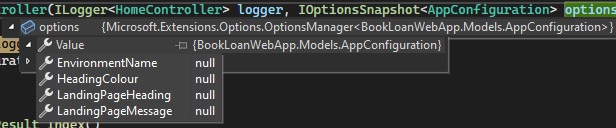
When the application is run with the “Dev” label filter and the unlabeled filter, 5 keys-value pairs are retrieved as shown:

In the HomeController, where we inject the settings into through the IOptionsSnapshot object, we check for null values in the options (when no settings are retrieved for localised settings) in the Index() action:
public class HomeController : Controller
{
    private readonly ILogger<HomeController> _logger;
    private readonly IOptionsSnapshot<AppConfiguration> _appConfiguration;

    public HomeController(ILogger<HomeController> logger,
        IOptionsSnapshot<AppConfiguration> options)
    {
        _logger = logger;
        _appConfiguration = options;
    }

    public IActionResult Index()
    {
        IndexModel indexModel = new IndexModel() {
        HeadingColour = _appConfiguration.Value.HeadingColour == null ?
 		    "" : _appConfiguration.Value.HeadingColour,
        EnvironmentName =
            _appConfiguration.Value.EnvironmentName == null ?
            "" : "Current Environment is " + _appConfiguration.Value.EnvironmentName,
        HeadingMessage =
            _appConfiguration.Value.LandingPageHeading == null ?
            "Welcome Reader!" : _appConfiguration.Value.LandingPageHeading,
        WelcomeMessage = _appConfiguration.Value.LandingPageMessage == null ?
            "Welcome to our collection of Books!" : _appConfiguration.Value.LandingPageMessage
    };
    return View(indexModel);
}
…
During the running of the application, the “Dev” settings are injected into the options snapshot as shown:

If we were to run the application with the local AppLocation setting value as “Local”, we will see the options properties with null values are shown:
With the Index view, I have added some conditional markup for the settings to control the visibility of the labelled EnvironmentName setting and for the HeadingColour labelled setting:
@model IndexModel;

@{
    ViewData["Title"] = "Landing Page!!";
}

<div class="text-center">
    <h1 class="display-4">@Model.HeadingMessage</h1>
    <p>@Model.WelcomeMessage</p>
    @if (Model.EnvironmentName.Length > 0)
    {
        <p>@Model.EnvironmentName</p>
    }
</div>

<br />

@if (Model.HeadingColour == "Blue")
{
    <h2 style="color:blue">Main Menu</h2>
}
else
@if (Model.HeadingColour == "Green")
{
    <h2 style="color:green">Main Menu</h2>
}
else
@if (Model.HeadingColour == "Red")
{
    <h2 style="color:red">Main Menu</h2>
}
else
{
    <h2>Main Menu</h2>
}

<br />
<div>
    @Html.ActionLink("View Books", "List", "Book", null,
        new { id="viewBookLink" })
...
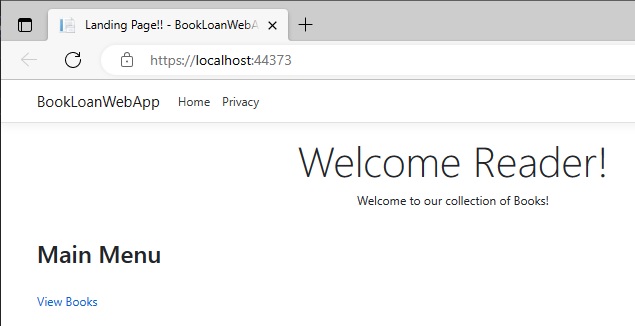
The resulting landing page for the “Dev” labelled settings will show as follows:

With the localised application settings, we will see the landing page display as shown:
To re-run the app configured to read in “Test” labelled settings, I set the label in the local configuration file as shown:
"AppSettings": {
    "AppLocation": "Remote",
    "AppEnvironment": "Test",
    "AppConfigConnection": "…"
}
During debugging, we will see the key-values filtered by the “Test” label:
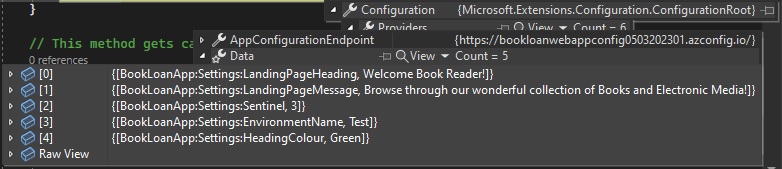
The options snapshot object will then be populated with the corresponding data as shown:

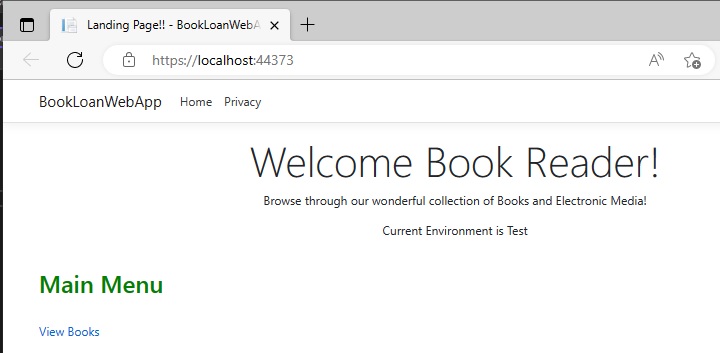
The resulting landing page for the configured data corresponding to the “Test” labelled keys is shown:
The above has showed how we can use labelled key-value settings within an Azure Application Configuration service to vary settings across multiple environments.
I have also shown how to switch from remote settings back to localized settings and adjust these conditionally within the application.
That is all for today’s post.
I hope you have found this post useful and informative.
Andrew Halil is a blogger, author and software developer with expertise of many areas in the information technology industry including full-stack web and native cloud based development, test driven development and Devops.

