
Welcome to today’s post.
In today’s post I will be giving an overview of form validations within .NET Core Blazor applications. I will also be showing how to validate fields within an edit form using the implicit (or declarative) method of field validation.
In the previous post I showed how to use Entity Framework Core to provide data access and data manipulation of data presented within an ASP.NET Core Blazor application. What I didn’t explain was how to validate the form’s input fields.
Before I dive into how Blazor forms use implicit validation, I will first explain the types of forms we need field validations and some important reasons why validation is needed in application forms.
When and why Form Validations are used
In this section I will discuss when and why form validation are used, and the different approaches we can adopt in terms of validation.
In relation to when form validations are utilised, the types of forms where we do need them include:
- Data entry forms needed for data insertion, update, or removal.
- Input parameters for running reports.
- Input parameter required for starting or scheduling a process.
Why do we need validation in application forms?
- To protect the backend database from invalid data, to maintain consistency of the type of data in a table field (Avoid posting alphabetic string data to a numeric or date field.)
- Prevent bad scripts or dangerous SQL being transmitted and saved into database table fields.
- Prevent invalid or perhaps undesirable input parameters including large requests that might compromise the integrity or stability of a backend data or service. One example would be limiting file sizes that would impact database storage limits or cause memory faulting issues.
What approaches can we take to validate form data?
- Validate input field values before the user can submit the form.
- Validate input field values after submission.
With pre-submission field validations, we know that the data is validated before it can reach the backend data or service. In this case, the user is prevented from submitting the client form with either the submission button hidden or disabled when the field validations fail. If the input data is valid, then the submission button is enabled, and the input data is submitted to the server for data processing, or service for execution.
With post-submission field validations, we know that the data is entered unvalidated on the client form and the user is permitted to submit the input data to the server. When the input data reaches the server, it is validated through an intermediate validation function, which determines the errors, and sends error messages back to the client. If the validation succeeds on the server, then the input data is dispatched to the destination method where the data request is processed, or service is executed.
What are some benefits of pre-submission form validation?
The main benefit here is that the validation process is confined to the client, reducing load on the server.
One other benefit here is that client and server round trips are limited, with the only server trip confirmed to a submission to the server.
In the following steps that I will walk though, I will show how to use pre-validation submission with the implicit (or declarative) method of validation. This involves using data annotations within our model class and a validation summary within the data entry form.
Preparing Blazor Razor Forms to Handle Implicit Validations
There are seven steps I will go through to show how to convert a basic HTML Razor form into a Razor form that supports implicit input validation.
Step 1: Wrap HTML Controls in EditForm tags
Before we can use field validations in Blazor Razor forms, we will need to convert forms that use HTML forms to use <EditForm> tags:
We go from:
<div class="form-field">
    <label>ID:</label>
        <div>
            <label>@book.ID</label>
        </div>
</div>
…
to
<EditForm Model=@book>
    <div class="form-field">
        <label>ID:</label>
            <div>
                <label>@book.ID</label>
            </div>
        </div>
    ...
</EditForm>
Step 2: Convert HTML Controls to EditForm Controls
Below are examples of how we replace HTML input controls with text or numeric Blazor input controls:
Replacing HTML text inputs to InputText controls:
<div class="form-field">
    <label>Title:</label>
        <div>
            <input @bind="book!.Title" />
        </div>
</div>
to
<div class="form-field">
    <label>Title:</label>
    <div>
        <InputText @bind-Value=book.Title></InputText>
    </div>
</div>
Replacing HTML numeric inputs to InputNumber controls:
<div class="form-field">
    <label>Year Published:</label>
    <div>
        <input @bind="book.YearPublished" />
    </div>
</div>
to
<div class="form-field">
    <label>Year Published:</label>
    <div>
        <InputNumber @bind-Value=book.YearPublished></InputNumber>
    </div>
</div>
Step 3: Add annotations in the model class
The form data entry is restricted by the properties of the associated model class object.
Where we wish to prevent blank fields from being entered, we use the [Required] annotation to ensure a value is entered in the associated property.
This is shown in the model class below:
using System.ComponentModel.DataAnnotations;

namespace BookLoanBlazorServerApp.Models
{
    [Serializable]
    public class BookViewModel
    {
        public int ID { get; set; }

        [Required]
        public string? Title { get; set; }

        [Required]
        public string? Author { get; set; }

        [Required]
        [Range(1000, 3000, ErrorMessage = "Year Published range invalid (1000-3000).")]
        public int YearPublished { get; set; }

        [Required]
        public string? Genre { get; set; }
        public string? Edition { get; set; }
        public string? ISBN { get; set; }

        [Required]
        public string? Location { get; set; }

        [Required]
        public string? MediaType { get; set; }
        public DateTime DateCreated { get; set; }
        public DateTime DateUpdated { get; set; }
        public BookViewModel() { }
    }
}
Important Note: If you set a [Required] annotation in a model class member, and the same field has a null value in the table in at least one record, then executing a query to list all records in the table will give an exception error (the data reader cannot read a null value) on the record that has a null in the table field.
Step 4: Create EditContext object instance from model and field change validation
Before we can link the model instance to the Blazor form input controls for validation, we will need to create the edit context from the model instance, then link field changes to a validation flag, isFormInvalid. This is done in the following code segment:
@code {
    private BookViewModel? book;

    private bool isFormInvalid = false;
    private EditContext? editContext;

    protected override async Task OnInitializedAsync()
    {
        book = await LibraryBookService.GetBook(ID);
        editContext = new(book);
        editContext.OnFieldChanged += HandleFieldChanged;
    }

    private void HandleFieldChanged(object? sender, FieldChangedEventArgs e)
    {
        if (editContext is not null)
        {
            isFormInvalid = !editContext.Validate();
            StateHasChanged();
        }
    }
    ....
Step 5: Add the Form Edit Context in the <EditForm> Tag
We then link the edit context to be form input controls by referencing the edit context within the <EditForm> tag. This is done as shown:
<EditForm EditContext="@editContext">
    ...
</EditForm>
...
Step 6: To display validation summaries and enable validations from the associated model instance properties
For this step we add the <DataAnnotationsValidator> and <ValidationSummary> tags within and near the top of the <EditForm> tags as shown:
<EditForm EditContext="@editContext">
    <DataAnnotationsValidator />
    <ValidationSummary />
    ...
Step 7: Keep Update button disabled from validation state
The final step is to enable or disable the button depending on the isFormInvalid flag. This is done as follows:
<button class="btn btn-primary"
    @onclick="UpdateBook">
    Update Changes
</button>
to
<button class="btn btn-primary"
    @onclick="UpdateBook" disabled="@isFormInvalid">
    Update Changes
</button>
The resulting Razor HTML markup is shown below:
@page "/editbook"
@using Microsoft.AspNetCore.Components
@using BookLoanBlazorServerApp.Services
@using BookLoanBlazorServerApp.Models
@inject IBookService LibraryBookService
@inject NavigationManager PageNavigation
@inject IJSRuntime JS

<PageTitle>Edit Book</PageTitle>

<h3>Edit Book</h3>

@if (book == null)
{
    <p><em>Loading...</em></p>
}
else
{
    <EditForm EditContext="@editContext">
        <DataAnnotationsValidator />
        <ValidationSummary />

        <div class="form-field">
            <label>ID:</label>
            <div>
                <label>@book.ID</label>
            </div>
        </div>

        <div class="form-field">
            <label>Title:</label>
            <div>
                <InputText @bind-Value=book.Title required></InputText>
            </div>
        </div>

        <div class="form-field">
            <label>Author:</label>
            <div>
                <InputText @bind-Value=book.Author></InputText>
            </div>
        </div>

        <div class="form-field">
            <label>Year Published:</label>
            <div>
                <InputNumber @bind-Value=book.YearPublished></InputNumber>
            </div>
        </div>

        <div class="form-field">
            <label>Genre:</label>
            <div>
                <InputText @bind-Value=book.Genre></InputText>
            </div>
        </div>

        <div class="form-field">
            <label>Edition:</label>
            <div>
                <InputText @bind-Value=book.Edition></InputText>
            </div>
        </div>

        <div class="form-field">
            <label>ISBN:</label>
            <div>
                <InputText @bind-Value=book.ISBN></InputText>
            </div>
        </div>

        <div class="form-field">
            <label>Location:</label>
            <div>
                <InputText @bind-Value=book.Location></InputText>
            </div>
        </div>

        <div class="form-field">
            <label>Media Type:</label>
            <div>
                <InputText @bind-Value=book.MediaType></InputText>
            </div>
        </div>

        <br />

        <button class="btn btn-primary"
            @onclick="UpdateBook" disabled="@isFormInvalid">
            Update Changes
        </button>
        …
    </EditForm>
    <br />
}
The resulting Razor C# code segment is shown below:
@code {
    [Parameter]
    [SupplyParameterFromQuery]
    public int ID { get; set; }

    private BookViewModel? book;

    private bool isFormInvalid = false;
    private EditContext? editContext;

    protected override async Task OnInitializedAsync()
    {
        book = await LibraryBookService.GetBook(ID);
        editContext = new(book);
        editContext.OnFieldChanged += HandleFieldChanged;
    }

    private void HandleFieldChanged(object? sender, FieldChangedEventArgs e)
    {
        if (editContext is not null)
        {
            isFormInvalid = !editContext.Validate();
            StateHasChanged();
        }
    }

    // Update entered book properties.
    private async void UpdateBook()
    {
        var result = await LibraryBookService.UpdateBook(ID, book!);
        if (result != null)
            message = "Record has been successfully updated!";
        else
            message = "Unable to update record.";
        await JS.InvokeVoidAsync("alert", message);
    }

    public void Dispose()
    {
        if (editContext is not null)
        {
            editContext.OnFieldChanged -= HandleFieldChanged;
        }
    }
}
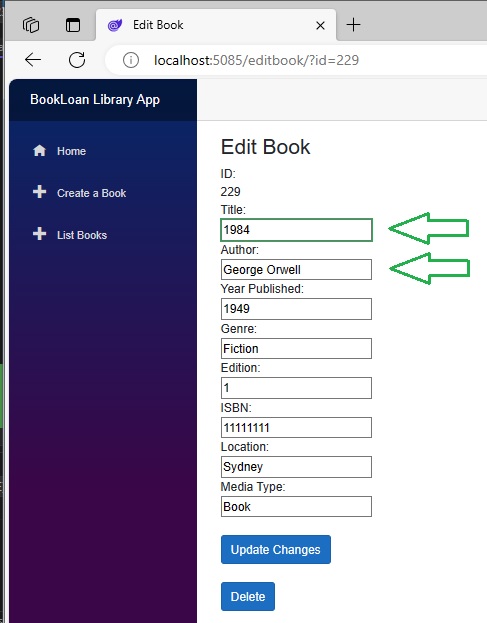
After building and running the above component, we see the form below with two of the required fields indicated. With values in those fields, we see that the Update Changes button is enabled:
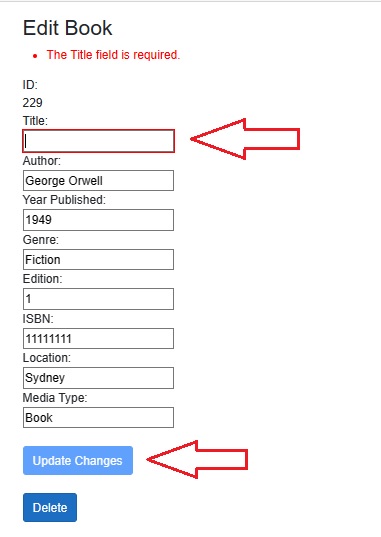
When we clear the Title field, then hot the tab key, the field is highlighted with a red border, and a red validation error displays just below the form title:
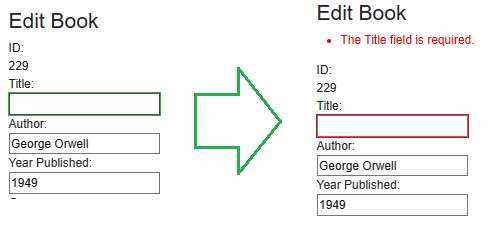
Notice also that the Update Changes button is then put into a disabled state as shown:
Similarly, if we clear the Author field, and tab off that as well, then we will see an additional red border show and a second validation error message appear.
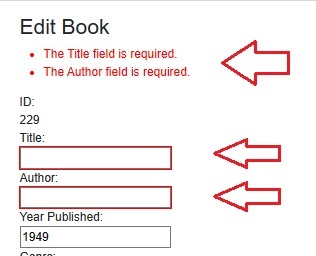
The above is instant feedback provided to users for each failed field validation. This client-side validation is quite fast, as this does not require any network round trips for server-side validation.
Applying Validation Rules to Data Creation Forms
Identical rules are applicable for forms that post input data for record creation.
Data creation components are different from data edit components in that an identifier parameter is not passed into the component, nor is it displayed in the Razor markup.
Below is the Razor creation component with all fields (except) the year publish field defaulting to empty values or default drop down selections:
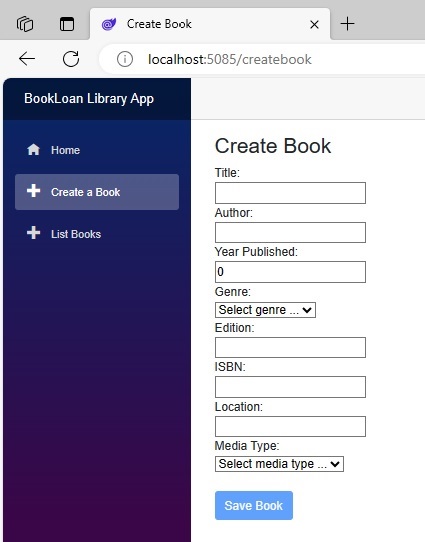
Notice the Save Book button is also disabled, which his ensured with the form validity flag set to a default (form data is invalid) as shown:
@code {
    …
    private bool isFormInvalid = true;
    …
When we start filling in field values and tab off the first field, we will notice the validation summary section shows erroneous fields in red:

When all field values have been entered validly, the Save Book button is enabled, and the input data can be saved.

We have seen how to setup a Blazor form Razor component for field validations by applying seven tasks, including adding data annotations and relevant markup to tie the edit context of a retrieved record to the Blazor input control fields.
In a future post I will show how to use a post-submission server-side validation, custom validations and apply validations to numeric fields and drop-down lists.
That is all for today’s post.
I hope you have found this post useful and informative.
Andrew Halil is a blogger, author and software developer with expertise of many areas in the information technology industry including full-stack web and native cloud based development, test driven development and Devops.

