
Welcome to today’s post.
In today’s post I will show how to create a conversational language understanding (CLU) model with Azure Language Studio.
You will be asking what are conversational language understanding models used for?
Before I show how to create a CLU model, I will first explain the purpose behind using the CLU model. I will also explain how language understanding is used in other types of Azure AI services, such as in Speech to Text services that require the use of intent recognition to determine the meaning and text output from uttered speech.
One part of the model creation process will include creating utterances used for training and texting the model. I will also show how to create custom entities and intents that are linked to each utterance so that the trained model can associate each utterance with an intent.
Purpose of the Conversational Language Understanding Model
A CLU model is used to model and predict the intent of utterances that are input and parsed within chatbots. When an intent is determined from an utterance, the bot is then able to dispatch the end user to another skilled bot that then performs a useful task such as help desk, a price quote, order a product, or conduct some automation tasks. I explained the concept of chatbots in a previous post, where I showed how to create a basic web chatbot using the Bot Framework Composer. From the model I will create in this post, I will show how, in a later post, we can integrate it into a smarter web chatbot that uses intent recognition to perform intent recognition and orchestration.
In previous posts I showed how to implement offline intent recognition models to help our speech to text application recognize the intent of the text output of speech input using a conversational language understanding model. In the offline intent recognition models, with the most basic model, I stored the utterances with references back to custom entities. I also showed a slightly more complex offline model with patterns used in the utterances.
The training datasets and markdown files we use for a Custom Speech Model that are used within a Speech to Text service are identically structured to those used in any of the language understanding models, which include conversational language understanding models.
In a previous post, when I created a custom speech model, I used a language understanding markup file and audio files to train and evaluate the recognition accuracy and quality of the custom speech model.
Instead of using markup files to train the language understanding model, I will be using a data labelling editor within the Azure Language Studio to construct the sentence utterances that will be used to train a custom conversational language understanding model.
In the next section, I will show how to start off by creating an Azure Language Service resource, which is what is required before we can create a Azure Language Studio project.
Creating an Azure Language Studio Project
In this section, I will show how to create an Azure Language Studio project, which we will then use to create a CLU model.
Before we can create a project within the Azure Language Studio, a Language Service resource will need to be created that will provide the storage for the language resources that we create within our project.
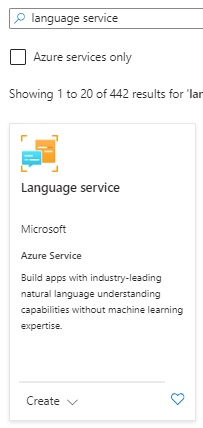
In the Azure Portal, search for “language service”.
In the marketplace services, you will see the Language Service resource appear:
After starting the creation process, you will see the first page, which displays the features.
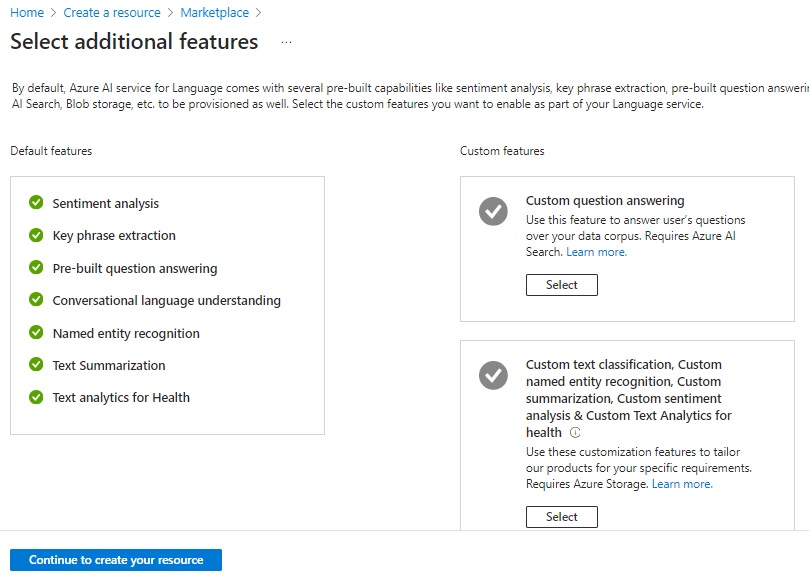
Click on Continue to create your resource.
In the next dialog, select your Azure subscription, resource group, instance name, region, and select the pricing tier. Before you can select the region, you will need to refer to the availability limits for the CLU resource.
Only certain regions support the authoring and prediction of CLU resources. Unlike the Speech Service resource, where we could use the West US region, with Language Services, only authoring is supported in West US. In the availability matrix for CLU, authoring and prediction are supported in the East US, Australia East and 10 other regions.
The regions supporting authoring capability permit you to create, edit, train, and deploy your projects, whereas the regions supporting prediction capability allow you to submit utterances, obtain predictions and visualize results.
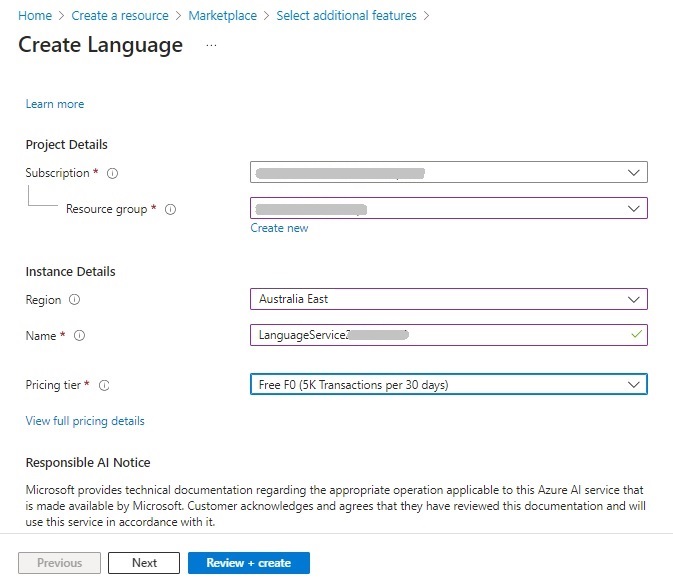
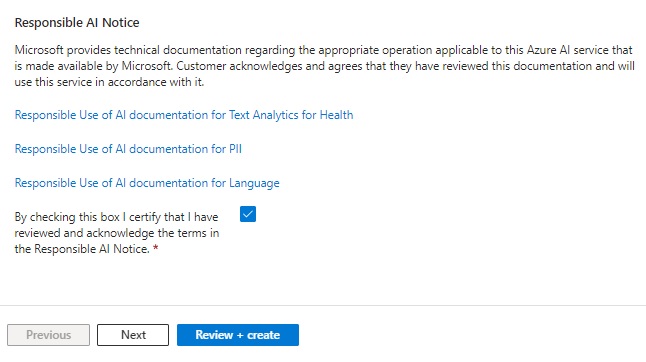
After accepting the responsibility of AI usage notice, hit Review + Create.
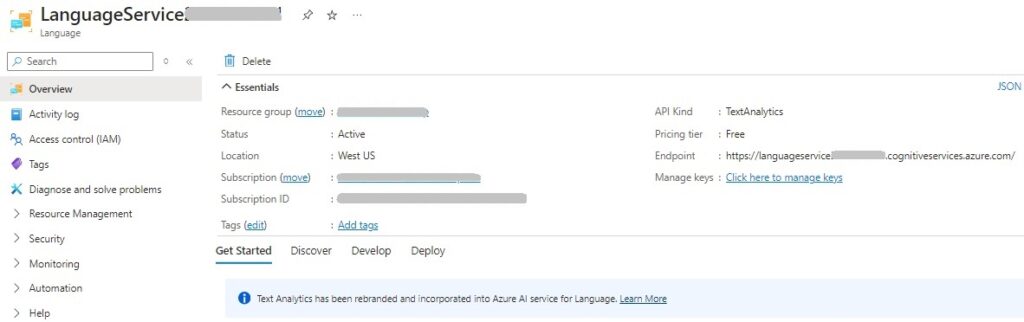
When your language resource is created, it will have an endpoint URI in the following form:
https://[service-name].cognitiveservices.azure.com/
where service-name is the instance name of the language resource. In the resource overview, you will notice that the API Kind is of type TextAnalytics, which is different from SpeechServices, which is the API Kind used in an Azure Speech Service resource.
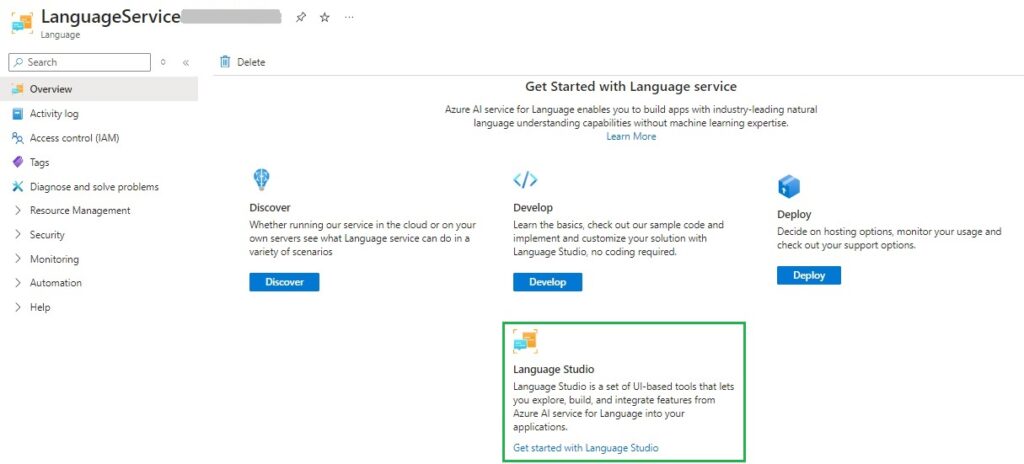
In the Get Started with Language service area, select the menu card Language Studio.
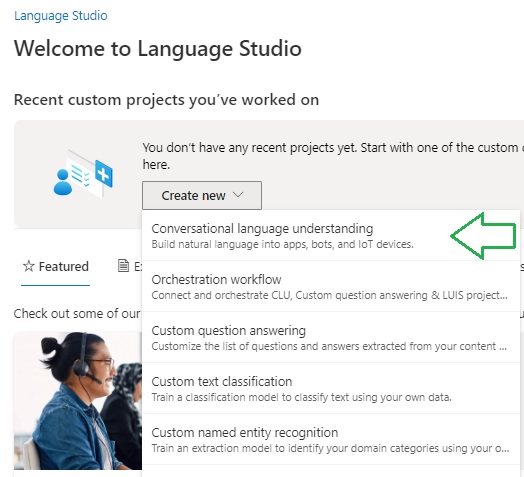
When we access the language studio, the following landing page will show with the various language services:
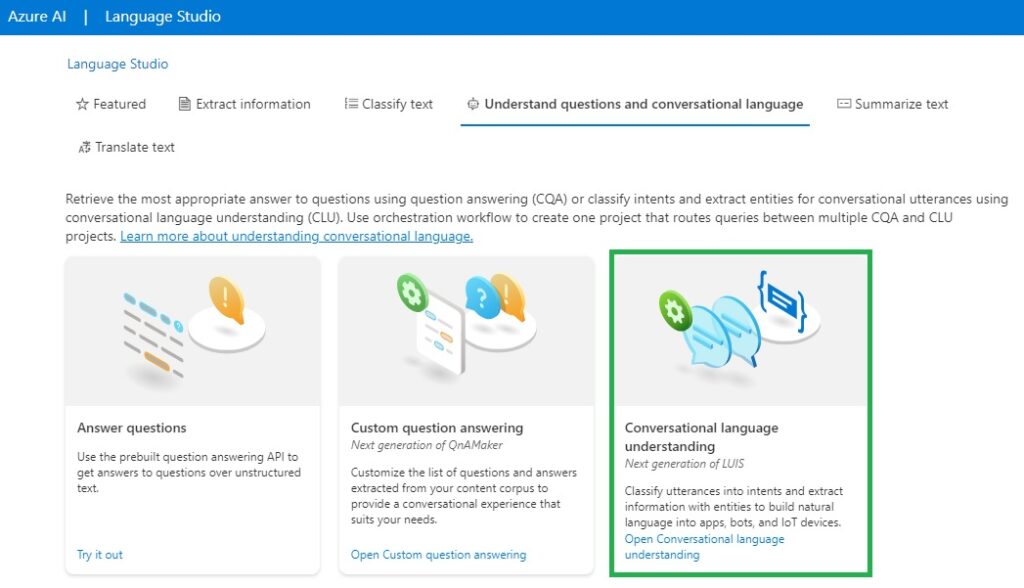
Clicking on the Conversational language understanding menu card will start loading the Language Studio.
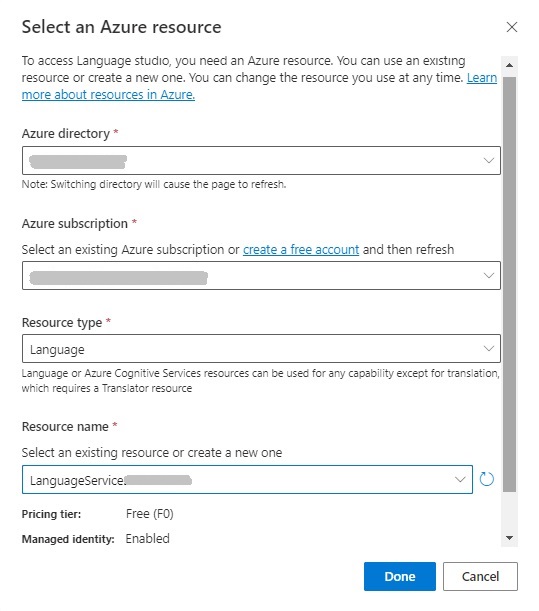
You will then be taken to a dialog that will require you to specify the resources, such as your Azure directory, Azure subscription, resource type (Language), and name of the Language Service resource you created earlier.
In the welcome screen, you will be able to select the language project type. For CLU projects, select the Conversational language understanding option as shown:
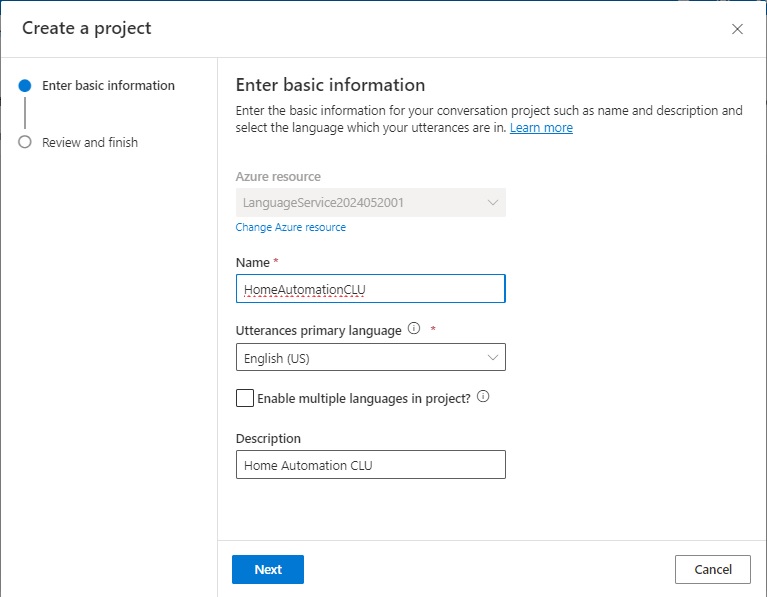
After selecting the project type, you will be taken to another dialog, where you will be required to enter the new project details such as the Name, Utterances primary language, and Description. It will default to the Azure Language resource that you selected when opening the Language Studio.
In the landing page, you will see a side menu that shows the options:
Schema definition.
Data labeling.
Model performance.
Deploying a model.
Testing deployments.
The landing page will show the Schema definition page.
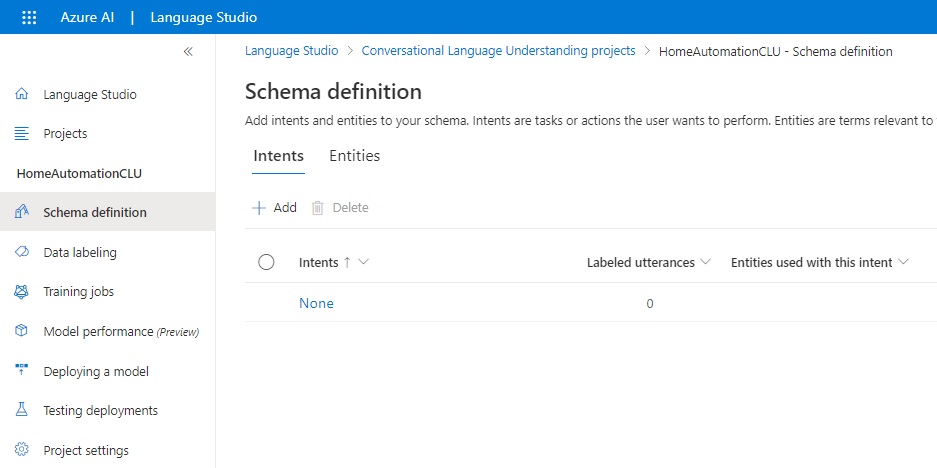
On this page, you will be able to add, remove, and update Intents and Entities that will be used to build the training data for your CLU model.
In the next section, I will be showing you how to create intents.
Creating Intents for the CLU Model
To add intents, we select the plus action just above the data entry grid. The Add an intent data entry screen shows with an edit Intent name, where we enter the first intent:
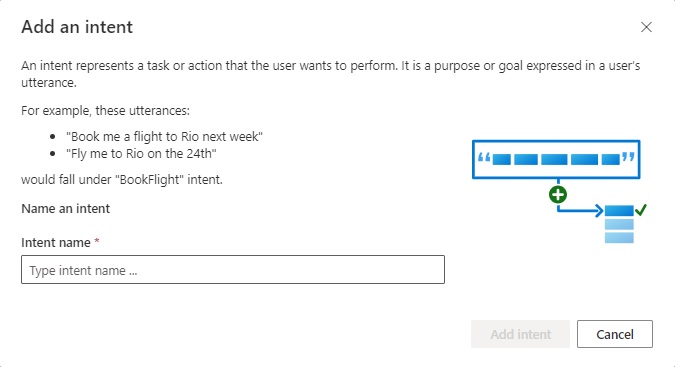
I will proceed to add the following intents into the schema:
ControlBlinds
ControlLights
ControlTemperature
ControlVolume
ControlAppliance
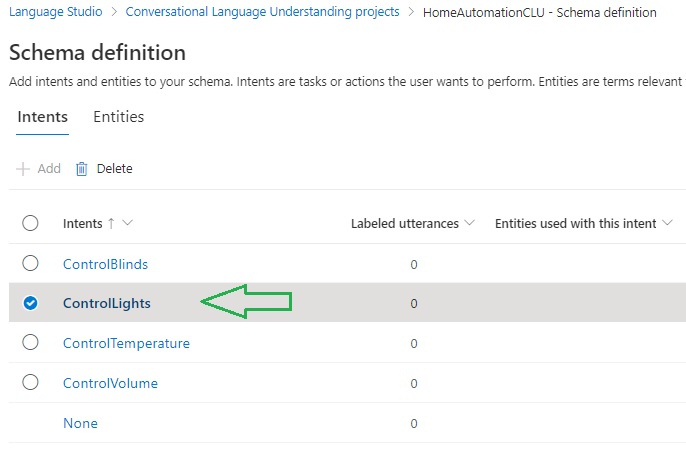
After adding the above intents, you will see the list below:
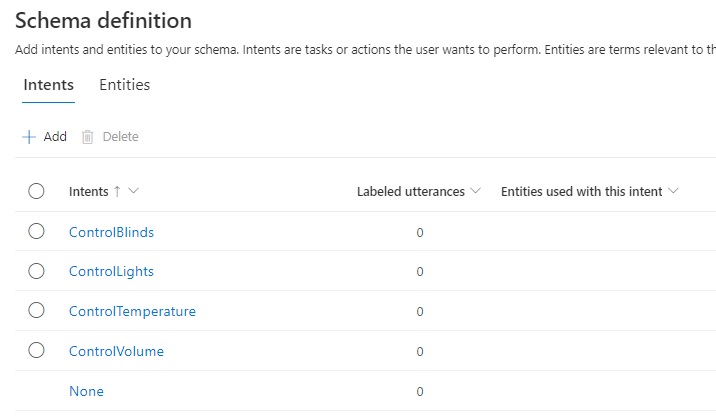
Each intent has no labeled utterances. This is something that we will add a little later. In the next section, I will show how to add Entities to our CLU model.
Creating Entities for the CLU Model
I will next show how to add entities to the model. Click on the Entities tab and you will see the following data entry screen:

To add entities, we select the plus action just above the data entry grid. The Add an entity data entry screen shows with an edit Entity name, where we enter the first entity, Room name:
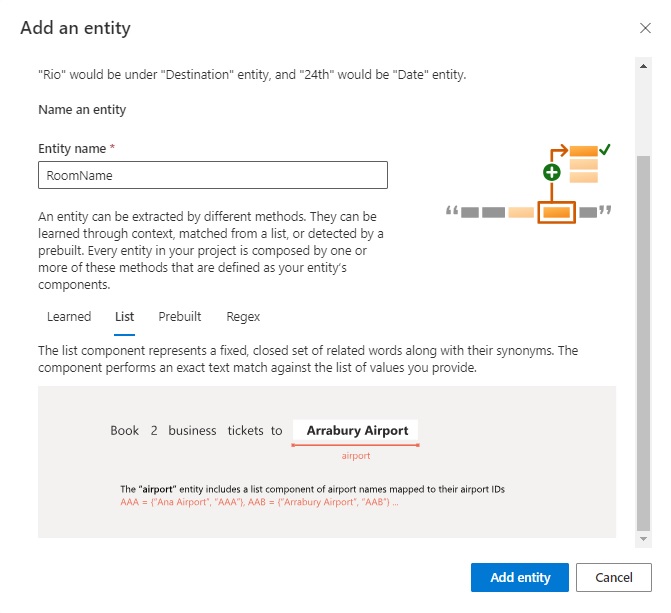
With this entity, I define the entity type as a list with a set of values. To create the entity and show the entity details screen, click on the Add entity button.
In the entity details screen we can see the List as one of the options. In the list grid, click on the Add new list action.
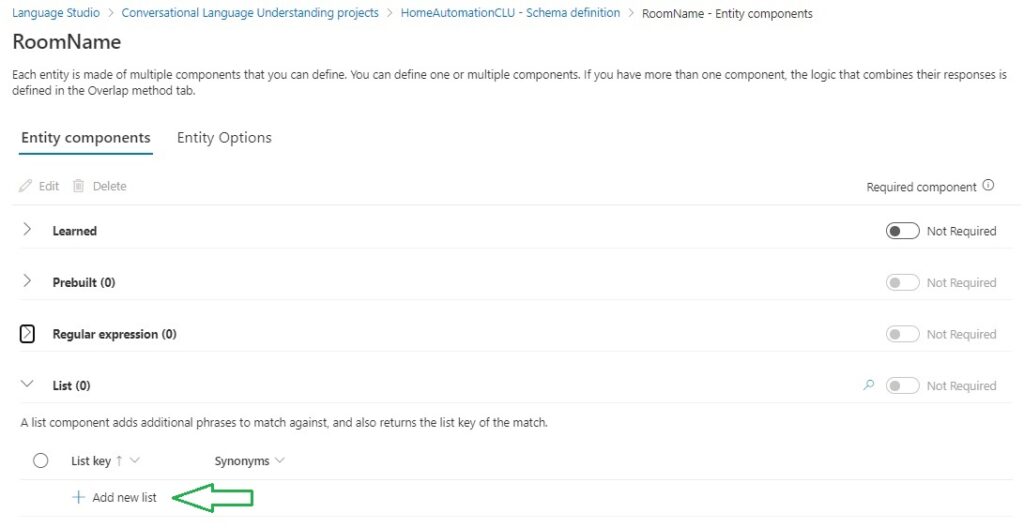
Enter a name for the list, then the values by typing in and pressing enter. Below is have named the entity list as RoomNameList with the values:
Living room
Dining room
Bedroom
Study
Bathroom
Then hit the Save button.
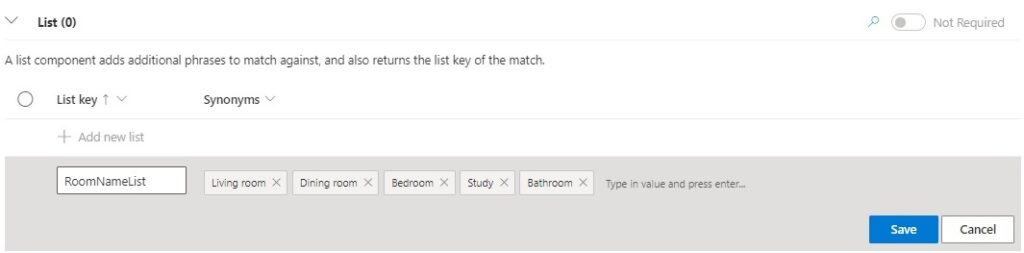
When saved, you will notice that the name of the list has been added as an extra list value. (This could be a bug with the in-place editor!) You can then remove this extra value and re-save the list.

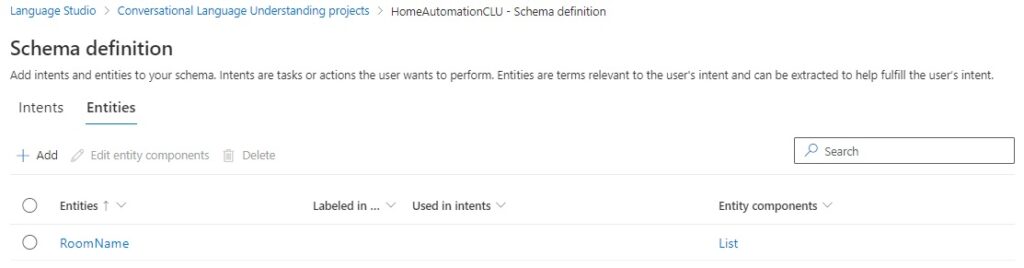
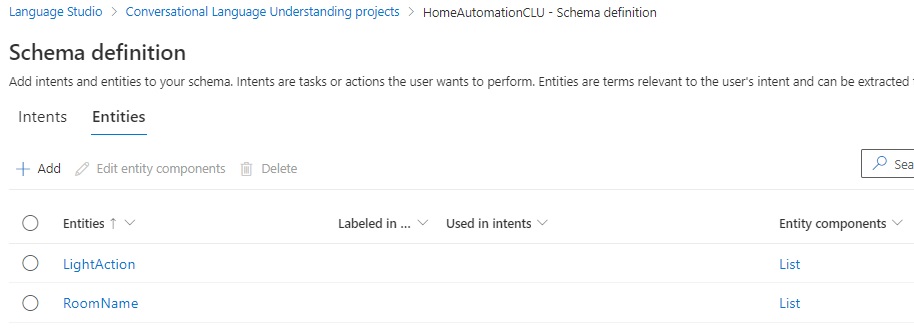
When saved, the Schema definition will look like this, with the entity names and the entity components in another column:
As the utterances I will be adding later will have two types of entities, a room entity, and an action entity, I will show how I add the second entity.
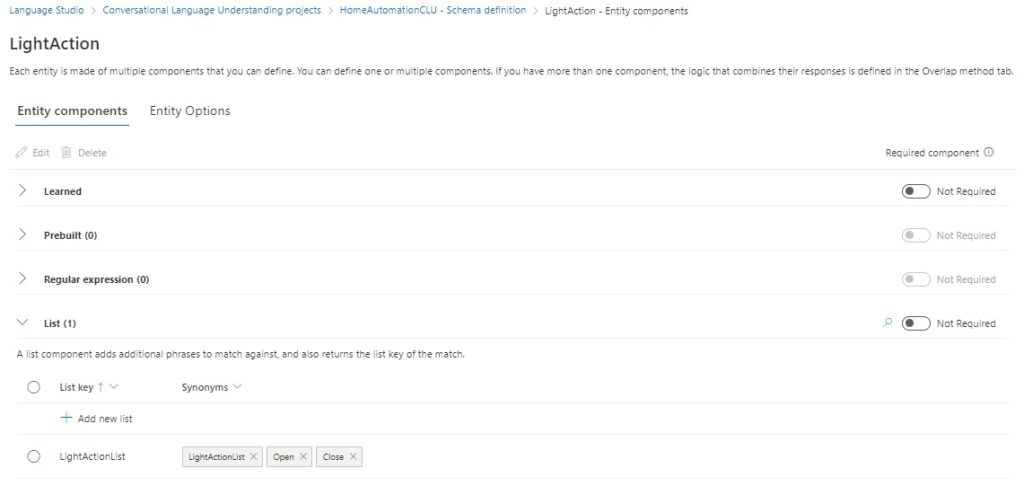
The second entity is named LightAction and is shown below in the entity editor:
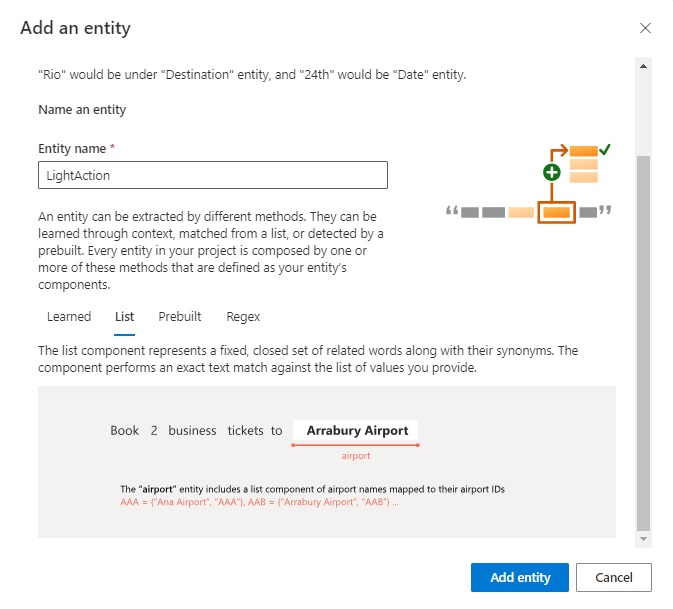
It is also a list entity, where I have created a list named LightActionList with the values:
Open
Close
The definition is shown below in the entity editor:
The two entities are now shown in the Entities grid:
In the next section, I will be showing you how to build a training data set with utterances that include data labeling.
Building Labeled Training Dataset Utterances
In the Schema definition page, you will see the intents that have been created, but there are no labeled utterances. To create utterances, select one of the intents from the list:
The Data labeling screen will open with the Training set tab as the default data entry page. You have the option to either upload utterances from a markup file or enter the utterances manually and label them. I will show how to manually enter the utterances.
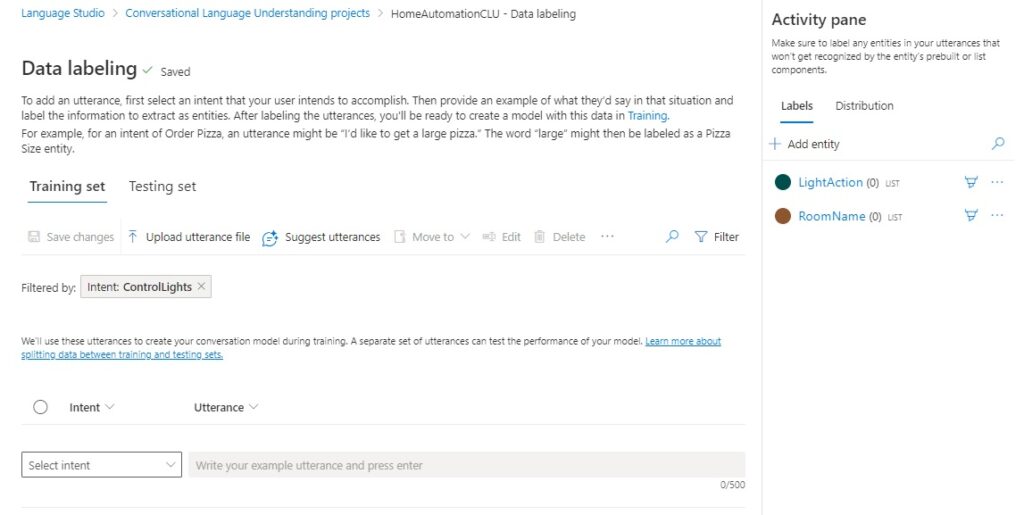
In the editable part of the page, from the Intent column, select the intent from the drop-down list you want to add the utterance for. In the Utterance column enter the utterance.
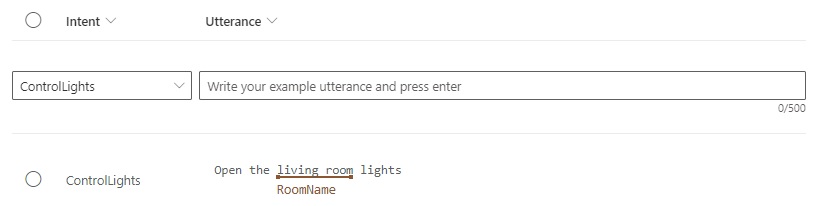
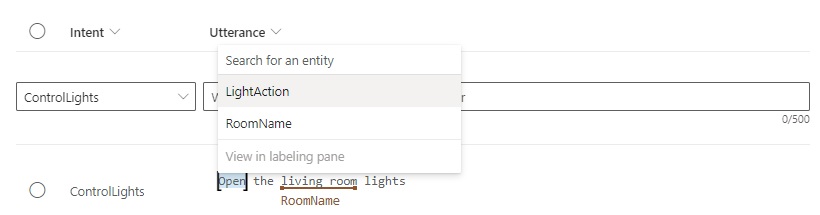
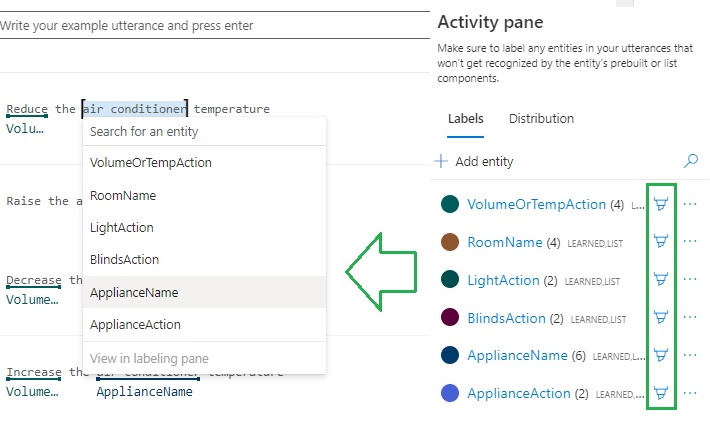
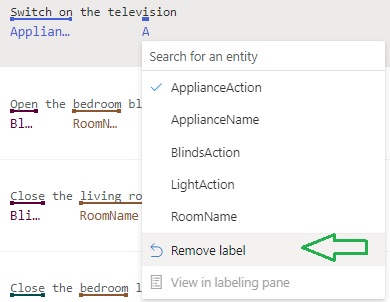
To link references to the words within utterance, select the word or words to reference, then a context menu will pop-up that contains a list of entities that were created earlier.
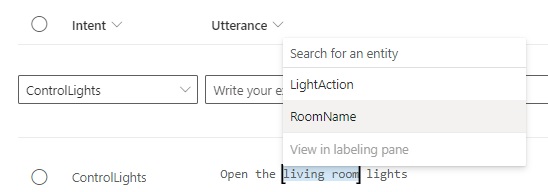
From the list, select an entity. You will then see the utterance display the selected word or words underlines in red with the referenced entity displayed under the word(s):
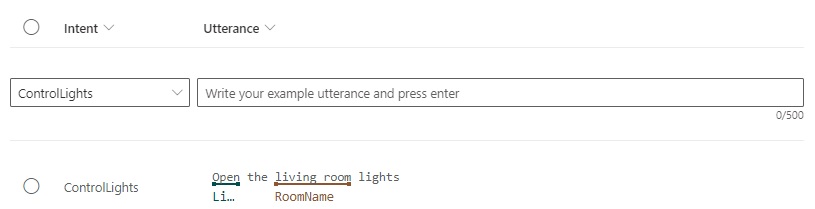
Repeat the process for any other word(s) in the utterance.
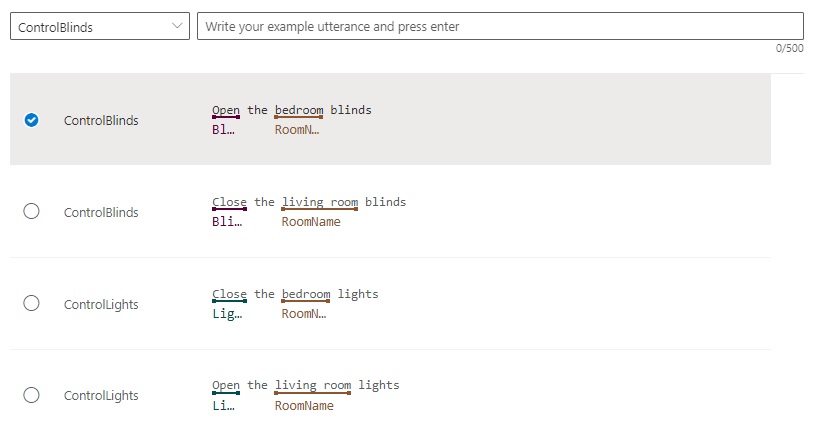
An utterance with complete data labeling is shown below:
Save the changes to the training set. Repeat the above entry and labeling for each utterance.
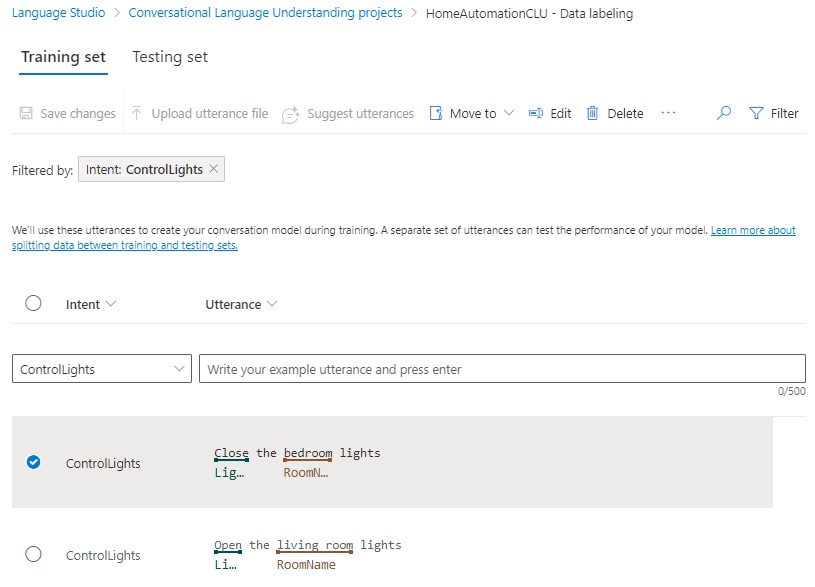
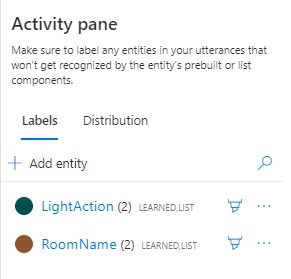
In the Activity pane, each entity will show how the number of linked utterances.
Another way to label utterances with entities is to click on the pencil icon next to the entity then selecting the word(s) in the utterance will float an entity tooltip above the selection, automatically assigning the selected word to the entity as shown:
By unchecking all the pencil icons in the entity pane, we can revert back to the entity context menu instead of the floating tooltip icon:
After labeling is completed, review the utterances and their labels to ensure that incorrect entities have not been assigned to words.
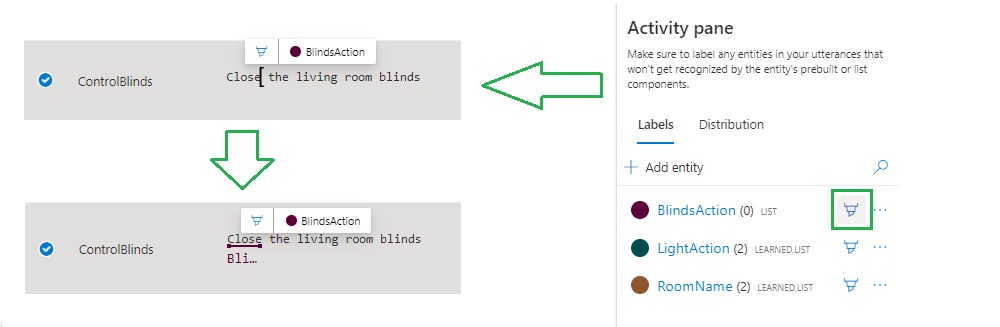
During the labeling activity, you may want to add additional entities while you are adding or editing utterances. To do this select the Edit option next to the entity in the Activity pane:
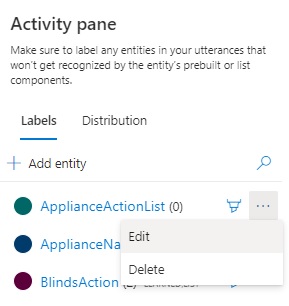
To remove an inaccurate entity reference from an utterance, select the labelled word(s). In the drop-down context menu, selecting the option Remove label will remove the reference:
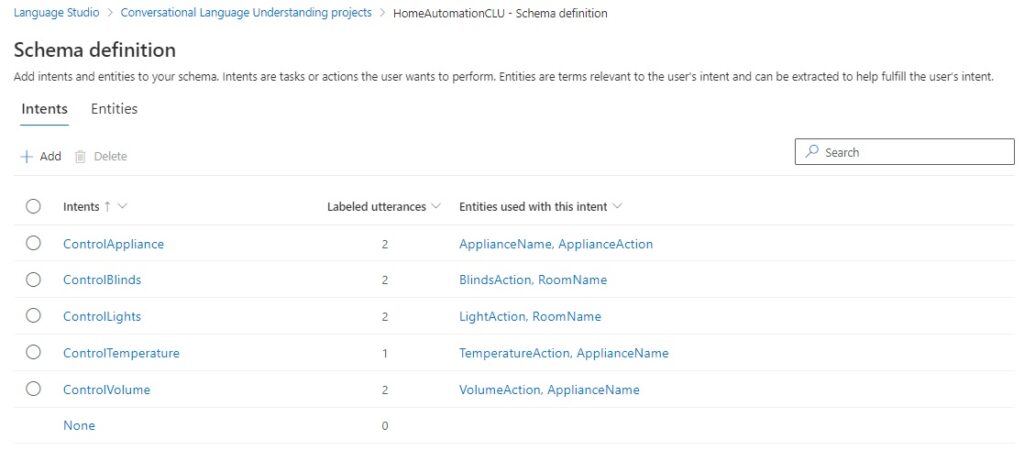
After completion of the entry of the utterances and data labeling, you will notice that each intent in the Schema definition page shows the number of labeled utterances, and the entities that are used with the intent:
We have now created a basic set of training data for our CLU model.
In the initial CDU model, I used the following entities and entity lists:
Entities
BlindsActions, BlindsActionList: Open, Close
LightAction, LightActionList: Open, Close
VolumeAction, VolumeActionList: Increase, Decrease
TemperatureAction, TemperatureActionList: Increase, Decrease
RoomNames, RoomNameList: living room, bedroom, dining room, study room, bathroom
ApplianceName, ApplianceNameList: television, radio, air conditioner
ApplianceAction, ApplianceActionList: Switch on, Switch off
Below are the initial utterances created for the intents:
ControlTemperature
Decrease the air conditioner temperature
Increase the air conditioner temperature
ControlVolume
Decrease the radio volume
Increase the radio volume
Increase the television volume
ControlAppliance
Switch off the radio
Switch on the television
ControlBlinds
Open the bedroom blinds
Close the living room blinds
ControlLights
Close the bedroom lights
Open the living room lights
At this point we are ready to start training our model using the entered data set.
In the next post, I will show how we configure and execute a training run using our data. I will also show how to interpret the results from the training and test runs. I will also show how to correct issues with the training and test data so that the CLU model is optimized for intent recognition and suitable for use in a chatbot.
That is all for today’s post.
I hope that you have found this post useful and informative.
Andrew Halil is a blogger, author and software developer with expertise of many areas in the information technology industry including full-stack web and native cloud based development, test driven development and Devops.