Welcome to today’s post.
In today’s post I will be showing you how to integrate a Conversational Language Understanding (CLU) Model into a Web Chatbot application using the Bot Framework SDK.
In a previous post, I showed how to create a CLU model using the Language Studio within Azure Language Services. I then showed in another post how to train and test the CLU model in Azure Language Studio. Near the end of that post, I then showed how to test the CLU model with entered utterances. I then created a deployment endpoint for the language service, which can then be used within any web (or windows) Chatbot clients, or Azure hosted services to access the CLU model.
As we know, a Chatbot is by default dumb, without any knowledge or understanding of what you say to it. In another previous post, I showed how to create a rudimentary Web Chatbot using the Bot Framework SDK that simply echoed back whatever human response text we type back to it.
Using CLU Models within Chatbots
By integrating the CLU model from our language service into the Chatbot, we can make our Bot make the following intelligent decisions.
- Determine a speech intent from an entered utterance.
- Determine the main entities and actions within the utterance.
- Make intelligent conversational responses.
- Perform the intended action (or actions) based on the intent.
- Direct the conversation to another skilled bot.
- Change conversational looping pattern (sequential, looping etc.) based on logic from the utterance.
In one of my previous posts, I used the Bot Framework Composer tool to help build a basic Chatbot. I used visual tools and a canvas to help define the flow of the chat, including conversational dialogs and configurations.
If you want to create a Chatbot that can be customized with the C# language and .NET Framework development, then we can use the Bot Framework SDK.
The Bot Framework SDK is a library that has a rich set of functions that allows full customization of a Chatbot application, including creation of skill bots, conversational dialogs, dialog patterns, and integration with external services, including language models defined and implemented from the Azure Language Service.
Starting with a CLU Chatbot Solution
Instead of starting from scratch and trying to grapple with how to use the Bot Framework SDK to implement the most basic conversational dialog pattern, I will take one of the Azure Cognitive language services code samples from GitHub. The Core Bot starter application with CLU integration shows how to integrate an Azure Language Service endpoint into the Chatbot application, sending calls to the API endpoint with utterances, then process responses from the service, including determining intents and entities from the utterance.
The starter Chatbot CLU application uses an existing Flight Booking CLU model. What I did was to rewrite parts of the main dialog, conversational dialog, main model, and recognizer classes to work with the response returned from my Home Automation CLU model, which I engineered in Azure Language Studio. Most of the classes and helpers are common to any model and can be left as they are, with some additional source files added for the custom dialogs, dialog data, streamed response from the service, and a custom recognizer class.
Below are the source code files that are amended:
MainDialog.cs
Startup.cs
Below are the source code files that I have added:
ControlLightsDialog.cs
ControlLightsDetails.cs
HomeAutomation.cs
HomeAutomationRecognizer.cs
I will go through each and explain how each works.
Explaining the Custom Chatbot CLU Integration
The recognizer class, HomeAutomationRecognizer provides access to the CLU model endpoint within the Azure Language Service through configured parameters including project name, deployment name and API key. These are the same configuration parameters that are available from the Azure Language Studio that we used to engineer and deploy our CLU model.
using System.Threading;
using System.Threading.Tasks;
using Microsoft.Bot.Builder;
using Microsoft.BotBuilderSamples.Clu;
using Microsoft.Extensions.Configuration;

namespace Microsoft.BotBuilderSamples
{
    public class HomeAutomationRecognizer : IRecognizer
    {
        private readonly CluRecognizer _recognizer;

        public HomeAutomationRecognizer(IConfiguration configuration)
        {
            var cluIsConfigured = !string.IsNullOrEmpty(configuration["CluProjectName"]) && !string.IsNullOrEmpty(configuration["CluDeploymentName"]) && !string.IsNullOrEmpty(configuration["CluAPIKey"]) && !string.IsNullOrEmpty(configuration["CluAPIHostName"]);
            if (cluIsConfigured)
            {
                var cluApplication = new CluApplication(
                    configuration["CluProjectName"],
                    configuration["CluDeploymentName"],
                    configuration["CluAPIKey"],
                    "https://" + configuration["CluAPIHostName"]);
                var recognizerOptions = new CluOptions(cluApplication) {Language = "en"};

                _recognizer = new CluRecognizer(recognizerOptions);
            }
        }

        // Returns true if clu is configured in the appsettings.json and initialized.
        public virtual bool IsConfigured => _recognizer != null;

        public virtual async Task<RecognizerResult> RecognizeAsync(ITurnContext turnContext, CancellationToken cancellationToken)
            => await _recognizer.RecognizeAsync(turnContext, cancellationToken);

        public virtual async Task<T> RecognizeAsync<T>(ITurnContext turnContext, CancellationToken cancellationToken)
            where T : IRecognizerConvert, new()
            => await _recognizer.RecognizeAsync<T>(turnContext, cancellationToken);
    }
}
A class that acts as a helper, passing the dialog conversation turn data (the utterance) from the language service response through the virtual RecognizeAsync() call to the common recognizer class, which then returns the result of the analyzed utterance as , which is then cast into the HomeAutomation class, that stores the detected intents and entities.
HomeAutomation.cs:
using System.Collections.Generic;
using System.Linq;
using Microsoft.Bot.Builder;
using Microsoft.BotBuilderSamples.Clu;
using Newtonsoft.Json;

namespace Microsoft.BotBuilderSamples
{
    /// <summary>
    /// An <see cref="IRecognizerConvert"/> implementation that provides helper methods and properties to interact with
    /// the CLU recognizer results.
    /// </summary>
    public class HomeAutomation: IRecognizerConvert
    {
        public enum Intent
        {
            ControlLights,
            ControlBlinds,
            ControlTemperature,
            ControlVolume,
            ControlAppliance,
            Cancel,
            None
        }

        public string Text { get; set; }

        public string AlteredText { get; set; }

        public Dictionary<Intent, IntentScore> Intents { get; set; }

        public CluEntities Entities { get; set; }

        public IDictionary<string, object> Properties { get; set; }

        public void Convert(dynamic result)
        {
            var jsonResult = JsonConvert.SerializeObject(result, new JsonSerializerSettings {NullValueHandling = NullValueHandling.Ignore});
            var app = JsonConvert.DeserializeObject<HomeAutomation>(jsonResult);

            Text = app.Text;
            AlteredText = app.AlteredText;
            Intents = app.Intents;
            Entities = app.Entities;
            Properties = app.Properties;
        }

        public (Intent intent, double score) GetTopIntent()
        {
            var maxIntent = Intent.None;
            var max = 0.0;
            foreach (var entry in Intents)
            {
                if (entry.Value.Score > max)
                {
                    maxIntent = entry.Key;
                    max = entry.Value.Score.Value;
                }
            }

            return (maxIntent, max);
        }

        public class CluEntities
        {
            public CluEntity[] Entities;

            public CluEntity[] GetRoomNameList() => Entities.Where(e => e.Category == "RoomName").ToArray();

            public string GetRoomName() => GetRoomNameList().FirstOrDefault()?.Text;

            public CluEntity[] GetApplianceNameList() => Entities.Where(e => e.Category == "ApplianceName").ToArray();

            public string GetApplianceName() => GetApplianceNameList().FirstOrDefault()?.Text;

            public CluEntity[] GetLightOrBlindsActionList() => Entities.Where(e => e.Category == "LightOrBlindsAction").ToArray();

            public string GetLightOrBlindsAction() => GetLightOrBlindsActionList().FirstOrDefault()?.Text;

            public CluEntity[] GetVolumeOrTempActionList() => Entities.Where(e => e.Category == "VolumeOrTempAction").ToArray();

            public string GetVolumeOrTempAction() => GetVolumeOrTempActionList().FirstOrDefault()?.Text;
        }
    }
}
Aside from the usual helper methods, the provision of the function GetTopIntent() returns the intention that provides the highest confidence score of intents from the analyzed utterance.
In the next section, I will explain how the dialog flow works within the Chatbot.
Explaining the Dialog Flow within the Custom Chatbot
In the implementation, I use sequential dialog pattern, which starts with a main dialog, which is a component dialog. A component dialog is a dialog component that can be reusable across the same Chatbot application. The main dialog, MainDialog is where our Chatbot application starts the conversation process.
To simplify the flow in the example, I have used one dialog for the conversations related to actions and entities for light switches. We could also have included additional dialogs for the other intents and included those into a top-level dialog that prompts the user then branches off to the dialog matching the user intent of the submitted phrase.
The main dialog code includes the handlers for the start, action, and end dialogs.
With waterfall dialogs, in the constructor of our component dialog class we add each conversation dialog to the dialog stack using the ComponentDialog method AddDialog(). If the dialog we are adding is part of a multi-step sequential dialog conversation, then we include the extra dialogs into the AddDialog() constructor.
MainDialog.cs:
using System;
using System.Threading;
using System.Threading.Tasks;
using Microsoft.Bot.Builder;
using Microsoft.Bot.Builder.Dialogs;
using Microsoft.Bot.Schema;
using Microsoft.Extensions.Logging;
using Microsoft.Recognizers.Text.DataTypes.TimexExpression;

namespace Microsoft.BotBuilderSamples.Dialogs
{
    public class MainDialog : ComponentDialog
    {
        private readonly HomeAutomationRecognizer _cluRecognizer;
        protected readonly ILogger Logger;

        // Dependency injection uses this constructor to instantiate MainDialog
        public MainDialog(HomeAutomationRecognizer cluRecognizer, ControlLightsDialog controllightsDialog, ILogger<MainDialog> logger)
            : base(nameof(MainDialog))
        {
            _cluRecognizer = cluRecognizer;
            Logger = logger;

            AddDialog(new TextPrompt(nameof(TextPrompt)));
            AddDialog(controllightsDialog);
            AddDialog(new WaterfallDialog(nameof(WaterfallDialog), new WaterfallStep[]
            {
                IntroStepAsync,
                ActStepAsync,
                FinalStepAsync,
            }));

            // The initial child Dialog to run.
            InitialDialogId = nameof(WaterfallDialog);
        }
    ...
The implementations for each of the above waterfall dialog steps starts with the initial step as shown:
private async Task<DialogTurnResult> IntroStepAsync(WaterfallStepContext stepContext, CancellationToken cancellationToken)
{
    if (!_cluRecognizer.IsConfigured)
    {
        await stepContext.Context.SendActivityAsync(
            MessageFactory.Text("NOTE: CLU is not configured. To enable all capabilities, add 'CluProjectName', 'CluDeploymentName', 'CluAPIKey' and 'CluAPIHostName' to the appsettings.json file.", inputHint: InputHints.IgnoringInput), cancellationToken);

        return await stepContext.NextAsync(null, cancellationToken);
    }

    // Use the text provided in FinalStepAsync or the default if it is the first time.
    var messageText = stepContext.Options?.ToString() ?? $"What can I help you with today?\nSay something like \"Switch on the living room lights\"";
    var promptMessage = MessageFactory.Text(messageText, messageText, InputHints.ExpectingInput);

    return await stepContext.PromptAsync(nameof(TextPrompt), new PromptOptions { Prompt = promptMessage }, cancellationToken);
}
The initial step includes an additional prompt dialog, which is used to ask the user for a text value and is activated with the SDK method PromptAsync(). In other scenarios, we could also use dialog prompts to request numeric or date values. We declared an instance of the text prompt in the constructor class using:
AddDialog(new TextPrompt(nameof(TextPrompt)));
Each handler step in the waterfall dialog includes a parameter of type WaterfallStepContext, which stores the results of the previous dialog, which essentially controls the persistence of data between the dialogs. This can include the values entered within prompts. In the next dialog step, I will explain how this is used. Below is the implementation of the action step of the waterfall dialog:
private async Task<DialogTurnResult> ActStepAsync(WaterfallStepContext stepContext, CancellationToken cancellationToken)
{
    if (!_cluRecognizer.IsConfigured)
    {
        // CLU is not configured, we just run the ControlLightsDialog path with an empty ControlLightsDialog Instance.
        return await stepContext.BeginDialogAsync(nameof(ControlLightsDialog), new ControlLightsDialog(), cancellationToken);
    }

    // Call CLU and gather any potential control lights details. (Note the TurnContext has the response to the prompt.)
    var cluResult = await _cluRecognizer.RecognizeAsync<HomeAutomation>(
        stepContext.Context,
        cancellationToken);
    switch (cluResult.GetTopIntent().intent)
    {
        case HomeAutomation.Intent.ControlLights:
            // Initialize ControlLightsDetails with any entities we may have found in
 	        // the response.
            var controllightsDetails = new ControlLightsDetails()
            {
                Action = cluResult.Entities.GetLightOrBlindsAction(),
                RoomName = cluResult.Entities.GetRoomName()
            };

            // Run the ControlLightsDialog giving it whatever details we have from
            // the CLU call, it will fill out the remainder.
            return await stepContext.BeginDialogAsync(nameof(ControlLightsDialog), controllightsDetails, cancellationToken);

        default:
            // Catch all for unhandled intents
            var didntUnderstandMessageText = $"Sorry, I didn't get that. Please try asking in a different way (intent was {cluResult.GetTopIntent().intent})";
            var didntUnderstandMessage = MessageFactory.Text(didntUnderstandMessageText, didntUnderstandMessageText, InputHints.IgnoringInput);
            await stepContext.Context.SendActivityAsync(didntUnderstandMessage, cancellationToken);
            break;
    }

    return await stepContext.NextAsync(null, cancellationToken);
}
In the above step, the result from the prompt in the previous dialog is stored in the Context property of the WaterfallStepContext class. We then pass the context value stepContext.Context into the CLU recognizer method _cluRecognizer.RecognizeAsync() which then extracts the prompt activity message and from the CLU model, determines the intents and entities from the message.
It then uses the BeginDialogAsync() method of the WaterfallStepContext class to activate the custom component child dialog, ControlLightsDialog and passing in an instance of the ControlLightsDetails() class. The members within ControlLightsDetails() class are populated with the Action and RoomName values that are used by the custom dialog. The ControlLightsDetails() class is defined below:
namespace Microsoft.BotBuilderSamples
{
    public class ControlLightsDetails
    {
        public string RoomName { get; set; }

        public string Action { get; set; }
    }
}
When there are no matching intents, the dialog can send an error message to the user with the SendActivityAsync() method of the stepContext.Context property. With unhandled intents, following the message, we can then cancel the dialog using the NextAsync(null, cancellationToken) call from the WaterfallStepContext class.
In the final step, I will show how the data within the ControlLightsDialog child dialog is used to confirm the entity and action in the final activity.
private async Task<DialogTurnResult> FinalStepAsync(WaterfallStepContext stepContext, CancellationToken cancellationToken)
{
    // If the child dialog ("ControlLightsDialog") was cancelled, the user failed to confirm or if the intent wasn't ControlLights the Result here will be null.
    if (stepContext.Result is ControlLightsDetails result)
    {
        // Now we have all the details call the home automation service.
        // If the call to the home automation service was successful tell the user.
        var actionProperty = result.Action;
        var roomNameProperty = result.RoomName;
        var messageText = $"I have {result.Action} the lights in {result.RoomName}";
        var message = MessageFactory.Text(messageText, messageText, InputHints.IgnoringInput);
        await stepContext.Context.SendActivityAsync(message, cancellationToken);
    }

    // Restart the main dialog with a different message the second time around
    var promptMessage = "What else can I do for you?";

    return await stepContext.ReplaceDialogAsync(InitialDialogId, promptMessage, cancellationToken);
}
The result from the ControlLightsDialog child dialog in the previous step is stored in the stepContext.Result property, which is then used to execute the service.
The final action is to restart the conversation at the main dialog with a call to the ReplaceDialogAsync() SDK method of the WaterfallStepContext class. This is essentially a loop. Unlike the BeginDialogAsync() SDK method, which keeps the current dialog on the stack, the replacement of the dialog removes the current dialog from the stack and adds the replaced dialog onto it.
Use of a Custom Component Dialog to Confirm Action and Intent
The custom child dialog, ControlLightsDialog is used to confirm the action and entity from the CLU model and end the dialog. It also provides a response tailored with the action and entity.
The constructor is like the main dialog, with multiple steps used to verify the room name and action before the confirmation step is executed.
ControlLightsDialog.cs:
using System.Threading;
using System.Threading.Tasks;
using Microsoft.Bot.Builder;
using Microsoft.Bot.Builder.Dialogs;
using Microsoft.Bot.Schema;
using Microsoft.Recognizers.Text.DataTypes.TimexExpression;

namespace Microsoft.BotBuilderSamples.Dialogs
{
    public class ControlLightsDialog : CancelAndHelpDialog
    {
        private const string RoomNameStepMsgText = "Which room to apply the light action?";
        private const string LightActionStepMsgText = "What light action do you want to apply?";

        public ControlLightsDialog()
            : base(nameof(ControlLightsDialog))
        {
            AddDialog(new TextPrompt(nameof(TextPrompt)));
            AddDialog(new ConfirmPrompt(nameof(ConfirmPrompt)));
            AddDialog(new WaterfallDialog(nameof(WaterfallDialog), new WaterfallStep[]
            {
                RoomNameStepAsync,
                LightActionStepAsync,
                ConfirmStepAsync,
                FinalStepAsync,
            }));

            // The initial child Dialog to run.
            InitialDialogId = nameof(WaterfallDialog);
        }
    …
The ControlLightsDialog dialog is derived from the class CancelAndHelpDialog, whichis one of the common helper classes provided in the Core Bot starter application with CLU integration in GitHub (see earlier).
The room name and light action dialog step handlers prompt the user for the correct value if either the room name or the action are not detected from the CLU model, otherwise they pass on the received parameter to the next dialog.
private async Task<DialogTurnResult> RoomNameStepAsync(WaterfallStepContext stepContext, CancellationToken cancellationToken)
{
    var controllightsDetails = (ControlLightsDetails)stepContext.Options;

    if (controllightsDetails.RoomName == null)
    {
        var promptMessage = MessageFactory.Text(RoomNameStepMsgText, RoomNameStepMsgText, InputHints.ExpectingInput);
        return await stepContext.PromptAsync(nameof(TextPrompt), new PromptOptions { Prompt = promptMessage }, cancellationToken);
    }

    return await stepContext.NextAsync(controllightsDetails.RoomName, cancellationToken);
}

private async Task<DialogTurnResult> LightActionStepAsync(WaterfallStepContext stepContext, CancellationToken cancellationToken)
{
    var controllightsDetails = (ControlLightsDetails)stepContext.Options;

    if (controllightsDetails.Action == null)
    {
        var promptMessage = MessageFactory.Text(LightActionStepMsgText, LightActionStepMsgText, InputHints.ExpectingInput);
        return await stepContext.PromptAsync(nameof(TextPrompt), new PromptOptions { Prompt = promptMessage }, cancellationToken);
    }

   return await stepContext.NextAsync(controllightsDetails.Action, cancellationToken);
}
The confirmation step then outputs the message to the user confirming the action on the detected entity.
private async Task<DialogTurnResult> ConfirmStepAsync(WaterfallStepContext stepContext, CancellationToken cancellationToken)
{
    var controllightsDetails = (ControlLightsDetails)stepContext.Options;

    var messageText = $"Please confirm, If you want to {controllightsDetails.Action} lights for room : {controllightsDetails.RoomName}. Is this correct?";
    var promptMessage = MessageFactory.Text(messageText, messageText, InputHints.ExpectingInput);

    return await stepContext.PromptAsync(nameof(ConfirmPrompt), new PromptOptions { Prompt = promptMessage }, cancellationToken);
}
In the final step handler, when the previous dialog prompt is confirmed, the child dialog ends and is popped off the waterfall stack with a call to the EndDialogAsync() SDK method of the WaterfallStepContext class.
private async Task<DialogTurnResult> FinalStepAsync(WaterfallStepContext stepContext, CancellationToken cancellationToken)
{
    if ((bool)stepContext.Result)
    {
        var controllightsDetails = (ControlLightsDetails)stepContext.Options;

        return await stepContext.EndDialogAsync(controllightsDetails, cancellationToken);
    }

    return await stepContext.EndDialogAsync(null, cancellationToken);
}
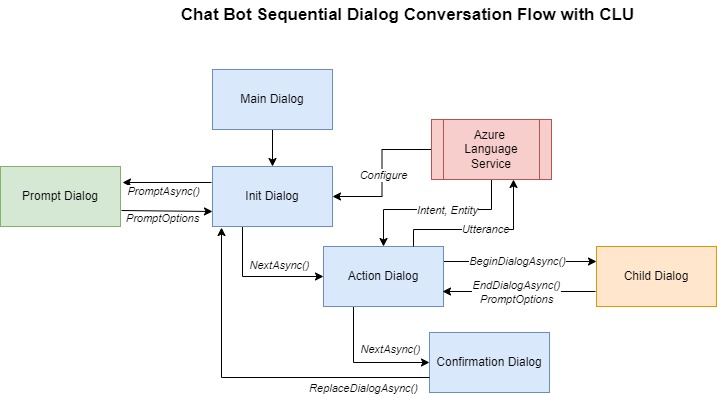
The flow in the above Chatbot can be summarized with the flow diagram as shown:
In the next section, I will show what happens when we run the Chatbot CLU in the Chatbot Emulator.
Running and Testing the Chatbot CLU in the Chatbot Emulator
When the above Chatbot is run and connected to the Chatbot Emulator, we can review how the sequential waterfall dialogs work for entered utterances.
Below is my first interaction with the Chatbot, where I enter the initial utterance:
Switch on the dining room lights
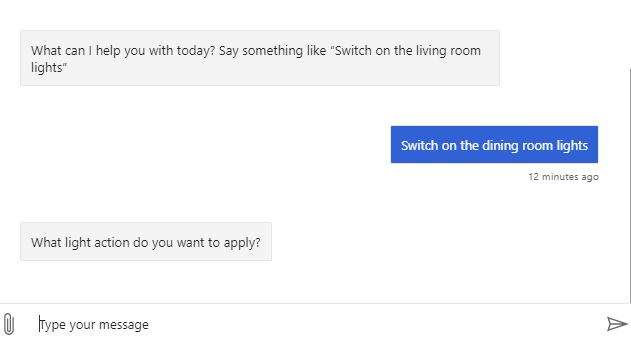
The Bot then responds with What light action do you want to apply?
What has happened is that the code has run into the LightActionStepAsync() method in the ControlLightsDialog dialog, and the action has not been detected from the utterance sent to the CLU model.
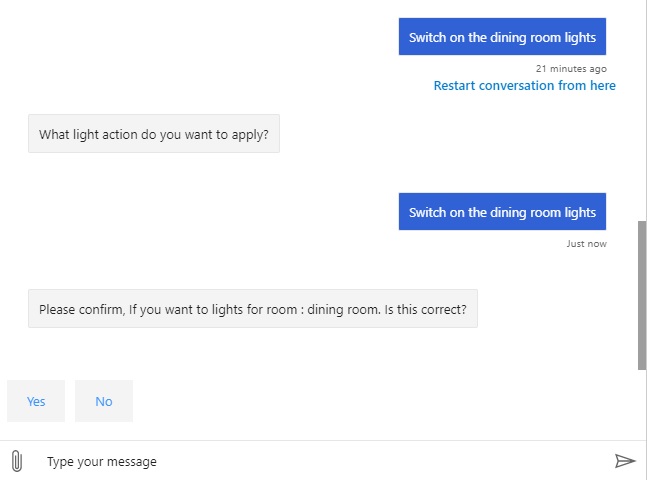
I then respond again with the utterance:
Switch on the dining room lights
And receive the following response:
Please confirm, If you want to lights for room : dining room. Is this correct?
There seems to be a mismatch in the CLU model for the utterance:
Switching on the dining room lights
I then open the language model data labels and search for training data utterances containing “switch on”. This is what I see:
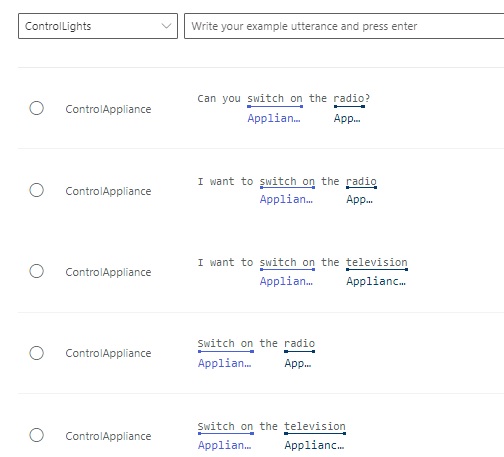
Clearly, there are no references to switching on dining room lights. The only intents that match the action “Switch on” are for ControlAppliance.
From the debugger within the cluRecognizer class, the recognition results show that the top matching intent is ControlLights.
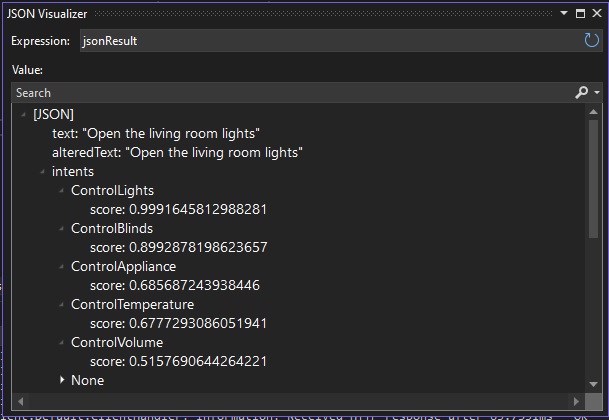
The entities show that the matching entities are the categories LightOrBlindsAction and RoomName. The respective matching words are Open and living room. Based on the CLU training model, the Bot was expecting us to start the action with Open instead of Switch on.

Changing the utterance in the chat to:
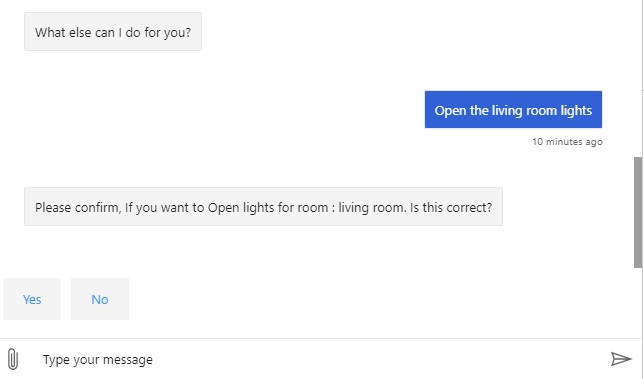
Open the dining room lights
The bot then responds with the expected response:
Please confirm, If you want to Open lights for room : dining room. Is this correct?
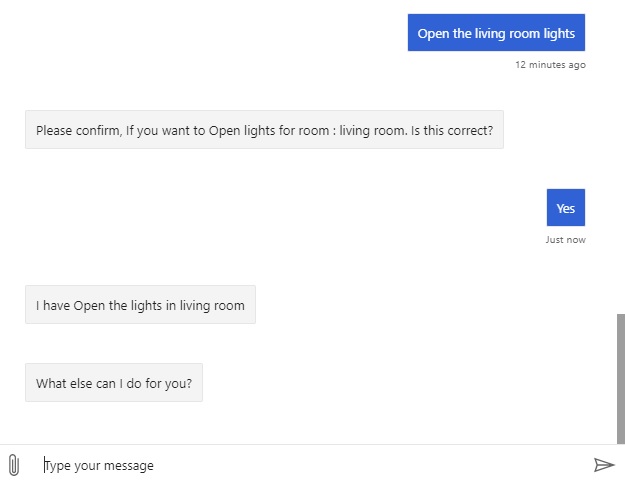
After selecting Yes for the confirmation, we get the following response:
I have Open the lights in the living room
We can confirm the above utterance is expected from the CLU model by searching the Open action in the utterances training data:
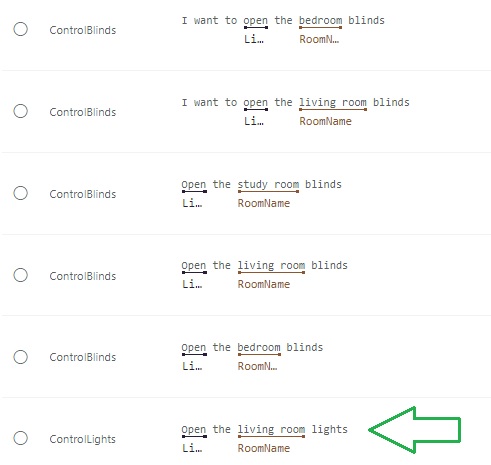
We see an entry for labelled utterance Open the living room lights exists.
The above has shown how to implement a powerful Chatbot with conversational language understanding capabilities. In the example above, I integrated one of the intents from my CLU model into the Chatbot dialog flow. As the dialogs are quite standard, similar classes for the custom child dialogs can be implemented for other intents.
In future posts I will discuss other ways of improving the Chatbot application.
That is all for today’s post.
I hope that you have found this post useful and informative.
I hope that you have found this post useful and informative.
Andrew Halil is a blogger, author and software developer with expertise of many areas in the information technology industry including full-stack web and native cloud based development, test driven development and Devops.

