
Welcome to today’s post.
In today’s post, I will be showing you how to analyse object within real-world images using the Vision SDK library within Azure AI Vision Services.
Unlike speech and language-based recognition services, with images, we process unstructured data that is not formatted. With images, we have binary data that can only be parsed by rendering the image visually, then using a machine model to determine characteristics of the image that match everyday real-world entities, such as objects, living beings, and surroundings.
Comparing Image Recognition of Living Organisms and Machines
Humans and other living beings process images in the same way. Images are stored in neurons within the visual cortex, which are a series of nodes corresponding to similar views of the same objects. Depending on the complexity of the organism, the images may be stored in the brain as very detailed representations, or with limited details, and in some cases, with no colour. The definition of the image recorded through the lens of the eye of an insect can be as basic as a black and white matrix. With cats, the images are black and white.
Machine models recognise categories of objects within an image by matching similar images stored in training data. The matching process is not perfect and is based on matching pixels and colours with each node with the currently viewed object. When the match is sufficiently high, the image node with the highest match is returned with the image properties.
Image Recognition with Azure AI Vision Services
Image recognition is provided by the Analyze Image API, which provides the following capabilities:
- People detection
- Facial detection
- Object detection
- Brand detection
- Text detection (Image OCR)
- Object bounded coordinates
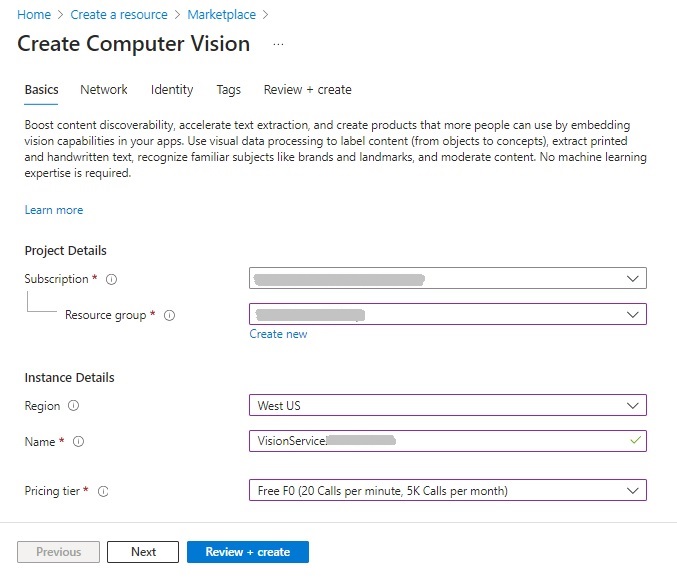
Creation of an Azure AI Vision Services resource is done from the Azure Portal, where you search for “vision”, then select and create the resource as shown:
Then enter the required parameters: subscription, resource group, region, resource name, and pricing tier:
After creating the vision services resource, we are ready to start exploring the capabilities of the vision services, which is what I will show in the next section.
Image Analysis in the Azure AI Vision Studio
The Azure AI Vision Studio allows you to experiment with different vision processing tasks that allow you to input images, then receive outputs that return locations of objects that have been detected within the image.
Select the AI Vision Service from the Computer Vision resource overview screen, and you will be taken to the landing page for the Vision Studio.

In the same page, you will see image processing tasks that can be experimented with sample images, or your own images or photos.
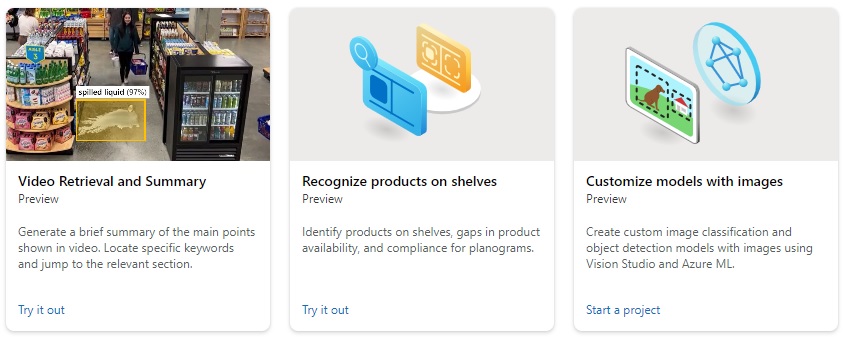
Below are the image processing task categories and the available image recognition processing tasks:
Optical Character Recognition
Extract text from images
Spatial Analysis
Video Retrieval and Summary
Count people in an area
Detect when people cross a line
Detect when people enter/exit a zone
Monitor social distancing
Face
Detect faces in an image
Liveness detection
Image Analysis
Recognize products on shelves
Customize models with images
Search photos with image retrieval
Add dense captions to images
Remove backgrounds from images
Add captions to images
Detect common objects in images
Extract common tags from images
Detect sensitive content in images
Create smart-cropped images
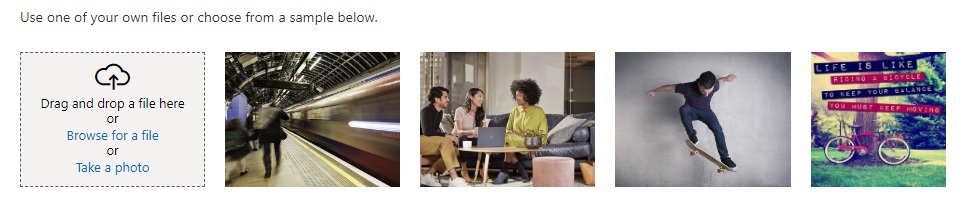
Selection of the recognition task, Detect common objects in images, will display some sample images and a drag-drop input control to select a custom image or take a photo.
Below is the image of a business meeting I have uploaded to the object recognition task:

Below are the results of the object recognition task being applied to the image, with the results displayed with the detected attributes to the right:
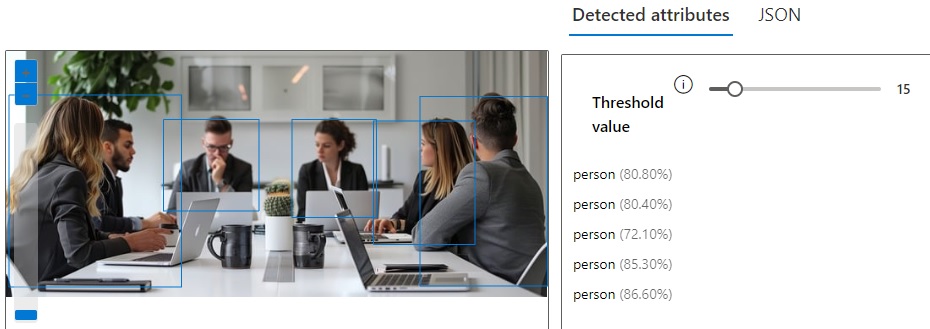
You will notice that each detected object has a name and has a percentage in brackets. This percentage is the level of confidence that the detected object has to the matched object.
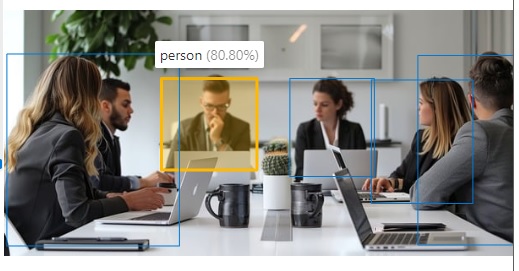
If you select each object in the results, the corresponding visual object will display within the image with a yellow rectangle bounding box, and a tag with the object name and percentage confidence level.
The JSON result for the above selected detected object is:
{
  "apim-request-id": "xxxxxxxxx-xxxxxxx-xxxxxxxx-xxxxxxxx",
  "content-length": "569",
  "content-type": "application/json; charset=utf-8",
  "modelVersion": "2023-10-01",
  "metadata": {
    "width": 640,
    "height": 291
  },
  "objectsResult": {
    "values": [
      {
        "boundingBox": {
          "x": 186,
          "y": 81,
          "w": 113,
          "h": 108
        },
        "tags": [
          {
            "name": "person",
            "confidence": 0.808
          }
        ]
      },
      {
        "boundingBox": {
          "x": 338,
          "y": 81,
          "w": 100,
          "h": 116
        },
        "tags": [
          {
            "name": "person",
            "confidence": 0.804
          }
        ]
      },
      {
        "boundingBox": {
          "x": 434,
          "y": 83,
          "w": 120,
          "h": 146
        },
        "tags": [
          {
            "name": "person",
            "confidence": 0.721
          }
        ]
      },
      {
        "boundingBox": {
          "x": 489,
          "y": 54,
          "w": 151,
          "h": 224
        },
        "tags": [
          {
            "name": "person",
            "confidence": 0.853
          }
        ]
      },
      {
        "boundingBox": {
          "x": 3,
          "y": 52,
          "w": 204,
          "h": 227
        },
        "tags": [
          {
            "name": "person",
            "confidence": 0.866
          }
        ]
      }
    ]
  }
}
The above result has shown four human faces detected, the with the location (the bounding box), and confidence level and object name within each tag.
Another example photo that we can analyse is shown below:

The results for the detected objects we have returned after uploading the image are as shown:
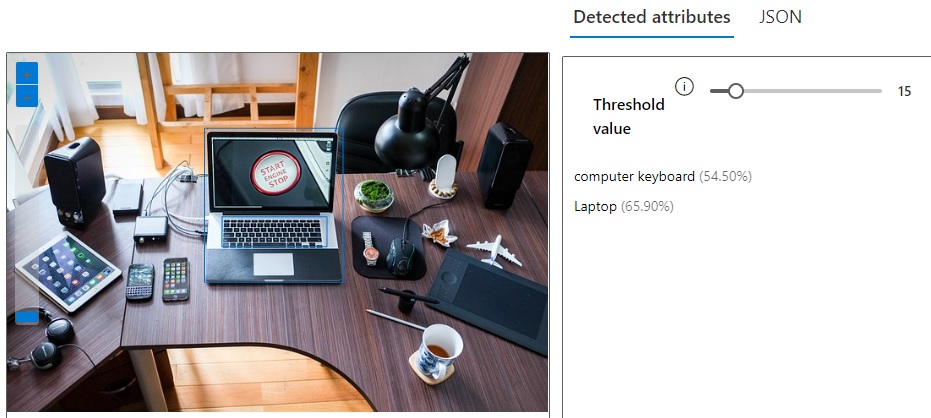
When we select one of the objects, the laptop, we see the tag showing that there is approximately a 66% confidence of it being a laptop:

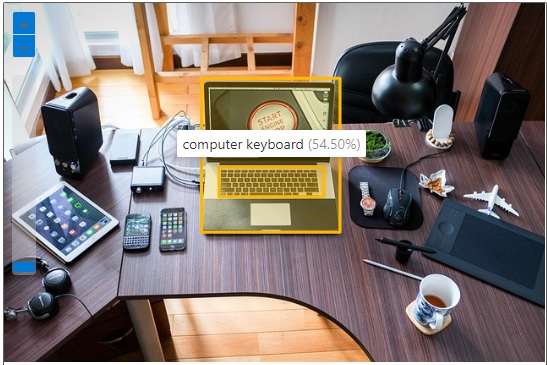
As we know, a laptop consists of a screen and a keyboard. The keyboard itself is recognized as an object, with a 54% confidence level:
We have just seen the basics of how image recognition works. In the next section, I will show how to use the Azure Vision Client and the Image Analysis API to do likewise within a development environment.
Configuration of the Azure Vision Client
To be able to use the Azure Vision SDK and the Image Analysis API, you will need the following prerequisites:
- An existing Azure AI Vision Services resource.
- The key and endpoint to the Azure AI Vision Services resource.
In the previous sections, I showed how to create the vision services resource within the Azure Portal. The key and endpoint can be obtained from the Vision Service resource. The Azure Vision Client requires the use of the access key and endpoint. Using the key and endpoint within the development environment, requires us to either include the keys within a secure key vault, an azure application configuration, an application configuration, or environment variables. As these keys should be secured, it is advisable to not store the key within any application code. One common store is within environment variables, which can be done from the following Azure CLI setx commands within either Windows or the Azure Cloud CLI:
setx VISION_KEY your-key
setx VISION_ENDPOINT your-endpoint
Unlike many other Azure resources, we don’t need to specify the region of the resource to access the Vision SDK or Image Analysis API.
In Visual Studio, access to the Image Analysis API is through the following NuGet package, which needs to be installed:
Microsoft.Azure.CognitiveServices.Vision.ComputerVision
Next, we retrieve the environment variables for the key and endpoint:
string visionKey = Environment.GetEnvironmentVariable("VISION_KEY");
string visionEndpoint = Environment.GetEnvironmentVariable("VISION_ENDPOINT");
We then create an instance of the vision client, with the key and endpoint, which will provide access to the Image Analysis API:
var visionConfig = new ComputerVisionClient(new ApiKeyServiceClientCredentials(visionKey))
{
    Endpoint = visionEndpoint
};
Now that we have setup the configuration of the vision client, we can make calls to analyse images using the built-in image recognition models within Azure AI Vision Services. I will show how this is done in the next section.
Setup of Image Data for Image Recognition
To prepare an image that is to be input for vision analysis, we will need to specify a file URL. In the legacy AI vision analysis library Azure.AI.Vision.ImageAnalysis, it is possible to specify the file as a memory buffer which is loaded from a local file. In the most recent library,
Microsoft.Azure.CognitiveServices.Vision.ComputerVision,
we cannot specify local files. We will have to specify the file as a publicly accessible URL. We can also specify the file as a URL of a file that is within an Azure Blob Container, which is a URL of the form:
https://[storage-account-name].blob.core.windows.net/[storage-container-name]/[image-file-name]?sp=r&st=[from-date-time-stamp]&se=[expiry-date-time-stamp] &spr=https&sv=2022-11-02&sr=b&sig=[sas-signature]
To create a storage container, we can apply the following Azure CLI commands as shown:
az group create --location [region] --name [resource-group]
az storage account create --name [storage-account-name] --resource-group [resource-group] -l [region] --sku Standard_LRS
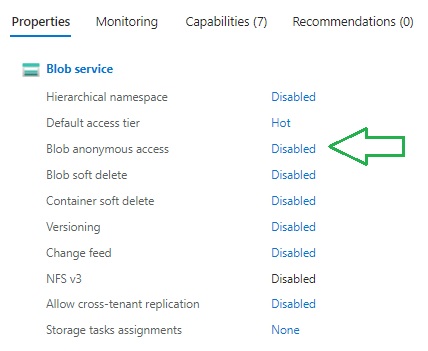
Before we can view any blobs within the storage container, we will need to change the access permissions to enable anonymous access.
I will show now how to change the access permissions. In the storage account overview, navigate to the properties tab. You will then see a property under the Blob service category, Blob anonymous access, which by default is set to Disabled.
In the past, storage accounts when initially created, had this property enabled, so that blobs could by default by accessed.
Normally, with blobs, you should set them to be publicly accessible with restrictions, as they will incur costs for file access and storage. I will show how to enable public access for blobs with time restrictions.
Open Configuration under Settings. In the properties that are displayed in the right pane, you will see the Allow Blob anonymous access property:
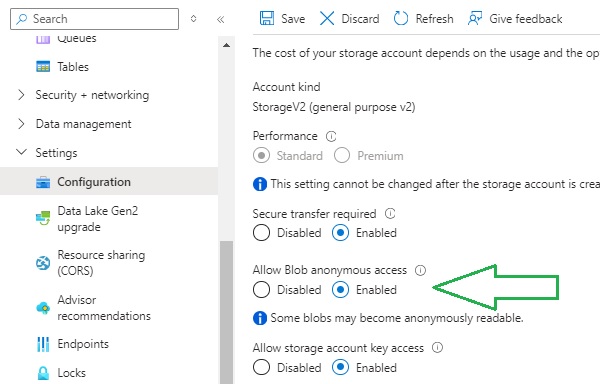
Set the property to Enabled and Save changes.
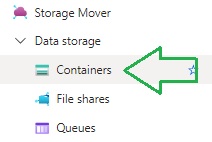
To add a new storage container, first select the Containers option under the Data storage menu as shown:
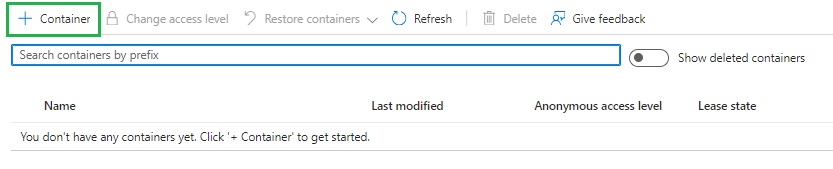
In the Containers screen, the grid displays with the option to add new containers:
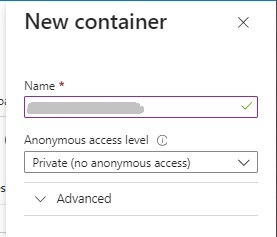
After clicking on the add Container action, the New Container dialog displays, where you will need to enter a container name and anonymous access level, which is set to Private access level by default.
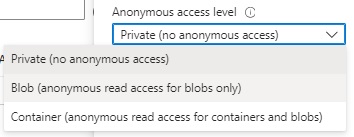
Expand the access level drop down list and you will see three choices:
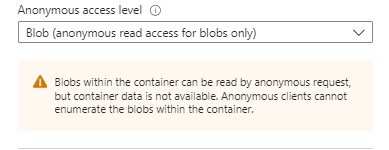
With the other access options, Blob and Container, thereare some differences to consider: with the Blob permission, read access to blobs is permitted, but not with the container. With the Container permission, read access to blobs and containers is permitted.
We will not permit access to the container, so we will permit read access to the blob as shown:
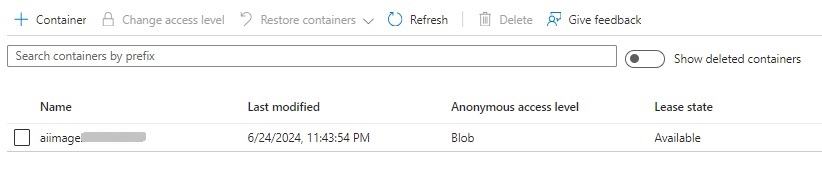
After adding the new storage container, you will see it in the container grid, with the name, access level and lease state:
Next, we need to upload a sample image to the container. We can do this programmatically, but I will show how this is done within the storage container.
After clicking on the container in the above storage account container properties, you will see the container blob files. As we don’t have any blob files in the container, the grid is empty, so the click on the Upload action to upload a file:

After adding the file, we will see it as a blob file in the grid:

I used the same image file I used in the Azure AI Vision Studio.
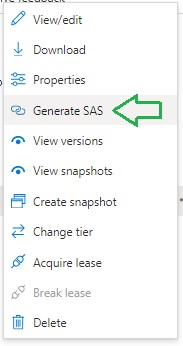
To access the blob file in the container, we will need to generate and retrieve a Blob SAS URL that contains a token and expiry dates.
To generate a SAS Blob URL, click on the ellipsis menu to the right of the above blob image file row in the Containers screen. Then select the Generate SAS menu item:
You will then see two generated properties,
Blob SAS token
and
Blob SAS URL
The generated Blob SAS token is of the form:
sp=r&st=[starting-date-time-stamp] &se=[expiry-date-time-stamp] &spr=https&sv=2022-11-02&sr=b&sig=[signature]
The generated Blob SAS URL is of the form:
https://[storage-account-name].blob.core.windows.net/[storage-container-name]/[blob-file-name]?sp=r&st=[starting-date-time-stamp] &se=[expiry-date-time-stamp] &spr=https&sv=2022-11-02&sr=b&sig=[sas-signature]
I then copy the Blob SAS URL. I will use it as input within the client application later.
Implementation of Image Analysis
In this section, I will show how to implement a basic client application that allows us to select the image features that we want to analyze, input the blob URL file that we generated earlier, then output the results of the image recognition analysis.
In the console applications, main() method below, we ask the user if they want to include any of the features: Tags, Objects, or Faces:
using System;
using System.IO;
using System.Collections.Generic;
using System.Threading.Tasks;
using Microsoft.Azure.CognitiveServices.Vision.ComputerVision;
using Microsoft.Azure.CognitiveServices.Vision.ComputerVision.Models;
using Microsoft.Extensions.DependencyInjection;
using Microsoft.Extensions.Hosting;
using Microsoft.Extensions.Logging;
using System.Text;

class Program
{
    async static Task Main(string[] args)
    {
        HostApplicationBuilder builder = Host.CreateApplicationBuilder(args);

        string visionKey = Environment.GetEnvironmentVariable("VISION_KEY");
        string visionEndpoint = Environment.GetEnvironmentVariable("VISION_ENDPOINT");

        builder.Services.AddLogging(
            l => l.AddConsole().SetMinimumLevel(LogLevel.None));

        using IHost host = builder.Build();

        var visionConfig = new ComputerVisionClient(new ApiKeyServiceClientCredentials(visionKey))
            { Endpoint = visionEndpoint };

        List<VisualFeatureTypes?> features = new List<VisualFeatureTypes?>();

        Console.WriteLine("For Object Recognition from an Image File Press O.");
        Console.WriteLine("Press Escape to finish.");
        ConsoleKeyInfo consoleKeyInfo = Console.ReadKey(true);
        if (consoleKeyInfo.Key == ConsoleKey.O)
        {
            Console.WriteLine("Detect Tags? Y or N:");
            ConsoleKeyInfo tagKeyInfo = Console.ReadKey(true);
            if (tagKeyInfo.Key == ConsoleKey.Y)
                features.Add(VisualFeatureTypes.Tags);

            Console.WriteLine("Detect Objects? Y or N:");
            ConsoleKeyInfo objectKeyInfo = Console.ReadKey(true);
            if (objectKeyInfo.Key == ConsoleKey.Y)
                features.Add(VisualFeatureTypes.Objects);

            Console.WriteLine("Detect Faces? Y or N:");
            ConsoleKeyInfo faceKeyInfo = Console.ReadKey(true);
            if (faceKeyInfo.Key == ConsoleKey.Y)
                features.Add(VisualFeatureTypes.Faces);

            Console.WriteLine("Enter the file path to the image file:");
            string? filePath = String.Empty;
            filePath = Console.ReadLine();

            RunObjectRecognitionFromAFile(visionConfig, filePath, features);
        };

        await host.RunAsync();

        Console.WriteLine("Application terminated.");
    }
    ...
}
To specify vision features, we use a list that is typed with the structure VisualFeatureTypes, and add the features we want to analyse as shown:
List<VisualFeatureTypes?> features = new List<VisualFeatureTypes?>();
…
features.Add([visual feature enum type]);
Where [visual feature enum type] is an enumeration of the feature types which includes:
VisualFeatureTypes.Objects
VisualFeatureTypes.Tags
VisualFeatureTypes.Faces
When the above main method is run, the interaction shown below shows the selected visual features and the input blob file:
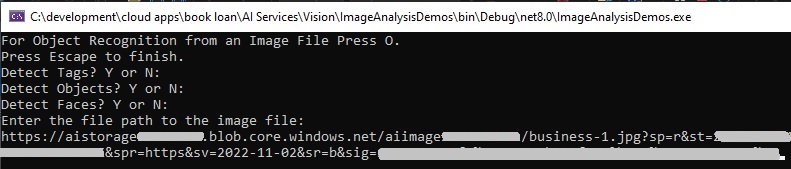
I then pass the specified parameters to a custom method, RunObjectRecognitionFromAFile() to analyse and output the image recognition results.
The method takes as input the vision configuration, file/blob URL path, and a list containing the visual features.
In the first version of the method, I run the image analysis with all the selected feature types, but output only the image tags:
public static async void RunObjectRecognitionFromAFile(
    ComputerVisionClient visionConfig,
    string? filePath,
    List<VisualFeatureTypes?> featureTypes)
{
    Console.WriteLine("Analyzing Image in File");
    Console.WriteLine();
    StringBuilder sb = new StringBuilder();
    string[] arrFeatures = new string[3];
    int arrMembers = 0;

    Console.WriteLine("Selected Feature Types: ");
    if (featureTypes.Contains(VisualFeatureTypes.Tags))
        arrFeatures[arrMembers++] = VisualFeatureTypes.Tags.ToString();
    if (featureTypes.Contains(VisualFeatureTypes.Faces))
        arrFeatures[arrMembers++] = VisualFeatureTypes.Faces.ToString();
    if (featureTypes.Contains(VisualFeatureTypes.Objects))
        arrFeatures[arrMembers++] = VisualFeatureTypes.Objects.ToString();
    Console.Write(string.Join(",", arrFeatures));
    Console.WriteLine();

    Console.WriteLine($"Analyzing the Image File {Path.GetFileName(filePath)}...");
    Console.WriteLine();

    ImageAnalysis results = await visionConfig.AnalyzeImageAsync(
        filePath,
        featureTypes
    );

    Console.WriteLine("Tags Found:");
    foreach (var tag in results.Tags)
    {
        Console.WriteLine($"{tag.Name} {tag.Confidence}");
    }

    Console.WriteLine();
}
Below are the outputs of the tags and confidence levels:
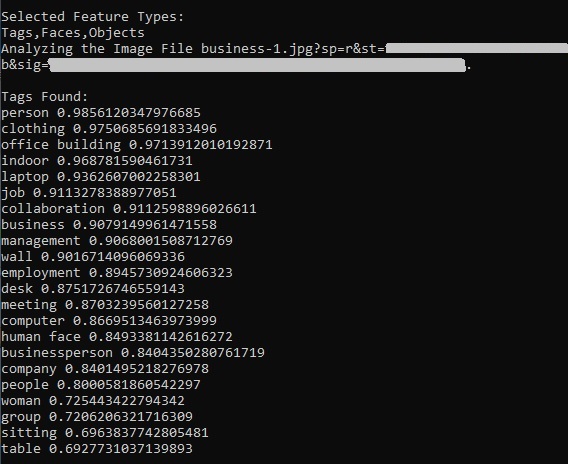
You can see from the above that the image recognition service has found far more types of objects than we had using the AI Vision Studio. We haven’t just found people, but also inanimate objects such as a desk, table, computer, laptop, and identified concepts such as indoor, job, collaboration, business, meeting and so on.
In the next section, I will show how we can include outputs for additional visual feature types that can provide details on the location of the features within the analysed images.
Output of Image Feature Locations from Recognition Results
In the previous section, I added user prompts to display Tags, Objects and Faces, however I only displayed vision recognition results for the Tags.
In this section I will show how we can add additional code to display the vision recognition results for the Objects, Faces and Categories feature types.
We can also seek feature categories from the recognition results. In the main() method, add a user prompt for the categories type:
Console.WriteLine("Detect Categories? Y or N:");

ConsoleKeyInfo categoryKeyInfo = Console.ReadKey(true);

if (categoryKeyInfo.Key == ConsoleKey.Y)
    features.Add(VisualFeatureTypes.Categories);
And in the RunObjectRecognitionFromAFile() add the line to add the categories to the features array:
if (featureTypes.Contains(VisualFeatureTypes.Categories))
    arrFeatures[arrMembers++] = VisualFeatureTypes.Categories.ToString();
In the section of code where we output the results, in addition to the Tag type, we output Objects, Faces and Categories. With the Objects and Faces types, we output the location of the feature with the use of the detected object rectangle property:
if (featureTypes.Contains(VisualFeatureTypes.Tags))
{
    Console.WriteLine("Tags Found:");
    foreach (var tag in results.Tags)
    {
        Console.WriteLine($"{tag.Name} {tag.Confidence}");
    }
}

if (featureTypes.Contains(VisualFeatureTypes.Objects))
{
    Console.WriteLine(" Objects Found:");
    foreach (var detectedObject in results.Objects)
    {
        Console.WriteLine($"   {detectedObject.ObjectProperty}, Bounding box (H,W,X,Y)=({detectedObject.Rectangle.H},{detectedObject.Rectangle.W},{detectedObject.Rectangle.X},{detectedObject.Rectangle.Y}), Confidence {detectedObject.Confidence:0.0000}");
    }
}

if (featureTypes.Contains(VisualFeatureTypes.Faces))
{
    Console.WriteLine(" Faces Found:");
    foreach (var faceDescription in results.Faces)
    {
        Console.WriteLine($"   Gender={faceDescription.Gender}, Age={faceDescription.Age}, Bounding box (H,W,X,Y)=({faceDescription.FaceRectangle.Height},{faceDescription.FaceRectangle.Width},{faceDescription.FaceRectangle.Left},{faceDescription.FaceRectangle.Top})");
    }
}

if (featureTypes.Contains(VisualFeatureTypes.Categories))
{
    Console.WriteLine(" Categories Found:");
    foreach (var category in results.Categories)
    {
        Console.WriteLine($"   Name={category.Name}, Score={category.Score}, Detail={category.Detail}");
    }
}

Console.WriteLine();
When the above code is run with the same business image, we get the following outputs when selecting Objects, Faces and Categories:
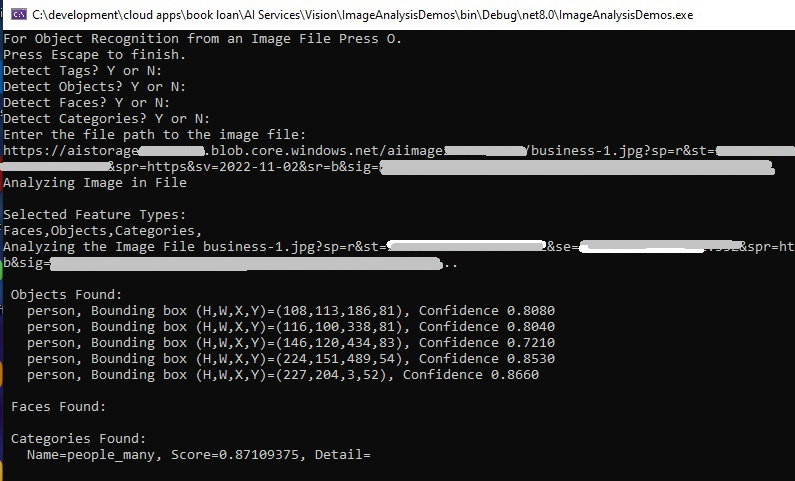
Notice that in addition to detection of the person(s), their bounded coordinates within the image are also output.
There is also a category: people_many that is output.
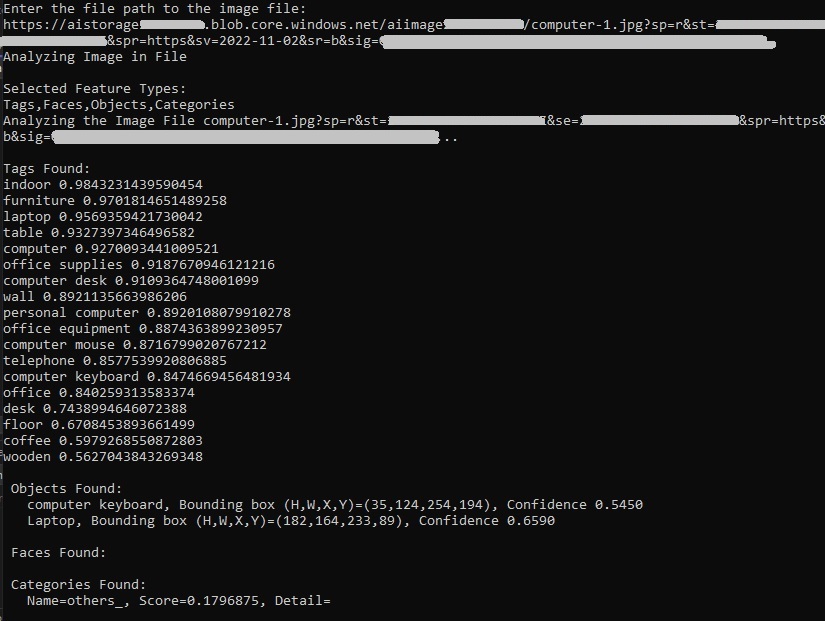
When we run the analysis for the computer desk image, with Tags, Objects, Faces and Categories, we get the following outputs:
We can see in both image files, many image features have been tagged and output in the vision recognition results.
In this post we have learned how to setup the Azure Vision Service, then understood how image features are tagged using the Azure AI Vision Studio.
I then showed how to create a blob container, loaded sample image files into it, and setup security and extracted the file URL.
We then created an application that allowed us to display the tags of objects within an image and displayed the locations of objects within images using the Azure Analysis API.
That is all for today’s post.
I hope that you have found this post useful and informative.
Andrew Halil is a blogger, author and software developer with expertise of many areas in the information technology industry including full-stack web and native cloud based development, test driven development and Devops.

