
Welcome to today’s post.
In today’s post I will be showing how to create and train custom vision object detection models using the Azure AI Custom Vision SDK.
In a previous post I showed how to use the Azure AI Custom Vision SDK to create and train custom vision object classification models.
In one of my previous posts, I explained the difference between object classification analysis and object detection analysis using custom vision models. In the same post, I then showed, using the Azure Custom Vision Portal how how to a create custom vision object detection model, that can be trained to determine what a particular object in an image looks like.
To train the model, I used the same process that we used to train custom vision object classification models to classify objects into a category. In the world of cutlery, the classifications of cutlery would be spoons, knives and forks. We then published the prediction API to allow us to test (make a prediction on) the trained custom object classification model against a sample test image that contained the object that we want to classify. The results we obtained were given for each object as percentages of likelihood that the image class matches the trained image class.
I will show how to use the same Azure AI Custom Vision SDK to create and train custom vision object detection models.
In the next section (which is identical to that of the previous post) I will show how to configure the development environment for use of the custom vision resources.
Configuration of the Environment for Developing Custom Vision Models
When we use the Custom Vision Training and Prediction API, the development environment I will use is the Visual Studio 2022 Development Environment.
Before we use the Visual Studio environment for development, we will need to setup some configuration keys and values that will be used to configure and create instances of the training and prediction custom vision resources.
The following are the configuration keys that will be required to create instances of and make calls to the Custom Vision Training and Prediction API libraries for the purpose of creating and managing Custom Vision models.
For Custom Vision Training models, the following configurations are required:
Training Resource Name
Training API Endpoint
The Training API Endpoint URL is of the form:
https://[resource-name].cognitiveservices.azure.com/
For Custom Vision Predictions, the following configurations are required:
Prediction Resource Name
Prediction API Endpoint
Prediction Resource Id
The Prediction resource name is suffixed with -prediction.
The Prediction API Endpoint URL is of the form:
https://[resource-name]-prediction.cognitiveservices.azure.com/
The Prediction Resource Id is of the form:
/subscriptions/{subscription-id}/resourceGroups/{resource-group}/providers/Microsoft.CognitiveServices/accounts/[{resource-name}-Prediction]
Note: You can find the prediction resource ID on the prediction resource’s Properties tab in the Azure portal, listed as Resource ID.
Once you have the above values, to initialize the values you can use the command line from within a local development workstation environment to create environment values for the vision resource.
Below are the commands that we can apply to setup the above configuration values:
setx VISION_TRAINING_KEY [training-key]
setx VISION_TRAINING_ENDPOINT [training-endpoint]
setx VISION_PREDICTION_KEY [prediction-key]
setx VISION_PREDICTION_ENDPOINT [prediction-endpoint]
setx VISION_PREDICTION_RESOURCE_ID [prediction-resource-id]
After applying the above configuration changes, they are accessible within the Visual Studio environment.
In the next section, I will show how to setup the application to use the Custom Vision SDK libraries.
Setup of the Training and Prediction Custom Model Library SDK
As I mentioned in the previous section, to use the Custom Vision SDK, the development environment we will use is the Visual Studio 2022 development environment. After initializing the resource names and keys for the Training and Prediction custom vision resources, we can start building our client application.
The first dependency that is required in the application are the installation of the NuGet packages:
Microsoft.Azure.CognitiveServices.Vision.CustomVision.Training
Microsoft.Azure.CognitiveServices.Vision.CustomVision.Prediction.
In the source files that use the custom vision resources, we will need to add the following library namespaces:
using Microsoft.Azure.CognitiveServices.Vision.CustomVision.Prediction;
using Microsoft.Azure.CognitiveServices.Vision.CustomVision.Training;
using Microsoft.Azure.CognitiveServices.Vision.CustomVision.Training.Models;
using System;
using System.Collections.Generic;
using System.IO;
using System.Linq;
using System.Text.Json;
using System.Threading;
Within the Program class, we declare any static variables that will store the configuration values for each of our custom vision resources:
internal class Program
{
    static string trainingEndpoint;
    static string trainingKey;
    static string predictionEndpoint;
    static string predictionKey;
    static string predictionResourceId;
    static string publishedModelName;
    …
}
In addition, we will require variable declarations for a set of images of spoons that we will be using for object detection training.
For the object detection model, we require lists of image files and the data for the locations of the bounded regions enclosing the objects that correspond to normalised coordinate values of the top left, top right, width, and height coordinates. I will explain how these are determined in the next section.
We will use lists to store the folder sources for each class of image and the bounded regions:
static Dictionary<string, double[]> imageFileToRegionMap;
Recall, when we implemented the object classification custom vision model, we only had to specify an image file and a tag for the image file.
Each object that is detected has an image file that requires a tag, which is declared as follows:
static Tag spoonTag;
Recall, that in a previous post when I demonstrated the custom vision object detection model, I used images containing multiple objects and multiple tags for each image file. On this occasion, I am using a data structure with one bounded region so that I can avoid the manual labor of tagging and calculating the normalized regions of many objects in each image. In more real-world scenarios, you will have to use many training images per detected object, determine their regions, and tag them.
For the current training testing iteration, we will need to store the iteration state, which is declared as follows:
static Iteration iteration;
When uploading the test image for use for prediction tests, we store the image contents in memory using the following declaration:
static MemoryStream testImage;
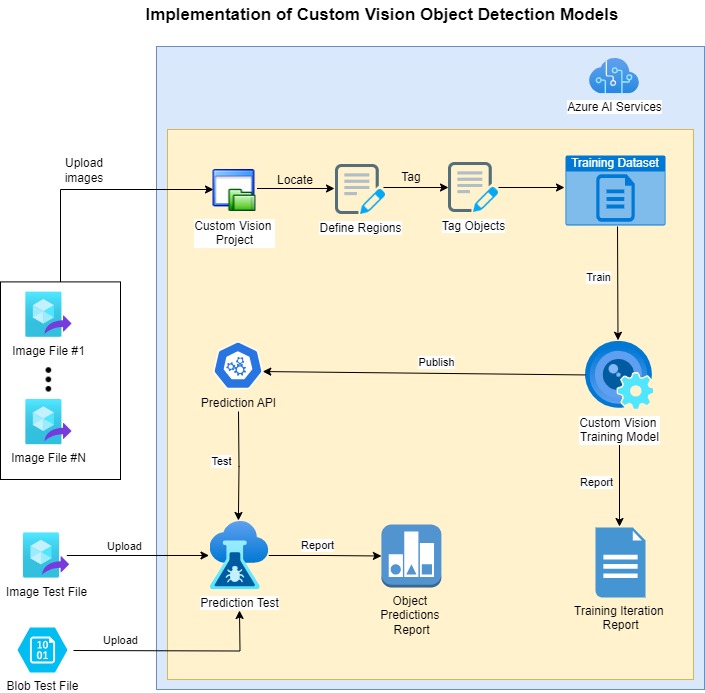
In the Main() method of the Program class, we will implement the methods that are used to apply the following tasks:
- Create instances of the Custom Vision Training API and Custom Vision Prediction API.
- Create a new Training project for the Custom Vision Training API.
- Create Tags for each image classification.
- Create list of image file names with the normalised bounding regions of the object within the image.
- Upload image files from disk into memory for training.
- Upload image files from disk into memory for testing.
- Add and tag in-memory files (and regions) into the Custom Vision Project’s Training model.
- Train the tagged images that are stored in the Custom Vision Project as an Iteration.
- Publish the latest training iteration of the Custom Vision trained model as a Prediction API using the Prediction resource.
- Test the iteration of the Custom Vision trained model using the published Prediction API.
- Display the results of the tests using the Prediction API.
- Unpublish the latest training iteration of the Custom Vision trained model.
- Remove the Custom Vision training project (including the model).
The diagram below provides a summary of most of the tasks mentioned above:
In the next section I will show how to create the training and prediction projects and resources.
Creation of Training and Prediction Resources and Projects
In the first part of the implementation, I will show how to resource keys and initialised, how the resources are created, and how the custom vision training project is created. This comprises tasks 1-2 above.
Below is the first part of the Main() method, where we initialise the variables and create the custom vision resources.
static void Main(string[] args)
{
    InitializeVariables();

    try
    {
        CustomVisionTrainingClient trainingApi = AuthenticateTraining(
            trainingEndpoint,
            trainingKey);

        CustomVisionPredictionClient predictionApi = AuthenticatePrediction(
            predictionEndpoint,
            predictionKey);
        ..
When creating and authenticating to each of the resources, we use a key for each of the training and predictive custom vision resource.
The variable initialization method is shown below:
private static void InitializeVariables()
{
    trainingEndpoint = Environment.GetEnvironmentVariable("VISION_TRAINING_ENDPOINT");
    trainingKey = Environment.GetEnvironmentVariable("VISION_TRAINING_KEY");
    predictionEndpoint = Environment.GetEnvironmentVariable("VISION_PREDICTION_ENDPOINT");
    predictionKey = Environment.GetEnvironmentVariable("VISION_PREDICTION_KEY");
    predictionResourceId = Environment.GetEnvironmentVariable("VISION_PREDICTION_RESOURCE_ID");
    publishedModelName = "cutleryClassModel";
}
The resource authentication methods are shown below:
private static CustomVisionTrainingClient AuthenticateTraining(
string? trainingEndpoint, string? trainingKey)
{
    // Create the training API, passing in the training key
    CustomVisionTrainingClient trainingApi = new CustomVisionTrainingClient(new Microsoft.Azure.CognitiveServices.Vision.CustomVision.Training
.ApiKeyServiceClientCredentials(trainingKey))
    {
        Endpoint = trainingEndpoint
    };
    return trainingApi;
}

private static CustomVisionPredictionClient AuthenticatePrediction(
string? predictionEndpoint, string? predictionKey)
{
    // Create the prediction API, passing in the prediction key
    CustomVisionPredictionClient predictionApi = new CustomVisionPredictionClient(
        new Microsoft.Azure.CognitiveServices.Vision.CustomVision.Prediction
.ApiKeyServiceClientCredentials(predictionKey))
    {
        Endpoint = predictionEndpoint
    };
    return predictionApi;
}
The Custom Vision Training resource requires an instance of CustomVisionTrainingClient to make use of the Custom Vision Training SDK, and the Custom Vision Prediction resource requires an instance of CustomVisionPredictionClient to make use of the Custom Vision Prediction SDK.
Before we can add tagged images to the training project, we require the creation of a Custom Vision project. This is done with the following call:
Project project = CreateProject(trainingApi, "CutleryImageDetectionProject");
Where the CreateProject() method is implemented as shown:
// Create a Custom Vision Project
private static Project CreateProject(CustomVisionTrainingClient trainingApi, string projectName)
{
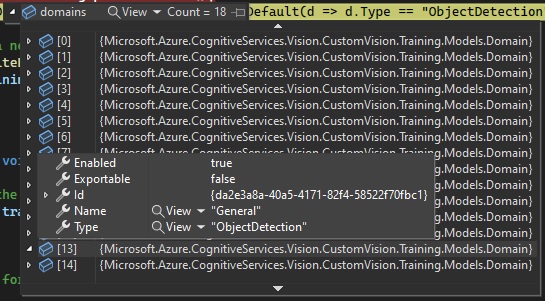
// Determine the object detection domain
var domains = trainingApi.GetDomains();
var objectDetectionDomain = domains.FirstOrDefault(d => d.Type == "ObjectDetection");
// Create a new custom vision project
Console.WriteLine($"Creating new custom vision project: {projectName}");
return trainingApi.CreateProject(projectName, null, objectDetectionDomain.Id);
}
Note: Notice that the difference between the usage of the above project creation API and the equivalent creation for object classification custom vision projects, is the additional parameter for the object detection domain. If the domain identifier is unspecified, the default custom vision project type is Classification. In the above, we have determined the domain identifier for the ObjectDetection domain and used this in the creation of the custom vision project.
Below is the snapshot of the Domain type showing the General domain and ObjectDetection domain type:
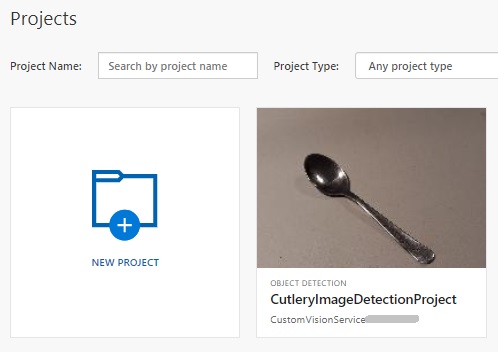
After the project is created successfully, it will return a Project instance with the Status property set to “Succeeded”.
You should then see the new project in the gallery within the Custom Vision Studio:
In the next section, I will show how to define the bounded region of the detected object within each image in the training dataset.
Defining Object Regions within Training Dataset Images
In the earlier sections I mentioned that before we can use uploaded images within an object detection custom vision project, we needed to calculate the normalized coordinates and regions of the objects that are contained in the training dataset images. We then include these normalized coordinates with the file name and binary data for each image file that will be uploaded into the training project.
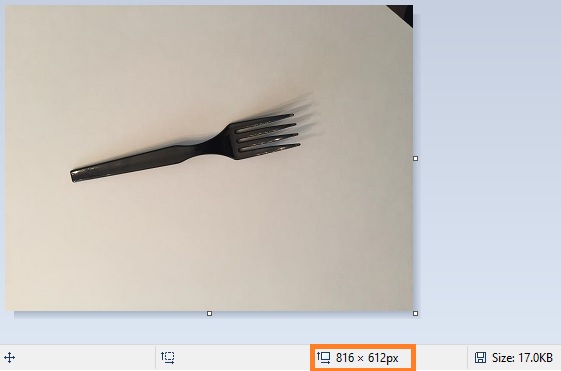
Below is an example of an image of a fork object that I have opened in MS Paint.
The first value that we require is the dimension of the image file. This is the value in the orange rectangle in the status bar as shown below:
We next determine the top-left coordinates of the object.
Move the cursor to the left most position and highest vertical point before and above the image as shown:
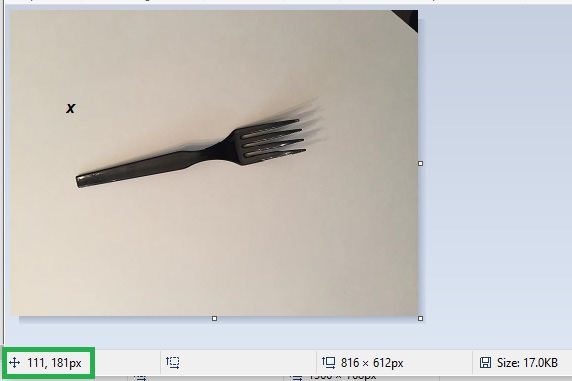
then make a note of the top-left coordinates, which are in the green rectangular region as shown.
The next step is to determine the rectangular bounded region surrounding the object. To do this we start at the top-left corner of the object (the X), drag the cursor just past the bottom right corner of the object as shown:
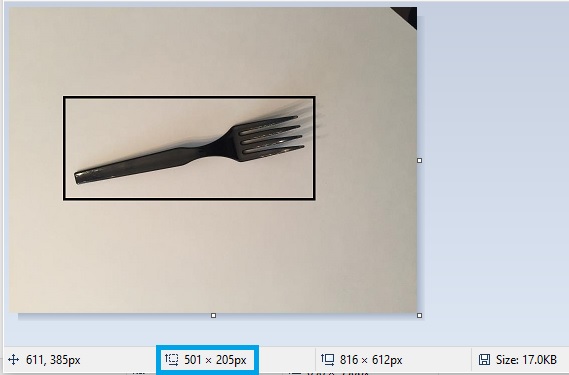
then make a note of the bounded rectangular dimensions, which are in the blue rectangular region as shown in the status bar.
The coordinates we have are as follows:
(image width, image height) = (816, 612) [image dimensions]

(top left, top right) = (111,181) [coordinate where the blue arrow points]

(region width, region height) = (501, 205) [region bounding the object]
To determine the normalised coordinates and dimensions, we will use the image dimensions to normalise the top-left and object region dimensions.
(normalised top left, normalised top right) = (111/816,181/612) = (0.13602, 0.29575)

(normalised region width, normalised region height) = (501/816, 205/612) = (0.61397, 0.33496)
The structured value in our training record is:
// FileName, Left, Top, Width, Height
{"fork_1", new double[] { 0.13602, 0.29575, 0.61397, 0.33496 } },
We then repeat the above for each image in the dataset.
In the next section, I will show how to add tags, then upload and tag images to the training dataset. I will also show how to upload a file used for later testing using the Prediction API.
Uploading to Projects Tagged Images within Training Datasets
In this section, I will show how to add tags, then upload and tag images to the training dataset.
To add the image classification tags to the project. This is done as shown:
AddTags(trainingApi, project);
The AddTags() method implementation is shown below:
// Add Tags
private static void AddTags(CustomVisionTrainingClient trainingApi, Project project)
{
    // Create the image tags for the project.
    spoonTag = trainingApi.CreateTag(project.Id, "Spoon");
}
The training dataset of images have one common tag. If we are to add additional objects that we want to detect to the training dataset, we would then create additional tags for each object and its associated batch of training images.
The Training API method for creating each image classification tag is:
trainingApi.CreateTag(Guid project-id, string tag-name);
The next step is to request the file upload folder, which will be used to load the training image files into memory. This is done as follows:
Console.WriteLine("Enter the folder path for the image input files:");
string? folderPath = String.Empty;
folderPath = Console.ReadLine();
We next define the image file map array for all the images and the bounded region of the detected object within the image.
DefineImageFileMaps();
The method DefineImageFileMaps() implementation is shown below:
// Define image file map.
private static void DefineImageFileMaps()
{
    // this loads the images file names and tagged region into lists.
    imageFileToRegionMap = new Dictionary<string, double[]>()
    {
        // FileName, Left, Top, Width, Height
        {"spoon_1", new double[] { 0.35625, 0.13911, 0.14425, 0.72577 } },
        {"spoon_2", new double[] { 0.26825, 0.20311, 0.41625, 0.55866 } },
        {"spoon_3", new double[] { 0.30425, 0.18533, 0.32425, 0.59777 } },
        {"spoon_4", new double[] { 0.38225, 0.19066, 0.14825, 0.65466 } },
        {"spoon_5", new double[] { 0.29625, 0.22444, 0.28025, 0.60133 } },
        {"spoon_6", new double[] { 0.26225, 0.16755, 0.35625, 0.64044 } },
        {"spoon_7", new double[] { 0.37425, 0.14266, 0.16825, 0.69733 } },
        {"spoon_8", new double[] { 0.24025, 0.18177, 0.40225, 0.62977 } },
        {"spoon_9", new double[] { 0.31025, 0.16755, 0.37025, 0.56577 } },
        {"spoon_10", new double[] { 0.34625, 0.11066, 0.18225, 0.80044 } },
        {"spoon_11", new double[] { 0.25025, 0.12133, 0.38625, 0.70088 } },
        {"spoon_12", new double[] { 0.23225, 0.16755, 0.44225, 0.65466 } },
        {"spoon_13", new double[] { 0.37825, 0.11066, 0.16425, 0.78266 } },
        {"spoon_14", new double[] { 0.27425, 0.16755, 0.36225, 0.66533 } },
        {"spoon_15", new double[] { 0.22825, 0.14266, 0.42825, 0.72222 } },
        {"spoon_16", new double[] { 0.36575, 0.08577, 0.21225, 0.77911 } },
        {"spoon_17", new double[] { 0.26025, 0.14622, 0.39225, 0.69377 } },
        {"spoon_18", new double[] { 0.25825, 0.13200, 0.38425, 0.65111 } }
    };
}
Now that we have the lists of test image file names and the region for each object within the image, we upload the images into a memory stream and then upload the contents of the memory stream into the training project’s custom model with the classification tag associated with the batch of images. This is done as follows:
UploadImages(trainingApi, project, folderPath, imageFileToRegionMap, spoonTag);
Below is the implementation of UploadImages() which I will soon explain:
// Upload images individually for each image folder for the given tag.
private static void UploadImages(CustomVisionTrainingClient trainingApi,
    Project project, string imageFolder, Dictionary<string, double[]> imageFiles,
    Tag imageTag)
{
        // Add some images to the tags
        Console.WriteLine($"Uploading training images for tag {imageTag.Name} ...");
        Console.WriteLine();

        string spoonImageFolder = Path.Combine(imageFolder, "Spoon");

        var imageFileEntries = new List<ImageFileCreateEntry>();
        foreach (var fileName in Directory.EnumerateFiles(spoonImageFolder))
        {
            var region = imageFiles[Path.GetFileNameWithoutExtension(fileName)];
            imageFileEntries.Add(
                new ImageFileCreateEntry(
                    fileName,
                    File.ReadAllBytes(fileName),
                    null,
                    new List<Region>(
                        new Region[] {
                            new Region(
                                spoonTag.Id,
                                region[0],
                                region[1],
                                region[2],
                                region[3]
                            )
                        }
                    )
                )
            );
        }

        // Add images to the custom vision project as a batch.
        trainingApi.CreateImagesFromFiles(
            project.Id,
            new ImageFileCreateBatch(imageFileEntries)
        );

        Console.WriteLine($"Finished uploading training images for tag {imageTag.Name}.");
        Console.WriteLine();
}
What we did in the above upload was to pass in the list of file mappings imageFileToRegionMap then iterate through each entry and add the following structure with its fields populated:
namespace Microsoft.Azure.CognitiveServices.Vision.CustomVision.Training.Models;

public class ImageFileCreateEntry
{
    [JsonProperty(PropertyName = "name")]
    public string Name { get; set; }

    [JsonProperty(PropertyName = "contents")]
    public byte[] Contents { get; set; }

    [JsonProperty(PropertyName = "tagIds")]
    public IList<Guid> TagIds { get; set; }

    [JsonProperty(PropertyName = "regions")]
    public IList<Region> Regions { get; set; }

    public ImageFileCreateEntry()
    {
    }
    ..
}
Where:
Name is the file name and path of the current image file.
Contents is the in-memory binary contents of the image file.
TagIds are the tags for the image file.
Regions are the object regions within the image.
Within the loop, the following Training API method is used to create images for training and testing from the dataset files:
trainingApi.CreateImagesFromFiles(
    Guid project_id,
    ImageFileCreateBatch imageBatch
);
The above API method passes the files, regions, and their contents in one batch structure entry, ImageFileCreateBatch as one of the input parameters.
The following Training API method used for object classifications in the previous post:
trainingApi.CreateImagesFromData(
    Guid project-id,
    MemoryStream stream,
    List<Guid> image-tag-id-list,
)
The above call requires inputs for each file stream, and a list of tags for each object within the image.
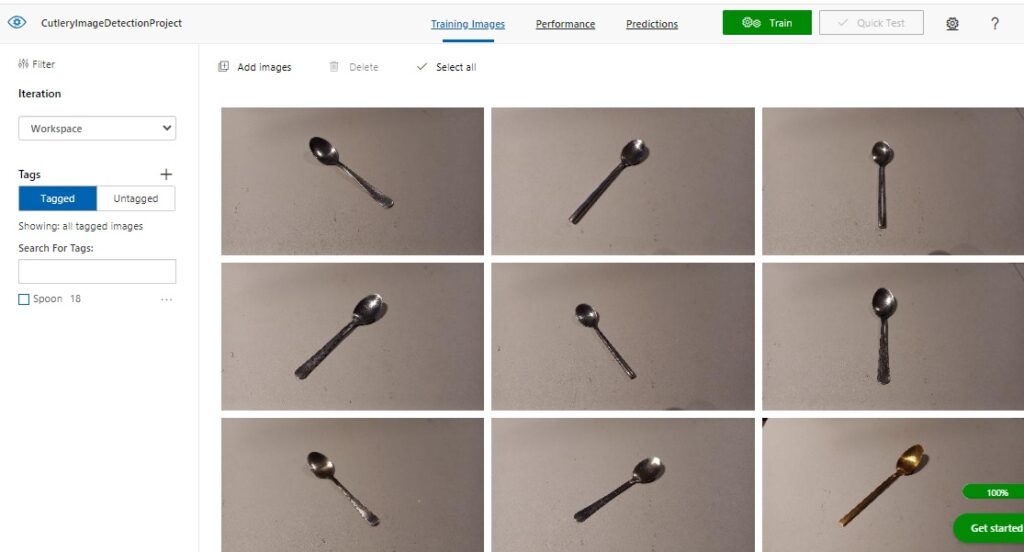
Below is the display in the Custom Vision Studio of the training images we see after uploading the set of Spoon images to the project training data set:
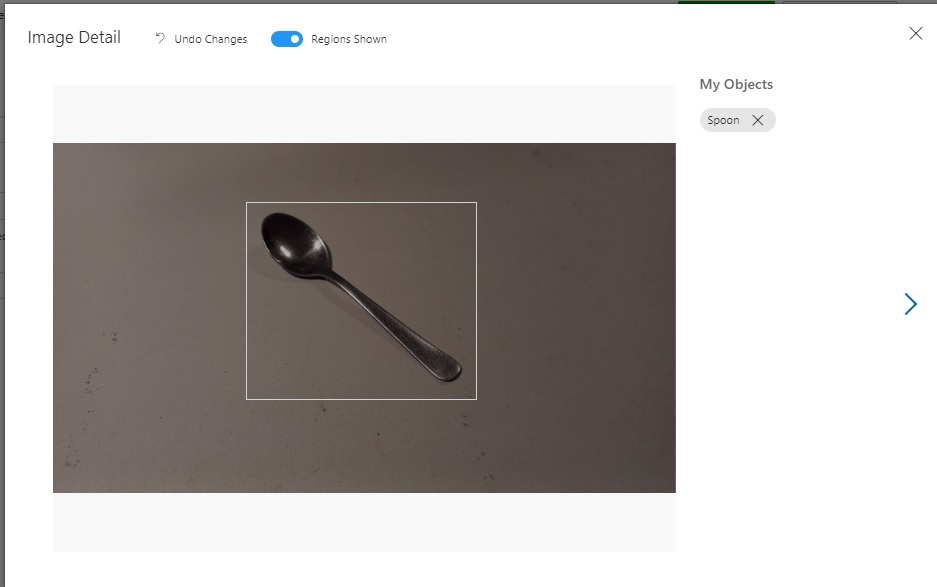
If we select one of the uploaded and tagged images, we will see that the main object within the image has been tagged with the name of the object:
The next step is to upload the test image from the same folder path as above into a local memory stream. This is done as shown:
UploadTestImage(folderPath);
The method UploadTestImage() implementation is shown below:
// Train the Project
private static void TrainProject(CustomVisionTrainingClient trainingApi, Project project)
{
    // With the tagged images prepared, we start training the project.
    Console.WriteLine("Start Training ...");
    Console.WriteLine();

    iteration = trainingApi.TrainProject(project.Id);

    // The returned iteration will be in progress.
    // We will query its progress.
    while (iteration.Status == "Training")
    {
        Console.WriteLine("Waiting 10 seconds for training to complete...");
        Thread.Sleep(10000);

        // Re-query the iteration to get it's updated status
        iteration = trainingApi.GetIteration(project.Id, iteration.Id);
    }
}
After establishing the image training data and object regions, we are ready to train the project to produce a custom vision object detection model, then publish the model for consumption. I will show how this is done in the next section.
Execution of Training and Publishing for the Project
The project now contains tagged and training images that will be used for object detection. To execute training for the project, we make the following call:
TrainProject(trainingApi, project);
The TrainProject() implementation is shown below:
// Train the Project
private static void TrainProject(CustomVisionTrainingClient trainingApi, Project project)
{
    // With the tagged images prepared, we start training the project.
    Console.WriteLine("Start Training ...");
    Console.WriteLine();

    iteration = trainingApi.TrainProject(project.Id);

    // The returned iteration will be in progress.
    // We will query its progress.
    while (iteration.Status == "Training")
    {
        Console.WriteLine("Waiting 10 seconds for training to complete...");
        Thread.Sleep(10000);

        // Re-query the iteration to get it's updated status
        iteration = trainingApi.GetIteration(project.Id, iteration.Id);
    }
}
To commence project training and obtain a training iteration, we make the following Training API call:
Iteration trainingApi.TrainProject(Guid project_id);
To obtain the status of the training run, we read the Status property of the Iteration class, which can return one of the following results:
Training

Completed
Where Training is while the training is still in progress and Completed is when training has completed.
To re-query the training status, we re-read the iteration instance with the Training API call:
Iteration trainingApi.GetIteration(Guid project-id, Guid iteration-id);
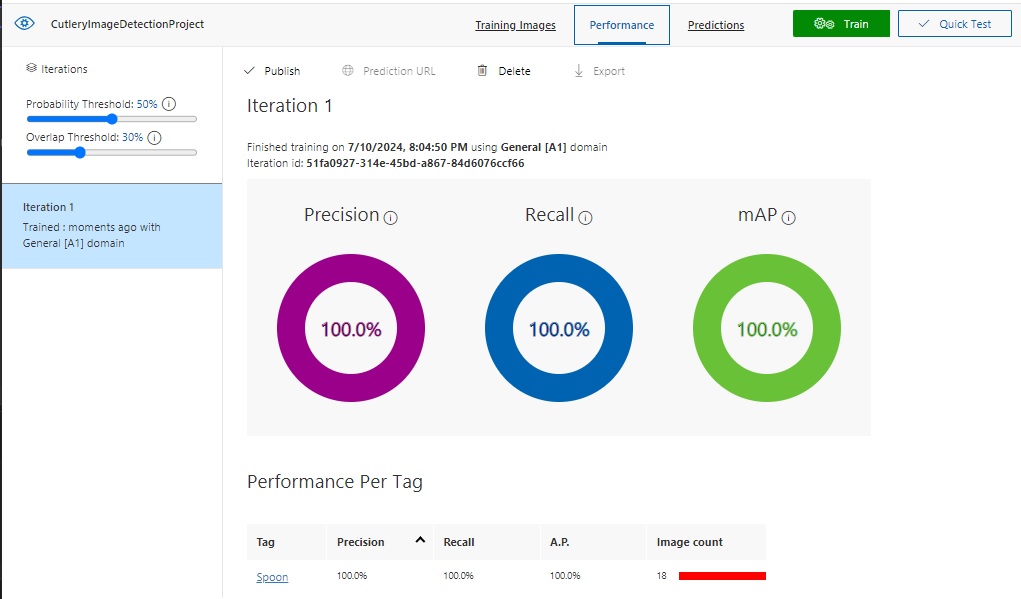
Below are the results of the same training iteration run when viewed in the Custom Vision Portal:
When training has completed, we can then publish the training model as a prediction API. This is done as follows:
PublishIteration(trainingApi, project);
The method PublishIteration() implementation is shown below:
// Publish Iteration
static void PublishIteration(CustomVisionTrainingClient trainingApi, Project project)
{
    trainingApi.PublishIteration(
        project.Id,
        iteration.Id,
        publishedModelName,
        predictionResourceId);

    Console.WriteLine("Training Completed!");
    Console.WriteLine();
}
The main Training API method used to publish the custom vision model as a Prediction API is:
trainingApi.PublishIteration(
        Guid project-id,
        Guid iteration-id,
        string published-model-name,
        string prediction-resource-id
);
In the next section, I will show how to run a prediction test with he published Prediction API.
Running Tests with the Prediction API
With the published custom vision model, we can test the model by making predictions using the Prediction API. With calls to the prediction API, we pass in an instance of CustomVisionPredictionClient. This is done as shown:
TestIteration(predictionApi, project);
The TestIteration() method is implemented as shown:
// Test Iteration
private static void TestIteration(CustomVisionPredictionClient predictionApi,
    Project project)
{
    // Make a prediction against the new project
    Console.WriteLine("Making a prediction from a test image:");
    var result = predictionApi.DetectImage(
        project.Id,
        publishedModelName,
        testImage
    );

    // Loop over each prediction and write out the results
    foreach (var c in result.Predictions)
    {
        Console.WriteLine($"\t{c.TagName}: {c.Probability:P1} [ {c.BoundingBox.Left}, {c.BoundingBox.Top}, {c.BoundingBox.Width}, {c.BoundingBox.Height} ]");
    }
}
The main Prediction API method for kicking off a prediction for a test image is defined below:
ImagePrediction predictionApi.DetectImage(
    Guid project-id,
    String published-model-name,
    MemoryStream test-image
);
Where the ImagePrediction class contains the results of the image prediction in the Predictions property. The useful properties within the Predictions property that we use for reporting are:
TagName

Probability

BoundingBox
Where:
TagName is the name of the tag for the classified object, and Probability is the confidence that the object has that classification.
BoundingBox is a region structure that contains the left, top, width, height properties of the object.
Note: If we tried to execute the API method DetectImage() on an object classification project, or were to execute the API method ClassifyImage() on an object detection project, then we would receive the following error message:
{"Operation returned an invalid status code 'BadRequest'"}
Invalid project type for operation.
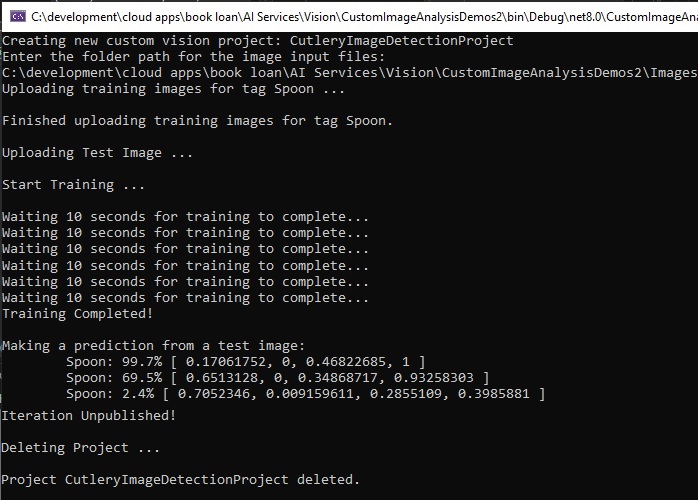
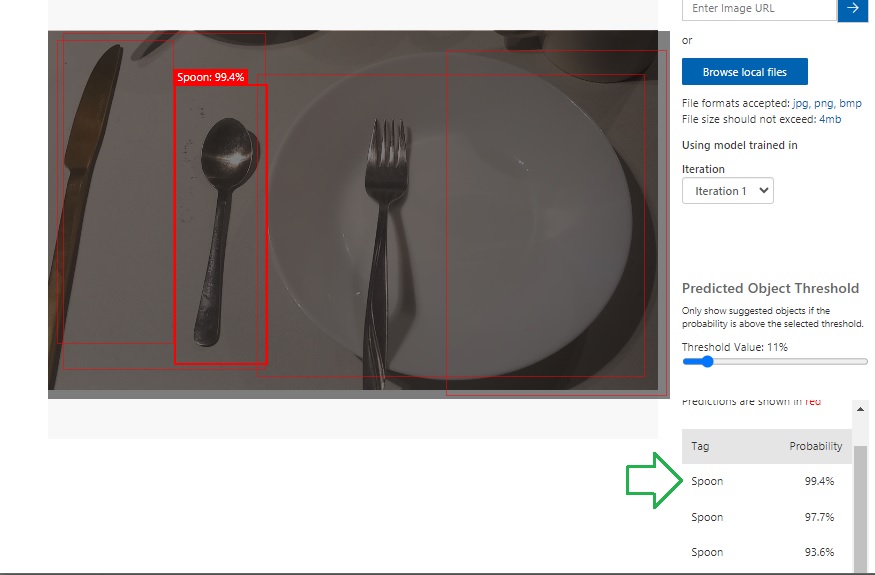
Below is a sample run of output in the console:
In the Custom Vision Portal, the same prediction on the testing image thumbnail is available for viewing as shown:
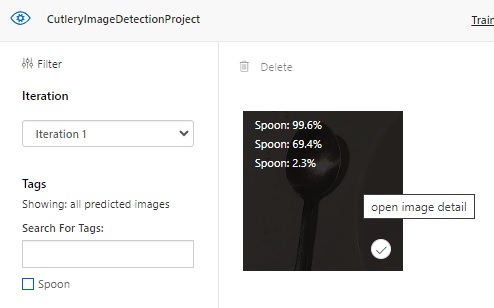
When we click on one of the uploaded images, we will see that the Prediction API has determined what the prediction are for the image and given each prediction a percentage:
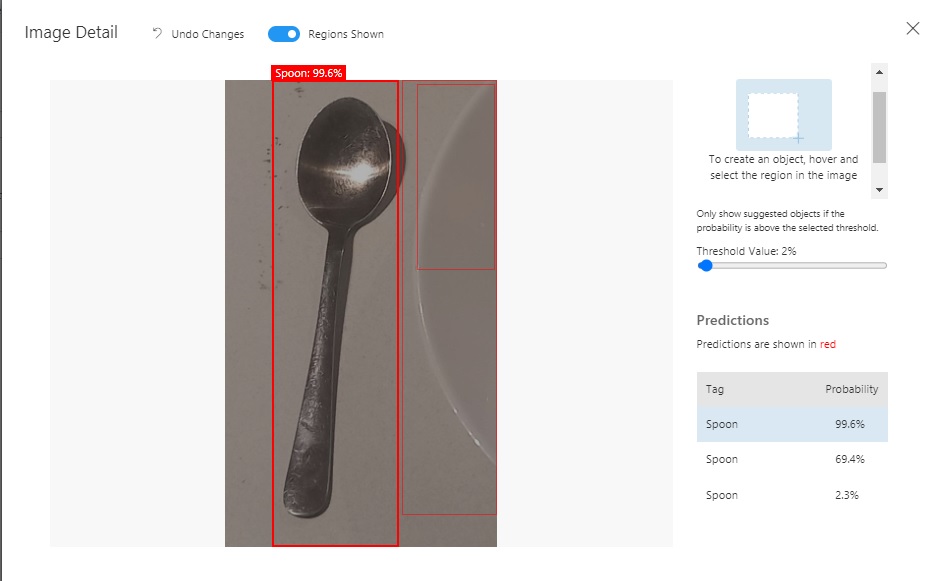
If we select an image file that contains multiple objects, then the object detection will try to tag multiple images.
In the next section I will show how to remove the custom vision training project.
Removing the Custom Vision Training Project
After you have made use of your custom Vision Training project, if you no longer require the model, you can remove it. I will show how this is done.
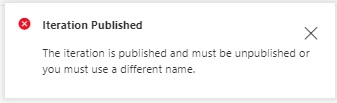
Before you can remove a training project, you will need to unpublish the training iteration of the project.
Attempting to delete the training project without unpublishing the training iteration results in the following error:
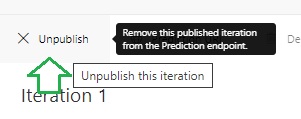
The following call unpublishes the training iteration.
UnPublishIteration(trainingApi, project);
The implementation of UnPublishIteration() is shown below:
// UnPublish Iteration
static void UnPublishIteration(CustomVisionTrainingClient trainingApi, Project project)
{
    trainingApi.UnpublishIteration(
        project.Id,
        iteration.Id);

    Console.WriteLine("Iteration Unpublished!");
    Console.WriteLine();
}
The Training API method that performs the unpublishing of the iteration is:
trainingApi.UnpublishIteration(
    Guid project-id,
    Guid iteration-id
);
The above is equivalent to the following action in the Custom Vision portal:
To remove the project, we make the following call:
DeleteProject(trainingApi, project);
The method DeleteProject() implementation is shown below:
private static void DeleteProject(CustomVisionTrainingClient trainingApi,
    Project project)
{
    Console.WriteLine("Deleting Project ...");
    Console.WriteLine();

    string projectName = project.Name;

    trainingApi.DeleteProject(project.Id);

    Console.WriteLine($"Project {projectName} deleted.");
    Console.WriteLine();
}
The Training API method that performs the deletion of the project is:
trainingApi.DeleteProject(Guid project-id);
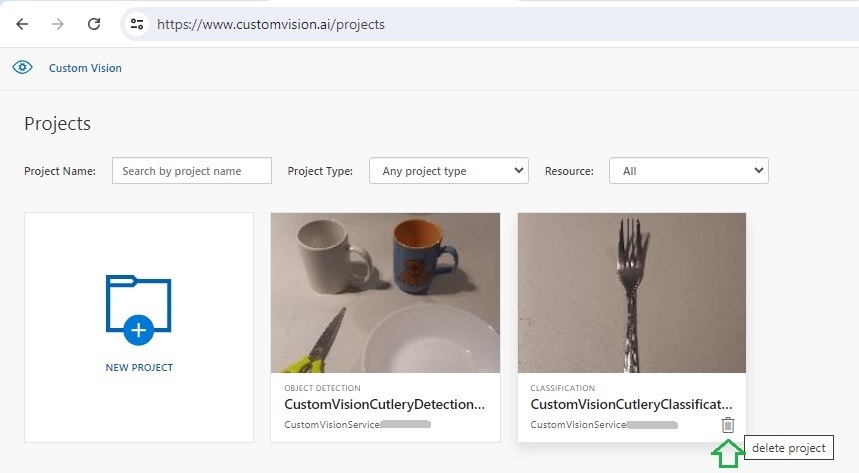
The above is equivalent to pressing the trash bin icon in the project gallery screen a shown:
I will now explain how to catch and display errors when running the above custom vision processing tasks.
Below is an example of how to use exception handling for custom vision processing tasks:
try
{
    CustomVisionTrainingClient trainingApi = AuthenticateTraining(
        trainingEndpoint,
        trainingKey);

    CustomVisionPredictionClient predictionApi = AuthenticatePrediction(
        predictionEndpoint,
        predictionKey);

    Project project = CreateProject(trainingApi, "CutleryImageDetectionProject");

    Console.WriteLine("Enter the folder path for the image input files:");
    string? folderPath = String.Empty;
    folderPath = Console.ReadLine();

    AddTags(trainingApi, project);

    LoadImageFilenamesFromDisk(folderPath);

    UploadImages(trainingApi, project, folderPath, imageFileToRegionMap, spoonTag);
    UploadTestImage(folderPath);
    TrainProject(trainingApi, project);
    PublishIteration(trainingApi, project);
    TestIteration(predictionApi, project);
    UnPublishIteration(trainingApi, project);
    DeleteProject(trainingApi, project);
}
catch (Microsoft.Azure.CognitiveServices.Vision.CustomVision.Training.Models.CustomVisionErrorException ex1)
{
    VisionServiceError error =
        JsonSerializer.Deserialize<VisionServiceError>(json: ex1.Response.Content);
    Console.WriteLine($"A Vision Training Model error has occurred: {error?.message}");
}
catch (Microsoft.Azure.CognitiveServices.Vision.CustomVision.Prediction.Models.CustomVisionErrorException ex2)
{
    VisionServiceError error =
        JsonSerializer.Deserialize<VisionServiceError>(json: ex2.Response.Content);
    Console.WriteLine($"A Vision Prediction Model error has occurred: {error?.message}");
}
catch (Exception ex)
{
    Console.WriteLine($"An general error has occurred: {ex.Message}");
}
The errors from the exception class CustomVisionErrorException contain a Body property, which has a JSON string containing a code and message property.
To extract the above error properties and display them, use a class with these properties:
internal class VisionServiceError
{
    public string? code { get; set; }
    public string? message { get; set; }
}
When then deserialized the JSON content of the exception body string into the above helper class:
VisionServiceError error = JsonSerializer.Deserialize<VisionServiceError>(
    json: ex1.Response.Content
);
We have seen how to implement data uploads, tagging, training, publishing and testing for a custom vision object detection model using the Custom Vision Training and Prediction API.
That is all for today’s post.
I hope that you have found this post useful and informative.
Andrew Halil is a blogger, author and software developer with expertise of many areas in the information technology industry including full-stack web and native cloud based development, test driven development and Devops.

