Welcome to today’s post.
I will we discussing how to configure and publish a .NET Core web application that has been built and tested using the TeamCity CI build configuration into an existing IIS web server.
In a previous post, I discussed how to configure a basic build configuration using TeamCity Continuous Integration tasks to check out the source from GitHub repository, then build and run a set of unit tests, and then deploy the application to Azure using Continuous Deployment tasks.
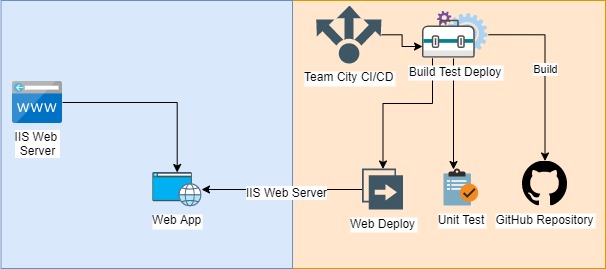
In this post I will expand on those previous posts with a build configuration which will publish a .NET Core application into IIS after the build, test and publish steps are successfully completed. The aim is to produce the following CI / CD flow:
To keep this blog brief I will not show you how to create a build configuration from scratch. Instead, I will show how to re-use an existing build configuration from the same Team City project configuration. All else being the same apart from the MSBuild configuration, the CICD pipeline should execute is a similar manner to the configuration we did for the Azure CICD build configuration.
I will return to the MSBuild configuration after I go over the first few steps in the process.
The first step after opening TeamCity is to locate our previous Build configuration (that worked), clone it and amend it to support an IIS deployment.
After selecting the project, select Edit Project Settings as shown:

In the build configurations section, locate the build configuration we would like to clone.
Select the right-most drop-down list.
You will see three choices: Copy, Move and Delete build configuration:

Select the copy build configuration. Nominate a name for the build. In the dialog below
I have appended _IIS to the name:

After selecting Copy, the following confirmation shows:

Returning to the build configurations section, you will notice the new build configuration.
Select the Build Steps from the left-most drop-down list:

Returning to the build configurations section, you will notice the new build configuration.
Select the Build Steps from the left-most drop-down list:

Before we proceed to the next step, let me return to the MSBuild configuration.
In order for the MSBuild configuration to be valid for an IIS deployment, there should be an existing publisher profile for an IIS deployment for our .NET Core application. Creating a publisher profile for our .NET Core application is quite straightforward, and and in a previous post where I discuss how to deploy .NET Core applications to Azure, I explain where this is located after running a publish.
Assuming out publisher profile is named:
BookLoanWebApp - WebDeploy IIS.pubxml
Then our MSBuild command parameters will be:
/p:PublishProfile="Properties\PublishProfiles\BookLoanWebApp - WebDeploy IIS.pubxml"
/p:DeployOnBuild=True
/p:ProfileTransformWebConfigEnabled=False
/p:userName=%deployusername%
/p:password=%deploypwd%
/p:EnableMSDeployAppOffline=True
/p:verb=sync
/p:dest=auto
Open Step 6 of our build Steps.
Next, locate the Command Line Parameters field.
Take the above MSBuild command and paste it into the field.
Save the change to step 6. Next, return to the project and run the new build configuration:

Select the build Agent.

The build configuration will run.

The pipeline will run and should take about 3 minutes.
Below is the log from step 6 onwards:

For the deployment to have succeeded you should see the steps:
[project] Publish
and
[MSDeployPublish] VSMSDeploy
To confirm the published artifacts have been deployed, expand [MSDeployPublish] VSMSDeploy.

We have successfully run a pipeline and deployed a .NET Core application to IIS!
That’s all for today’s post. I hope you have found it useful and informative.
Andrew Halil is a blogger, author and software developer with expertise of many areas in the information technology industry including full-stack web and native cloud based development, test driven development and Devops.