
Welcome to today’s post!
In today’s post I will explain how service lifetimes are managed within different .NET Core application scenarios.
In a previous post I introduced the different ways in which we can control the lifetimes of service collections with an ASP.NET Core application.
In today’s post I will show how service lifetimes can be used with emphasis on data contexts and single and multi-threaded application contexts within ASP.NET Core and ASP.NET Core Blazor web applications.
Each service class instantiated within a .NET Core application has one of three lifetimes:
- Singleton
- Scoped
- Transient
The longest lifetime for an instance is singleton and the shortest lifetime is transient.
Instances with a singleton lifetime persist while an application session is running.
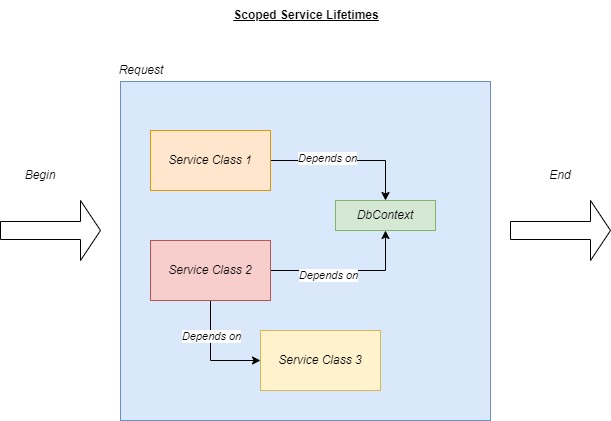
Instances with a scoped lifetime persist while a request is run within an application, or a transaction is run under its own data context.
Instances with a transient lifetime persist within a chain of dependent service classes that are instantiated and disposed within an application request.
Using Scoped Lifetimes within an ASP.NET Core Web Application
An example of where Scoped lifetime context is used in ASP.NET web applications is when using AddDbContext() to create instances of the Entity Framework Core dbContext class.
When AddDbContext() is used, it sets by default the lifetime of the dbContext database connection to Scoped.
What this means is that for every request (for example, an API call) within an ASP.NET application, the database connection instance is shared within each class or controller that it is injected into, and the concurrency is preserved by using await calls to block multiple calls within the same request.
Below is an example of how we create an instance of a DbContext in .NET Core startup service configuration:
public class Startup
{
    public Startup(IConfiguration configuration)
    {
        Configuration = configuration;
    }

    public IConfiguration Configuration { get; }

    // This method gets called by the runtime. Use this method to add services to the container.
    public void ConfigureServices(IServiceCollection services)
    {
        ..

        services.AddDbContext<ApplicationDbContext>(options =>
            options.UseSqlServer(Environment.GetEnvironmentVariable("DB_CONN_STR")));
        ..
    }
    ..
}
When using an DbContext instance concurrently within the application and don’t want the instance to interfere with an existing instance of the DbContext, we can include the context within a scope that will dispose of the instance after it has completed using it.
The example below ensures the database is created during startup if it is not already existing:
public void Configure(IApplicationBuilder app, IHostEnvironment env, ILogger<Startup> logger)
{
    ..
    try
    {
        using (var serviceScope = app.ApplicationServices
                .GetService<IServiceScopeFactory>()
                .CreateScope())
        {
            var context = serviceScope.ServiceProvider.GetRequiredService<ApplicationDbContext>();
                    context.Database.EnsureCreated(); // create database if not already created.
        }
    }
    catch (Exception ex)
    {
        Console.WriteLine("Error: Initialising the database.");
    }
	..
}
The above uses the service locator method to determine the data context within a scoped context.
Using Scoped Lifetimes within a Multi-threaded .NET Core Application
With multi-threaded applications, there is a danger that when we run multiple threads that use the same DbContext, there is a likelihood that access violations, data corruptions, and data inconsistencies can occur if code that accesses data does not block threads from simultaneously accessing the same database objects. The way we solve this problem is to use a Scoped service lifetime for the DbContext and create each transaction unit within its own scope. An example is when we have a background thread that runs a SQL transaction that we want to ensure does not allow concurrent threads to run the same section of data access within the same code block.
To create the scoped instance, we use the CreateScope() method to create a new instance to encapsulate the DbContext transaction. Then we use the GetRequiredService() method of the scoped service provider to retrieve the DbContext. This is the thread-safe way of retrieving the data context. A scoped class for a sample scoped transaction that retrieves a login audit entry is shown below:
public class CustomScopedDBService: ICustomScopedDbService
{
    private readonly ILogger _logger;
    private readonly IServiceProvider _serviceProvider;
    private int _result;

    public CustomScopedDBService(
        IConfiguration configuration,
        ILogger<CustomDBService> logger,
        IServiceProvider serviceProvider)
    {
        this._logger = logger;
        this._serviceProvider = serviceProvider;
    }

    public async Task<List<Models.LoginAuditViewModel>> RetrieveNextAuditEntries()
    {
        DateTime startDateTime = DateTime.Now.AddYears(-1);
        DateTime endDateTime = DateTime.Now;

        using (var serviceScope = _serviceProvider.GetService<IServiceScopeFactory>().CreateScope())
        {
            var _db = serviceScope.ServiceProvider.GetRequiredService<ApplicationDbContext>();

            _logger.LogInformation($"RetrieveNextAuditEntries(): Db Context = {_db.ContextId}.");

            Console.WriteLine("Running RetrieveNextAuditEntries() ..in Background Worker Service.");
            _logger.LogInformation($"Running RetrieveNextAuditEntries() ..in Background Worker Service.");

            Console.WriteLine($"RetrieveNextAuditEntries() .. start-date={startDateTime.ToString()}, end-date={endDateTime.ToString()}.");
            _logger.LogInformation($"RetrieveNextAuditEntries() .. start-date={startDateTime.ToString()}, end-date={endDateTime.ToString()}.");

            var auditEntries =
                _db.LoginAudits
                .Where(a => a.WhenLoggedIn >= startDateTime && a.WhenLoggedIn < endDateTime)
                .ToList();

            return auditEntries;
        }
    }
}
Each new instance of the DbContext running under a new thread has a unique ContextId value, so any subsequent uses of the data context in the application or service will run under a different transaction scope, or unit of work.
The transaction class method RetrieveNextAuditEntries() is called within a background thread as shown:
public void QueueBackgroundWorkItem(Func<CancellationToken, Task> workItem)
{
    if (workItem == null)
    {
        throw new ArgumentNullException(nameof(workItem));
    }

    _workItems.Enqueue(workItem);

    _logger.LogInformation($"Enqueue(): Number of Queued Items = {_workItems.Count}.");

    var taskResult = Task.Run(async () =>
    {
        await _customScopedDbService.RetrieveNextAuditEntries();
        return true;
    }).GetAwaiter();

    taskResult.OnCompleted(() =>
    {
        _logger.LogInformation($"RetrieveNextAuditEntries(): Completed Successfully.");
    });
    ..
}
The scoped lifetime and awaiting of each call to the service method within the thread allows each transaction to use its own instance of DbContext and dispose of it separately from the application.
Lifetime of Web Request HTTP calls within an ASP.NET Application
Any request made to a Web application or Web API method will have its own instance separate from any other request.
When the request ends, the context of the HTTP request will be disposed.
Any HTTP request context is created within the startup as shown:
services.AddSingleton<IHttpContextAccessor, HttpContextAccessor>();
An instance of HttpContextAccessor can be accessed within an injected class instance by using the HttpContext property. With each request, the details of each HTTP context are unique for each request. Once the request ends, the context is disposed of. The HttpContext within the http accessor objects scoped to the current request.
An example of how we access an HTTP context is shown below:
public class UserContextService: IUserContextService
{
    private readonly HttpContext _context;

    public UserContextService(IHttpContextAccessor httpContextAccessor)
    {
        _context = httpContextAccessor.HttpContext;
    }

    public UserContextModel GetUserDetails()
    {
        var userContext = new UserContextModel();

        string userName = _context.Request.HttpContext.User.Identity.Name;

		// populate more user details from context .. details omitted

        return userContext;
    }
    ..
}
In the next section, I will explore usage of service instance lifetimes in ASP.NET Core Blazor server applications.
Lifetimes of DbContext Instances within ASP.NET Core Blazor Server Applications
There is difference in the way the lifetime of DbContext Service instances default on creation and managed between ASP.NET Core Web Applications and ASP.NET Core Blazor Server Applications.
With ASP.NET Core Web Applications, DbContext instances have a Scoped lifetime instance throughout each Web HTTP request.
With ASP.NET Core Blazor Server Applications, DbContext instances are not recommended to use a Scoped lifetime. The reason for this is that an ASP.NET Core Blazor application maintains its connection to the server through SignalR. The connection cannot safely maintain a persistent thread-safe DbContext connection throughout an application session as multiple requests within the application from different service instances would attempt to concurrently access the DbContext instance and corrupt it. Similarly, a Singleton scope will also lead to data concurrency access issues. With a Transient scope, instances of services would be created in the session and not disposed until the end of the application session, thus not utilizing memory usage efficiently.
The recommendation is to use one context per database operation, like a unit of work.
Below is how we would configure the database context instance in the startup sequence:
services.AddDbContextFactory<ApplicationDbContext>(options =>
    options.UseSqlServer(Environment.GetEnvironmentVariable("DB_CONN_STR")));
We then inject the database context factory into a Razor component or service using:
@inject IDbContextFactory<ContactContext> DbFactory
Note that the above is NOT creating a new data context instance for the Razor component, it is creating a factory where we can instantiate a new data context for EACH occasion a request is made to initialize and render the Razor component.
Within our component we use the injected data context as shown:
bool TaskIsBusy = false;

private async Task DeleteBookAsync(int ID)
{
    using var context = DbFactory.CreateDbContext();

    TaskIsBusy = true;

    if (context.Books is not null)
    {
        var book = await context.Books
            .FirstAsync(b => b.Id == ID);

        if (book is not null)
        {
            context.Books?.Remove(book);
            await context.SaveChangesAsync();
        }
    }

    TaskIsBusy = false;
}
In the next section I will show how to use transient lifetimes in ASP.NET Core web applications.
Using Transient Lifetimes in ASP.NET Core Web Applications
Transient lifetimes are the most short-lived of the three service lifetimes. A web request to a controller method or API controller method may consists of at least one service dependency and should have each class within the service dependencies instanced with a Transient lifetime.
Their purpose is to keep the service instances intact while a request is running as the request itself is in a Scoped lifetime. The service dependencies injected within the request are disposed of first before the request goes out of scope.
An example of how transient lifetimes work is an example below where I have the services BookService and UserContextService that are instanced with Transient lifetimes in the startup as show:
public class Startup
{
    public Startup(IConfiguration configuration)
    {
        Configuration = configuration;
    }

    public IConfiguration Configuration { get; }

    // This method gets called by the runtime. Use this method to add services to the container.
    public void ConfigureServices(IServiceCollection services)
    {
        ...
        services.AddLogging();
        ...
        services.AddTransient<IBookService, BookService>();
        services.AddTransient<IUserContextService, UserContextService>();
        ...
    }
    ...
}
The BookService class is a service class that is dependent on the UserContextService class, both of which are instanced with transient lifetimes:
public interface IBookService
{
    Task<List<BookViewModel>> GetBooks();
}

public class BookService: IBookService
{
    readonly ApplicationDbContext _db;
    private readonly ILogger _logger;

    public BookService(ApplicationDbContext db,
        IUserContextService userContextService,
        ILogger<BookService> logger)
    {
        _db = db;
        _userContextService = userContextService;
        _logger = logger;
    }

    public async Task<List<BookViewModel>> GetBooks()
    {
        List<BookViewModel> books = await _db.Books.ToList();
        return books;
    }
}
In the next section I will show how singleton service lifetimes are used on ASP.NET Core web applications.
Using Singleton Lifetimes in ASP.NET Core Web Applications
A Singleton Lifetime is used in scenarios where we create a single instance of a service that is active throughout the running of the application instance and is accessible from any web request.
One such scenario is the use of an application configuration which is used as a shared instance that contains the common application properties such as the application name, version, date created, copyright information, vendor details, and so on.
The scenario is shown below:
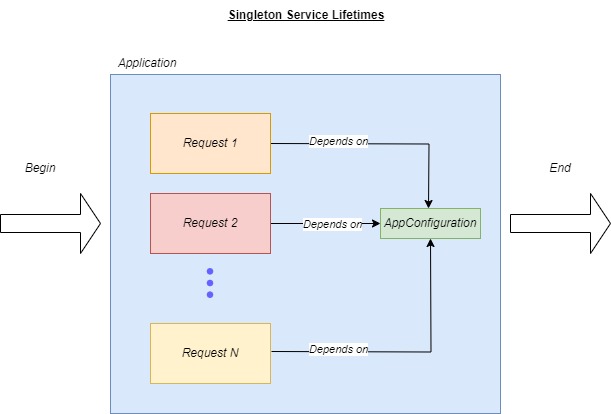
A typical example of Singleton service lifetime would be using a sealed class AppConfiguration to read in and store application settings as a single instance within the application.
Below is how we read settings values from the AppSettings section from the appSettings.json file and bind the values to the AppConfiguration object.
public class Startup
{
    public Startup(IConfiguration configuration)
    {
        Configuration = configuration;
    }

    public IConfiguration Configuration { get; }

    // This method gets called by the runtime. Use this method to add services to the container.
    public void ConfigureServices(IServiceCollection services)
    {
        ..
        services.Configure<AppConfiguration>(Configuration.GetSection("AppSettings"));
        ..
    }
}
Below is the interface and class for AppConfiguration:
using System;
using System.Collections.Generic;
using System.Linq;
using System.Threading.Tasks;

namespace BookLoan.Services
{
    public interface IAppConfiguration
    {
        string AppName { get; set; }
        string AppVersion { get; set; }
    }
}
namespace BookLoan.Services
{
    public sealed class AppConfiguration : IAppConfiguration
    {
        public AppConfiguration() { }
        public string AppName { get; set; }
        public string AppVersion { get; set; }
    }
}
Using the settings stored in the AppConfiguration instance is done by injecting a typed IOptions object through a constructor as shown:
public class BookService: IBookService
{
    …
    private readonly IOptions<AppConfiguration> _appConfiguration;

    public BookService( ... , IOptions<AppConfiguration> appConfiguration, …)
    {
        ..
        _appConfiguration = appConfiguration;
    }
	..

    public async Task<List<BookViewModel>> GetBooks()
    {
        ..
        string apiUri =  _appConfiguration.Value.UrlCatalogAPI
        ..
        // call the API
		..
    }
}
The above overview of the three service instance lifetimes has given us an understanding of how each can be used in different application development situations including when dealing with service class dependencies and data concurrency in ASP.NET Core, ASP.NET Core Blazor and .NET Core threading applications.
That is all for today’s post.
I hope you have found this post useful and informative.
Andrew Halil is a blogger, author and software developer with expertise of many areas in the information technology industry including full-stack web and native cloud based development, test driven development and Devops.

