Welcome to today’s post.
Today I will be showing how to build and configure a multi-image Docker container from your existing docker images.
As a starting point, if not familiar with how a basic Docker Container is created from a development environment, it would be helpful to refer to one of my previous posts, where I showed how to build a Docker Container within Visual Studio.
In addition, to get an idea of how application components (images) within our Docker container can be configured to work with other resources including databases and API services, you can refer to my other post where I show how to set environment variables within Docker Containers.
Characteristics of Multi-Image Docker Containers
When we combine our images into one container, each image container has the following characteristics:
- It has a self-contained network.
- It has a unique host port.
- It is accessible from other container services within the docker image.
Each container image can consist of many types of service, these can include:
- Web application.
- Web API service.
- Database service.
- Caching service.
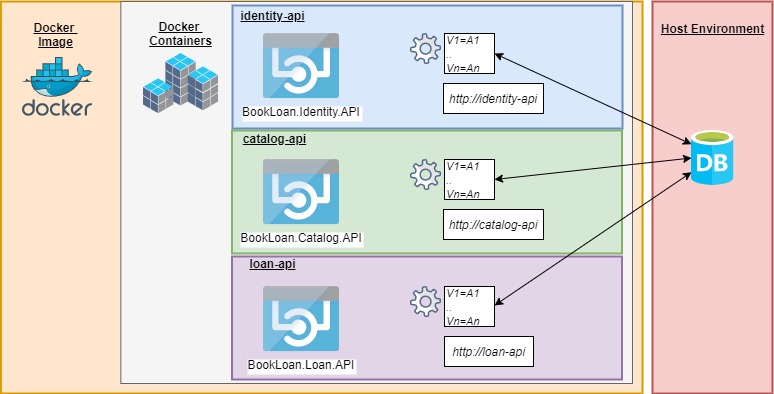
In the example I will be showing, I will be building a container that comprises of web API services that share data access to a database on the host. In some cases, we might include the database within the image as a data service for development or testing purposes, but in most environments the data service will be outside of the container in an external server. A diagram incorporating the above scenario is shown below:
In the remainder of this post, I will show the following tasks:
- Using the docker compose to build a container using existing images.
- Using environment variables to configure container services.
- Testing the container services.
Building a Multi-Image Container
First, I will show how to build a single image using docker compose. To build an API service into a docker image change to the project folder containing the docker-compose.yml script. This should be the folder one level up from the folder containing your Dockerfile. Then run the command:

docker-compose build
After the image is built, it will be assigned the “latest” tag.
To view images, run the command.
docker images
REPOSITORY      	TAG        IMAGE ID       CREATED            SIZE
bookloanloanapi   	latest     435a1a5610f0   9 hours ago        219MB
bookloancatalogapi	latest     2d8f8e29512d   12 hours ago       224MB
bookloanidentityapi latest     17b44736ac36   13 hours ago       219MB
After our images are build, we can combine them into a single image as container networked services.
We create a docker-compose script file that will contain the above images.
Including Environment Variables to Configure Container Services
Each container service will have its own network name, environment variables, host post and internal container port.
#docker-compose.yml (Base)
version: '3.4'
services:
  identity-api:
    image: bookloanidentityapi:${TAG:-latest}
    environment:
      - DB_CONN_STR=Server=172.x.x.x,1433;Database=aspnet-IdentityDb;User Id=xxxxx;Password=xxxxx;
    ports:
      - "5100:80"

  catalog-api:
    image: bookloancatalogapi:${TAG:-latest}
    environment:
      - DB_CONN_STR=Server=172.x.x.x,1433;Database=aspnet-BookCatalog;User Id=xxxxx;Password=xxxxx;
    ports:
      - "5110:80"

  loan-api:
    image: bookloanloanapi:${TAG:-latest}
    environment:
      - DB_CONN_STR=Server=172.x.x.x,1433;Database=aspnet-BookCatalog;User Id=xxxxx;Password=xxxxx;
      - URL_CATALOG_API=http://catalog-api:80/
    ports:
      - "5120:80"
For illustrative purposes I have explicitly included a connection string in the compose script. As a best practice you should include them in a separate environment file, which I showed how in a previous post.
In the above script the images with the ‘latest’ tag are all pulled from docker and a container is run with the specified environment variables. Running this script is done with the following command:
docker-compose up
When the script completes you will see that three containers are running:
Recreating bookloanmicroservices_catalog-api_1  ... done                                                                Starting bookloanmicroservices_loan-api_1       ... done
Recreating bookloanmicroservices_identity-api_1 ... done                                                                Attaching to bookloanmicroservices_loan-api_1, bookloanmicroservices_catalog-api_1, bookloanmicroservices_identity-api_1
catalog-api_1   | Hosting environment: Production
catalog-api_1   | Content root path: /app
catalog-api_1   | Now listening on: http://[::]:80
catalog-api_1   | Application started. Press Ctrl+C to shut down.
loan-api_1      | Hosting environment: Production
loan-api_1      | Content root path: /app
loan-api_1      | Now listening on: http://[::]:80
loan-api_1      | Application started. Press Ctrl+C to shut down.
identity-api_1  | Hosting environment: Production
identity-api_1  | Content root path: /app
identity-api_1  | Now listening on: http://[::]:80
identity-api_1  | Application started. Press Ctrl+C to shut down.
The container services catalog-api, loan-api and identity-api will be running from host ports 5110, 5120 and 5100 respectively. To be able to manually test the container service we can open the browser to the respective port and the swagger UI will show for the API service. For the catalog-api container we can use http://localhost:5110/index.html
To view the status of the containers, use the command:
docker-compose ps
or
docker container ls
Name                                 Command                    State     Ports
--------				             --------------	            -----     -------
bookloanmicroservices_catalog-api_1  dotnet BookLoan.Catalog.AP ... Up    0.0.0.0:5110->80/tcp
bookloanmicroservices_identity-api_1 dotnet BookLoan.Identity.A ... Up    0.0.0.0:5100->80/tcp
bookloanmicroservices_loan-api_1     dotnet BookLoan.Loan.API.dll   Up    0.0.0.0:5120->80/tcp
If the state shows ‘Up’ then the container has started successfully. If the state shows ‘Exit ..’ then check the environment variables correctly referencing a valid resource. The most common problem is a database connection referencing an invalid container network or an invalid external server or an invalid host IP network. An example of an exit state is shown in one of my previous posts on building docker images.
Testing Container Services
To test our containers, we can also use CURL command to make HTTP requests from our host environment:
Testing our identity API:
curl -X POST "http://localhost:5100/api/Users/token" -H "accept: */*" -H "Content-Type: application/json" -d "{\"userName\":\"test@bookloan.com\",\"password\":\"SomePwd123!\"}"
Output (truncated for brevity):
{
  "value": {
    "username": "test@bookloan.com",
    "token": "xyz"
  },
	…
}
Testing our book catalog API:
curl -X GET "http://localhost:5110/api/Book/List" -H "accept: application/json;odata.metadata=minimal;odata.streaming=true" -H "Authorization: Bearer xyz"
Output (truncated for brevity):
[
  {"id":1,"title":"The Lord of the Rings","author":"J. R. R. Tolkien", "yearPublished":1954, "genre":"fantasy", "edition":"0", "isbn":"654835", "location":"sydney", "dateCreated":"2019-11-05T00:00:00", "dateUpdated":"2020-12-14T15:13:35.2735839"},
	…
  {"id":13,"title":"Test Book 1","author":"Test Author 1", "yearPublished":2019, "genre":null, "edition":"1", "isbn":"1", "location":"sydney",
"dateCreated":"2020-07-26T19:33:05.68913", "dateUpdated":"0001-01-01T00:00:00"}
]
Testing our book loan API:
curl -X GET "http://localhost:5120/api/Loan/GetBookLoanStatus/1" -H "accept: */*" -H "Authorization: Bearer xyz"
Output (truncated for brevity):
{
  "status": "Available",
	…
}
In the above overview, you have seen how to implement a multi-image container using docker compose. We have also seen how to configure each container within the Docker image. This provides a starting point for the integration that the services within each of your container images require with other services (such as databases or external services) within your Docker container.
That is all for today’s post.
In a future post I will show how container API services can communicate using HTTP REST calls.
I hope you found today’s post useful and informative.
Andrew Halil is a blogger, author and software developer with expertise of many areas in the information technology industry including full-stack web and native cloud based development, test driven development and Devops.


