
Welcome to today’s post.
I will give an overview of how to upload CSV files into an Azure storage container.
In a previous post, I showed how to upload a CSV file to an Azure storage container using an SSIS package.
I will be using a slightly different approach: using the Azure Blob Storage API and C# to demonstrate this.
What do we know about blob storage in Azure?
- Every storage account in Azure has containers.
- Each container can contain blobs.
With blob uploads, we are not restricted to uploading unstructured images or media. We can also upload text files (including CSV files) and documents (including MS Office documents).
In this post, we will be uploading a CSV file into the blob container.
There are two main tasks that we will undertake to be able to upload the CSV file into an Azure blob container. These are:
- Establish the Azure storage connection endpoint.
- Implement a routine to use the Azure Blob Storage API to upload the CSV file.
I will explain the first step in the next section.
Determining the Azure Storage Connection Endpoint
Using the Azure storage will require obtaining the connection string to the Azure storage account.
This is done as follows.
Login to your Azure subscription.
Go to your Azure storage account.
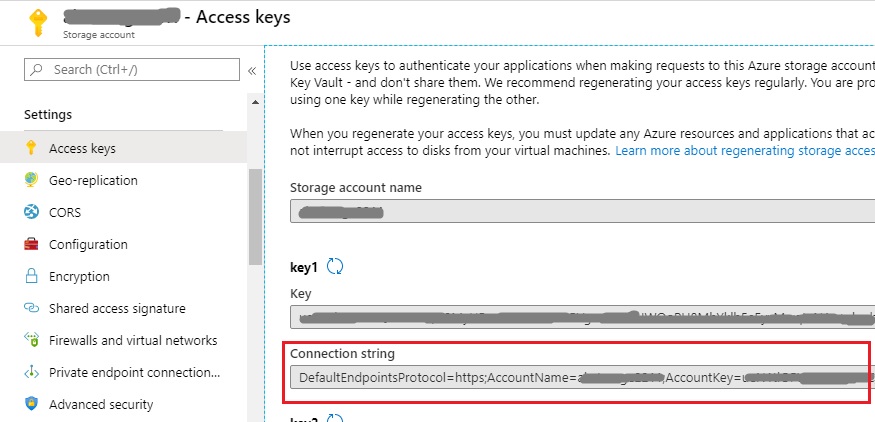
Open Access Keys.

Copy the Connection string key as shown:
Open a CMD prompt or Powershell.
Apply the command:
setx AZURE_STORAGE_CONNECTION_STRING "<storage account connection string>"
Close the CMD prompt / Powershell session.
Now that we have established the storage account endpoint, the next step is to write some code to upload the file into the Azure blob container. I will show how this is done in the next section.
Uploading the CSV file using the Azure Blob Storage API
Now open Visual Studio.
Create a new console project.
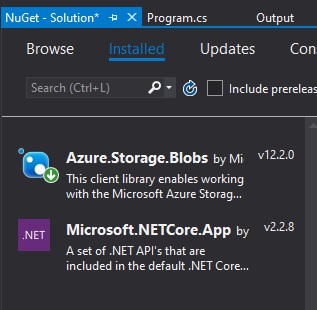
Add the NuGet package Azure.Storage.Blobs as shown:
The code to create a new container is shown:
string connectionString =
Environment.GetEnvironmentVariable( "AZURE_STORAGE_CONNECTION_STRING");

// Create a BlobServiceClient object which is used to create a
// container client
BlobServiceClient blobServiceClient = new BlobServiceClient(connectionString);

// Container name
string containerName = "bookloantriggerblobs";
bool bContainerExists = false;
Azure.Storage.Blobs.BlobContainerClient containerClient = null;
Azure.Storage.Blobs.Models.BlobContainerItem containerItem = null;

// Create the container and return a container client object
foreach (Azure.Storage.Blobs.Models.BlobContainerItem
blobContainerItem in blobServiceClient.GetBlobContainers())
{
       if (blobContainerItem.Name == containerName)
       {
              bContainerExists = true;
              containerItem = blobContainerItem;
              break;
       }
}

// Create or use existing Azure container as client.
if (!bContainerExists)
{
   containerClient = blobServiceClient.CreateBlobContainer(
containerName);
}
else
   containerClient = blobServiceClient.GetBlobContainerClient(
containerName);
Note that existence of existing containers should be checked or else an error will be returned from Azure.
Code to upload the CSV into the Azure container is shown:
// Create a local file in the ./data/ directory for uploading and
// downloading
string localPath = "./data/";
string fileName = "App Data - New Books.csv";
string localFilePath = Path.Combine(localPath, fileName);

// Get a reference to a blob
BlobClient blobClient = containerClient.GetBlobClient(fileName);

Console.WriteLine("Uploading to Blob storage as blob:\n\t {0}\n", blobClient.Uri);

// Open the file and upload its data
FileStream uploadFileStream = File.OpenRead(localFilePath);
await blobClient.UploadAsync(uploadFileStream);
uploadFileStream.Close();
Note that any existing blob with the same name is overwritten.
Also, ensure you have a subfolder \data in the application bin folder.
Create or copy a new CSV into the folder.
If you wish to upload the source file into a subfolder within the Azure blob container, then prefix the container with the folder name as shown:
string remotePath = "data";

// Get a reference to a blob
BlobClient blobClient = containerClient.GetBlobClient(remotePath + "/" + fileName);
Code to list blobs within the container is shown:
Console.WriteLine("Listing blobs...");

// List all blobs in the container
foreach (Azure.Storage.Blobs.Models.BlobItem blobItem in containerClient.GetBlobs())
{
   Console.WriteLine("\t" + blobItem.Name);
}
We then build and run the above solution, observing the output from the debug console. I will show how to verify the file has been uploaded in the Azure blob container in the next section.
Verifying the File has been Uploaded Successfully to the Blob Container
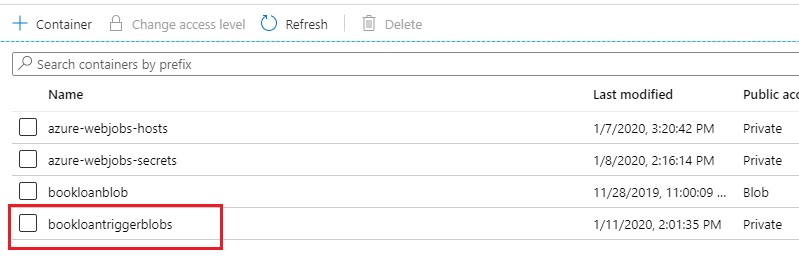
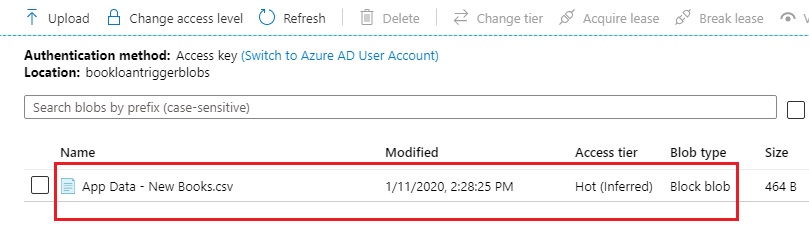
After running the above code, go back to the Azure portal and refresh the list of containers under the storage account. You should see an additional container displaying:
Drill into the container and you should see the CSV file created within the blob container:
(If you have uploaded into a subfolder within the blob container then the subfolder will be created:
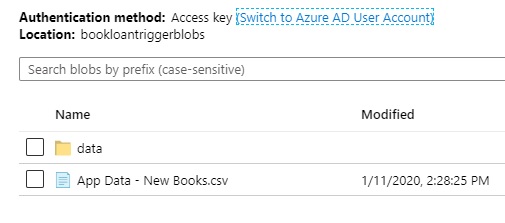
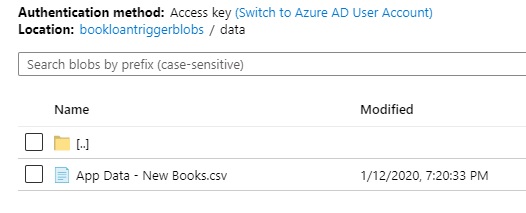
and drilling into the folder will show the uploaded file:
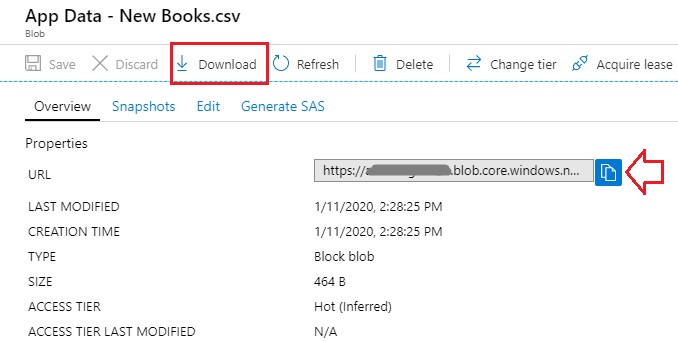
Click to inspect the properties with options to download, inspect the file or obtain the URL:
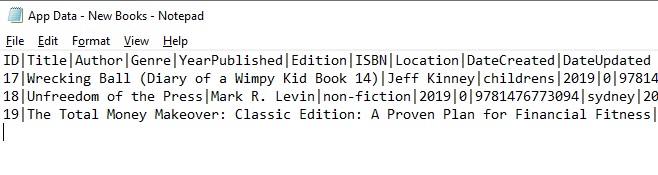
The last check we do is to compare the uploaded file is identical to the source CSV file on our local machine.
Selecting the Edit option shows the contents of the uploaded CSV file:
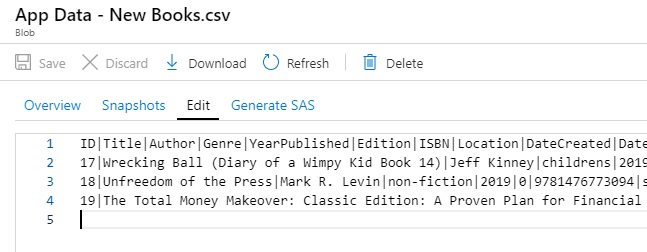
On the source file, the contents are as shown:
To retrieve the blob directly, the URL is of the format:
https://[storage account name].blob.core.windows.net/[blob name]/[file name] The upload has been successful!
With the above overview, you can upload many different file types to a blob container. Application use case include uploading images in a photo site or uploading documents in a file management system.
More details can be found on the Microsoft documentation as follows:
https://docs.microsoft.com/en-us/azure/storage/blobs/storage-quickstart-blobs-dotnetIn a future post I will discuss how we can use Azure Functions to check our Azure container blob for CSV files and upload them into an Azure SQL database.
That’s all for today’s post.
I hope this has been useful and informative.
Andrew Halil is a blogger, author and software developer with expertise of many areas in the information technology industry including full-stack web and native cloud based development, test driven development and Devops.

