
Welcome to today’s post.
In today’s post I will show you how to use the file compression utilities that are in the .NET library. Many of the useful compression utilities are available by including the System.IO.Compression namespace.
In the previous post, I showed how to use libraries with the System.IO and System.IO.Compression namespaces and the ZipFile class to implement basic file archiving.
In this post, I will show how to use the compression utilities to performs some useful yet basic file extraction operations. I will also show how to add files to an existing compressed ZIP archive.
Before we can make use of any file archiving and compression utilities, we will need to have ready a folder that contain at least one archive file that can be extracted and manipulated.
In one of my previous posts, I showed how to use the ZipFile.ExtractToDirectory() to download an in-memory ZIP archive stream through the Web API method. In this post, I will be using the same ZipFile method with a different overload to extract to a physical folder instead of an in-memory stream.
In the first section, I will show how to use the ZipFile and ZipArchive classes to programmatically extract file entries from within a ZIP file compressed archive.
Extraction from an Existing ZIP Archive to a Folder
As you may know, since .NET 8.0, there is a new static method in the ZipFile class which allows you to extract an existing ZIP archive file from a source ZIP compressed file to a destination folder:
ZipFile.ExtractToDirectory(sourceFile, destinationFolder);
We can use the above, however, what of if we wanted to count the number of files extracted in the same task?
We can do this however we would need to use a readable file stream, then create a ZipArchive object in read mode ZipArchiveMode.Read. We then count the entries in the archive using the Entries property, then all the ZipArchive member function ExtractToDirectory(), which will extract all archive file entries to the nominated solder.
The extraction method implementation is shown below:
/// <summary>
/// ExtractArchiveFile()
/// Extract archive file to nominated folder.
/// </summary>
/// <param name="fileName"></param>
/// <param name="destinationFolder"></param>
/// <returns></returns>
public async Task<FileExtractResponse> ExtractArchiveFile(string fileName, string
destinationFolder)
{
    var archiveFile = $"{UploadFolder}\\{fileName}";

    var archiveFileExists = System.IO.File.Exists(archiveFile);
    if (archiveFileExists == false)
        throw new IOException($"The archive file {archiveFile} does not exist.");

    if (Path.GetFileNameWithoutExtension(fileName) == destinationFolder)
        throw new IOException($"The archive file {fileName} and extract folder cannot have the same name.");

    var extractFolder = $"{UploadFolder}\\{destinationFolder}";

    int numEntries = 0;

    using (var streamSource =
        new System.IO.FileStream(archiveFile, FileMode.Open, FileAccess.Read))
        {
            _logger.LogInformation($"Archive {archiveFile}. Seek Status: {streamSource.CanSeek}");
            streamSource.Seek(0, SeekOrigin.Begin);
            ZipArchive zipArchive = new ZipArchive(streamSource, ZipArchiveMode.Read);
            numEntries = zipArchive.Entries.Count();
            zipArchive.ExtractToDirectory(extractFolder);
            zipArchive.Dispose();
        }
    FileExtractResponse fer = new FileExtractResponse
    {
        ArchiveFile = archiveFile,
        ExtractFolder = extractFolder,
        NumberOfExtractedEntries = numEntries
    };
    return fer;
}
One of the most important validations we need to make is to ensure that the source file name (excluding the extension) and destination folder name are NOT THE SAME! I will explain why in the next section.
The corresponding controller method is shown below:
[HttpPost("api/[controller]/ExtractArchiveFile")]
public async Task<IActionResult> ExtractArchiveFile(string fileName, string destinationFolder)
{
    var result = await _fileUtilityService.ExtractArchiveFile(fileName, destinationFolder);
    if (result == null)
    {
        return NotFound();
    }
    return Ok(result);
}
The API method with parameters for the source archive file and destination folder is shown below:
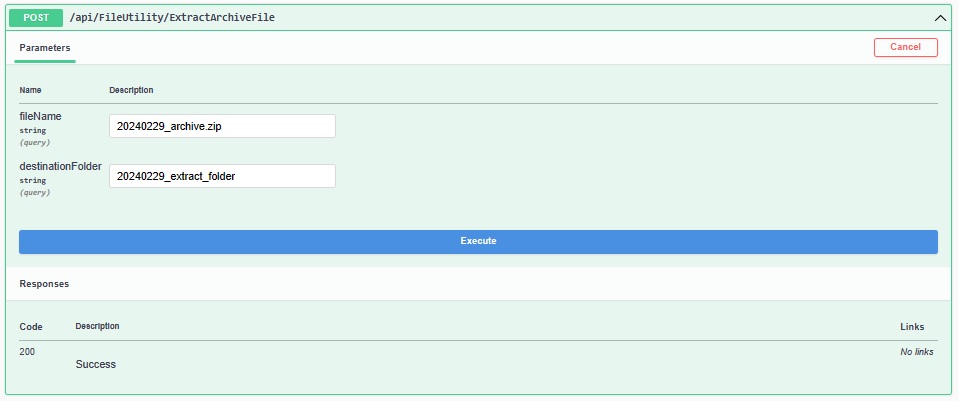
After execution of the API method, we get the following response:

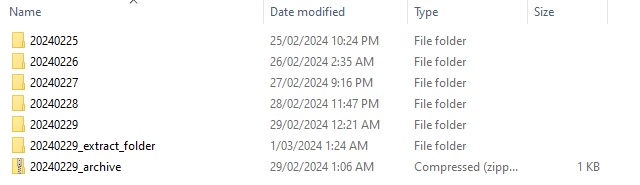
Going back to the upload folder in Windows Explorer, we can see the new extract sub-folder:
Opening the extract folder, we can see the extracted archive file entries in the new folder:

In the next section, I will go through an important consideration when extracting from an archive file to another folder.
The Golden Rule of File Extraction
As I mentioned in the previous section when covering file extraction, we need to ensure that the source file name (excluding the extension) and destination folder name are NOT THE SAME!
The reason for this is that the ZIP archive is essentially a valid folder that exists within a parent folder. If you try to extract to another folder with the same name within the same parent folder, you will cause Windows Explorer process to crash!
Even though you can create another folder within the same parent folder that has the same name as an existing archive ZIP file, the same does not apply when you attempt to extract to a folder with the same name as the ZIP archive.
In the next section, I will show how to open an existing ZIP archive file and add additional files to it.
Adding Files to an Existing ZIP Archive
In this section, I will show how to add a file to an existing compressed ZIP archive file.
In the previous section I showed how to compress an existing sub-folder into a new ZIP archive file with a comment. What I showed was how to use the new .NET 8.0 static ZipFile.CreateFromDirectory() method to create a new compressed file from an existing sub-folder.
I then showed how to open the same ZIP file in write mode, then updated the comment.
I will show how to open an existing ZIP archive file and add an existing file into the archive and leave the archive file in a compressed state.
In the implementation for adding file(s) to the ZIP archive, we need to ensure that the file we are adding, and the archive file are existing files.
We also would have to ensure that after we add the file to the archive, the archive is left in the compressed state.
The tasks we take to insert a file into an archive are as follows:
- Open the archive file in ReadWrite access mode. (Zip utilities require that the file is in a seekable state).
- Move to the beginning if the stream.
- Create a ZipArchive object on the file stream with update mode ZipArchiveMode.Update. This ensures the archive can be updated.
- Update the comment for the archive.
- Insert the file into the archive using CreateEntryFromFile().
- Dispose of the ZipArchive object.
To evaluate the overall file length and compression length, we would need to re-open the ZIP archive in a new stream, then iterate through each file entry in the Entries property and read the Length and CompressedLength properties respectively.
We then return the resulting file sizes from the method.
The implementation is below:
/// <summary>
/// AddFileToArchive()
/// Adds file to an existing archive file
/// </summary>
/// <param name="archiveFile"></param>
/// <param name="insertionFile"></param>
/// <returns></returns>
public async Task<FileArchiveResponse?> AddFileToArchive(string fileName,
 	string fileToAdd)
{
    var archiveFile = $"{UploadFolder}\\{fileName}";

    var archiveFileExists = System.IO.File.Exists(archiveFile);
    if (archiveFileExists == false)
        throw new IOException($"The archive file {archiveFile} does not exist.");

    var sourceFile = $"{UploadFolder}\\{fileToAdd}";
    var sourceFileExists = System.IO.File.Exists(sourceFile);
    if (sourceFileExists == false)
        throw new IOException($"The source file {fileToAdd} does not exist.");

    long archiveSize = 0;
    long archiveCompressedSize = 0;
    FileArchiveResponse far;

    // Open archive to add file entry and update comment..
    using (var streamSource =
        new System.IO.FileStream(archiveFile, FileMode.Open, FileAccess.ReadWrite))
        {
            _logger.LogInformation($"Archive {archiveFile}. Seek Status: {streamSource.CanSeek}");
            streamSource.Seek(0, SeekOrigin.Begin);
            ZipArchive zipArchive = new ZipArchive(streamSource, ZipArchiveMode.Update);
            zipArchive.Comment = $"Archive file {fileName} updated on {DateStringToday}.";
            zipArchive.CreateEntryFromFile(sourceFile, Path.GetFileNameWithoutExtension(sourceFile));
            zipArchive.Dispose();
        }

    // Re-open archive to read file lengths..
    using (var streamSource =
        new System.IO.FileStream(archiveFile, FileMode.Open, FileAccess.Read))
        {
            _logger.LogInformation($"Archive {archiveFile}. Seek Status: {streamSource.CanSeek}");
            streamSource.Seek(0, SeekOrigin.Begin);
            ZipArchive zipArchive = new ZipArchive(streamSource, ZipArchiveMode.Read);
            zipArchive.Entries.ToList().ForEach(x =>
            {
                archiveSize += x.Length;
                archiveCompressedSize += x.CompressedLength;
            });
            far = new FileArchiveResponse()
            {
                ArchiveComment = zipArchive.Comment,
                ArchiveFolder = String.Empty,
                ArchiveFileSize = archiveSize,
                ArchiveCompressedFileSize = archiveCompressedSize,
                NumberOfArchiveEntries = zipArchive.Entries.Count()
            };
            zipArchive.Dispose();
        }
    return far;
}
You can ask me: why didn’t I combine the summation/calculation of the archive file entries within the same using { … } block as the CreateEntryFromFile() method?? I will explain why I implemented it in the way I did in the next section.
First, I will go through the outputs after running the above method.
Before I can run the above method, I add the following controller API method:
[HttpPost("api/[controller]/AddFileToArchive")]
public async Task<IActionResult> AddFileToArchive(string fileName, string fileToAdd)
{
    var result = await _fileUtilityService.AddFileToArchive(fileName, fileToAdd);
    if (result == null)
    {
        return BadRequest();
    }
    return Ok(result);
}
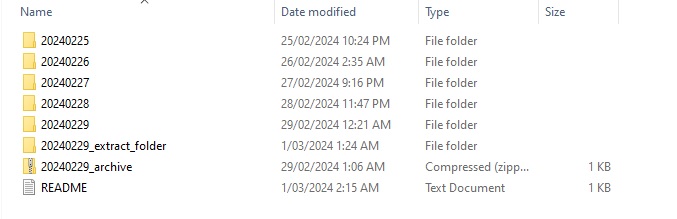
Before I can execute the file insertion, I create a new source text file that I will insert into the archive. It is placed in the same upload folder as shown:
The API method in the Swagger UI looks as follows with the two parameters for the existing source file and destination archive file:
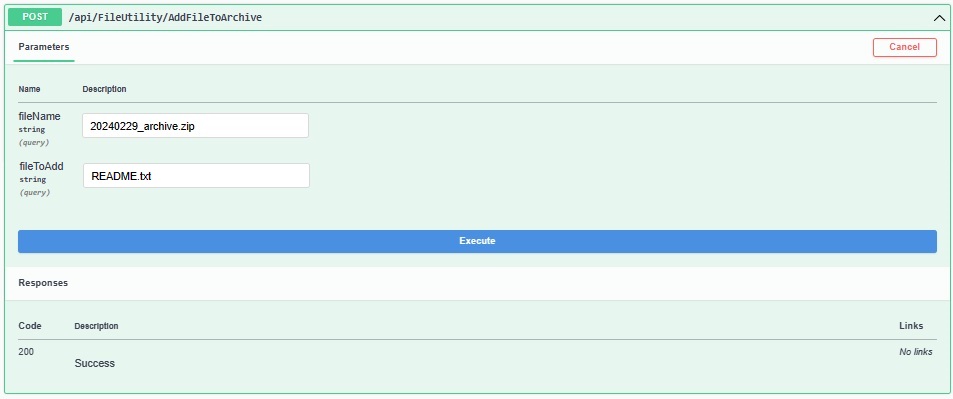
After the file insertion is executed, the response output is shown below:

What you will notice is that with the archive file, which has an additional file, has a size increase from its original size.
{
  "archiveFolder": "",
  "archiveComment": "Archive file 20240229_archive.zip updated on 2024-03-01.",
  "archiveFileSize": 248,
  "archiveCompressedFileSize": 105,
  "numberOfArchiveEntries": 3
}
Comparing the new file size to the original, which is below:
{
  "archiveFolder": "20240229",
  "archiveComment": "Archive file 20240229_archive.zip of upload subfolder 20240229.",
  "archiveFileSize": 224,
  "archiveCompressedFileSize": 81,
  "numberOfArchiveEntries": 2
}
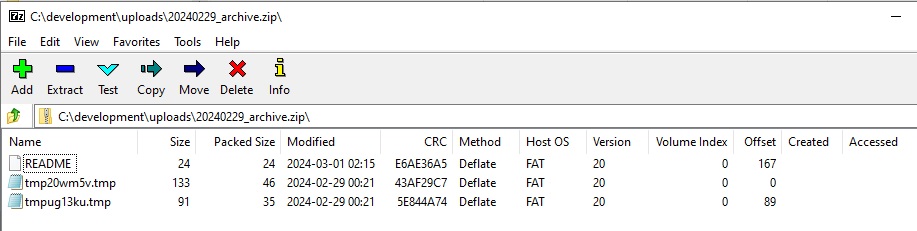
Opening the updated ZIP archive in Windows Explorer, we see the extra README.txt file in the archive:

To view more accurate file sizes, open it using an archive utility like 7-Zip. You can see the file sizes 24, 133, and 91 sum up to 248. The compressed file sizes 24, 46 and 35 sum up to 105. It shows that the library has used the Deflate compression method.
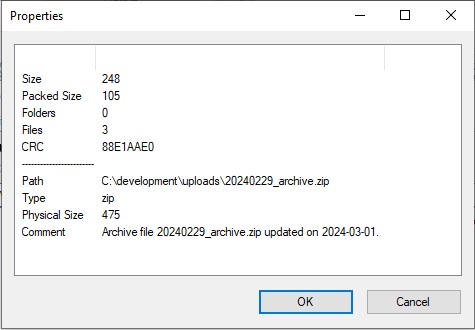
When we check the archive file properties, the updated comment shows, with the physical file size of the ZIP archive.
I will explain in the next section why accessing ZIP entry lengths and opening the ZIP entry don’t work so well.
A Nasty Problem to Avoid During Zip Entry Creation
In the previous section, I presented an implementation for adding an entry to the ZIP archive. In most cases, all we want to do is add the file to the ZIP archive, then close and dispose of the ZIP stream.
One sequence of tasks that we CANNOT DO within the same open ZIP stream is to read the Length and CompressedLength properties. The ZipArchive class utility does NOT ALLOW you to have the CreateEntryFromFile() open and read the lengths of ZIP entries in the same open file stream. It will give to the following error:
System.InvalidOperationException: Length properties are unavailable once an entry has been opened for writing.
   at System.IO.Compression.ZipArchiveEntry.get_Length()
   at File.Uploader.API.Services.FileUtilityService.<>c__DisplayClass24_0.<AddFileToArchive>b__0(ZipArchiveEntry x) in C:\development\File Management API\File Uploader API V0\File.Uploader.API\Services\FileUtilityService.cs:line 245
   at System.Collections.Generic.List`1.ForEach(Action`1 action)
To avoid this problem, you can do one of two workarounds:
- Read the file lengths before the CreateEntryFromFile() call.
- Separate into two stream calls, one with the CreateEntryFromFile() call, and the other stream to iterate and read lengths.
It makes more sense to read the lengths AFTER the file insertion, so I applied option 2 for the implementation.
In the above sections, we have seen how to perform the following file upload, download, and file compression and extraction tasks:
- File uploads to a file server.
- File downloads from a file server.
- Creation of a compressed ZIP extract file.
- Extraction of a compressed ZIP extract file to a folder.
- Adding files to an existing compressed ZIP extract file.
I explained how to make use of the new static ZipFile class method:
ZipFile.ExtractToDirectory()
Within .NET 8.0 to extract the contents of a compressed ZIP file archive to a folder.
That is all for today’s post.
I hope that you have found this post useful and informative.
Andrew Halil is a blogger, author and software developer with expertise of many areas in the information technology industry including full-stack web and native cloud based development, test driven development and Devops.

