
Welcome to today’s post.
In today’s post I will give an overview on how to unit test Angular UI components.
In previous posts I showed how to test Angular services and components using Protractor, Karma and Jasmine scripting. I also showed how to use test doubles and mocks to help us achieve the testing of services.
In today’s post I will go to an additional level of complexity by introducing testing UI components into the test specifications.
The Complexity of Testing Angular UI Components
Why are UI components more difficult to test than services?
The reason is that UI components are usually more complex than services and contain HTML elements that can vary dynamically during the Angular event lifecycle. For this reason, there are a few differences I will show to make this manageable.
When testing any component that requires user interaction, the most important part of the testing process that we need to get right is to be able to track the state of the component from the input, the data binding stage, user interaction stage, through to the resulting state.

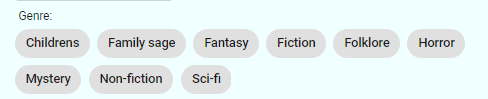
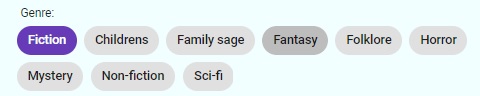
To illustrate UI component testing I will show a component that is a single selection control that when a list if chips are presented to the user, and one chip is selected, the selected chip is moved to the front of the list and highlighted. The resulting output is the value of the selected chip.
Below is the visual of the component in the initial state:
When a chip is selected, the resulting visual state is as shown:
The HTML to render the chips is shown below:
<mat-chip-list #chiplist aria-label="Single Selection">
    <mat-chip *ngIf="selectedItem" name="selectionItem" (click)="onSelect(item)">
      {{selectedItem}}
    </mat-chip>
    <mat-chip name="selectionItems" *ngFor="let item of selectableItems"
      	  (click)="onSelect(item)">
      {{item}}
    </mat-chip>
</mat-chip-list>
The HTML displays the selected chip, then followed by the remaining unselected chips in a list. The input and accessor for selected item is shown:
@Input('selectedItem')
set selectedItem(value: string)
{
    if (!value)
        return;
    this._selectedItem = value;
}
get selectedItem()
{
    return this._selectedItem;
}
The accessor for selected items is shown:
get selectableItems()
{
    return this._availableItems.filter(i => i.valueOf() !== this.selectedItem);
}
In the next section I will show how to make the interface component interactions testable.
Making Component Interactions Testable
To make component interactions testable, we can refactor the implementation of those interactions into their own methods and include these methods in the unit test run. In a previous post I discuss how code refactoring improves code quality. This makes the interface code cleaner and gives higher code coverage for the unit tests.
The component interaction is implemented as an event handler for the click event. The handler achieves the following state changes and output changes within the component:
- Trigger an output event through the selectionChange event emitter
- Set the selected item to the value of the selected chip element.
- Selects and sets focus to the first element of the component’s chips list.
The event handler for the click event is shown:
onSelect(value: any)
{
    this.selectionChange.emit(value);
    this._selectedItem = value;
    const firstChip = this.chipList['chips'].first;
    firstChip.select();
    firstChip.focus();
}
All outputs are directed through the event emitter:
@Output() selectionChange: EventEmitter<MatChipSelectionChange> =
  	new EventEmitter();
With the component, the chip lists within our component HTML template are stored within a list:
@ViewChild("chiplist", {static: false}) chipList = new QueryList<MatChip>();
As there is no straightforward way to programmatically select a UI chip list item, we implement a component method that allows us to select the nth item in the list. Again, this achieves the same behavior as the click event handler we saw earlier. The refactored code for the new method is shown below:
selectNthItem(item: number)
{
    const nthChip = this.chipList['chips']._results[item];
    if (!nthChip)
      return;
    nthChip.select();
    nthChip.focus();
    this.selectionChange.emit(nthChip.value.trim());
    this.selectedItem = nthChip.value.trim();
}
In our unit test specification file, we import the artifacts we need for testing: the angular testing library, Angular UI component and the component definition:
import { async, ComponentFixture, TestBed } from '@angular/core/testing';
import { MatChipsModule } from '@angular/material';
import { SingleSelectGroupComponent } from './single-select-group.component';
Our test bed configuration is setup, and we ensure that component binding occurs before each test is executed:
describe('SingleSelectGroupComponent', () => {
    let component: SingleSelectGroupComponent;
    let fixture: ComponentFixture<SingleSelectGroupComponent>;

    beforeEach(async(() => {
      TestBed.configureTestingModule({
        declarations: [ SingleSelectGroupComponent ],
        imports: [ MatChipsModule ]
      })
      .compileComponents();
}));

beforeEach(() => {
    fixture = TestBed.createComponent(SingleSelectGroupComponent);
    component = fixture.debugElement.componentInstance;
    fixture.detectChanges();
});
We then test the following cases:
Ensure that inputs we pass into our component can be retrieved through the accessors
The chip items we set as available items are returned as same available items:
it('should set and get available chip items', (() => {
    const items = ['apples', 'oranges', 'bananas'];

    component.availableItems = items;
    const result = component.availableItems;

    expect(result).toEqual(items);
}));
The selected chip item we set is returned as the same selected chip item:
it('should set and get selected chip item', (() => {
    const items = ['apples'];

    component.selectedItem = items[0];
    const result = component.selectedItem;

    expect(result).toEqual(items[0]);
}));
Ensure that user selection event triggers the output emitter
When selecting an item from the chips, the emitter is output once:
it('should emit event', () => {
    const items = ['apples', 'oranges', 'bananas'];
    component.availableItems = items;

    const pressSpy = spyOn(component['selectionChange'], 'emit');

    const event = { data: '0' };

    fixture.detectChanges();

    component.onSelect(event);

    expect<any>(pressSpy).toHaveBeenCalledWith(event);
    expect(pressSpy).toHaveBeenCalledTimes(1);
  });
Test the empty edge case when the component list has no chips
When the chip list is empty, selecting any item returns no selection (undefined):
it('empty list gives no selected chip', () => {
    component.availableItems = [];
    component.selectedItem = "";
    fixture.detectChanges();

    component.selectNthItem(0);
    const result = component.selectedItem;

    expect(result).toBeUndefined();
});
Test the user item selection sets the first item as the selected item
When selecting the last item in the chips list, the selected item is now the first item in the chips list:
it('selected chip is now first item', () => {
    const items = ['apples', 'oranges', 'bananas'];

    component.availableItems = items;
    component.selectedItem = items[2];
    fixture.detectChanges();

    component.selectNthItem(0);
    const result = component.selectedItem;

    expect(result).toEqual(items[2]);
});
Note that when we wish to force our component to bind the internal data from within our component to our HTML view, we run the following command:
fixture.detectChanges();
In this case after the setting of selected item, the rendering of the HTML causes the selected item to be the first item in the chip list. Once this desired UI change occurs (as it would in our UI user interaction), the remaining test assertions can be applied to our component to determine validity.
To ensure your unit test for a UI component is successful, ensure that the following goals have been achieved:
- All user component interaction tests (such as clicks, selections etc.) have been implemented.
- Each internal component method is covered by each unit test.
- As many edge cases such as the empty list or container are tested.
- Code within the component has been refactored to avoid unnecessary code duplication and test coverage for all component code is maximized.
That’s all for today’s post.
I hope you found this post helpful and informative.
Andrew Halil is a blogger, author and software developer with expertise of many areas in the information technology industry including full-stack web and native cloud based development, test driven development and Devops.

