
Welcome to today’s post.
In today’s post I will show how to add support for Docker containers into your .NET Core application.
Before I show how to enable Docker support in .NET Core applications, I will briefly explain what a Docker container is. Then I will explain some of the benefits of using Docker with .NET Core applications.
An Overview of Docker Containers
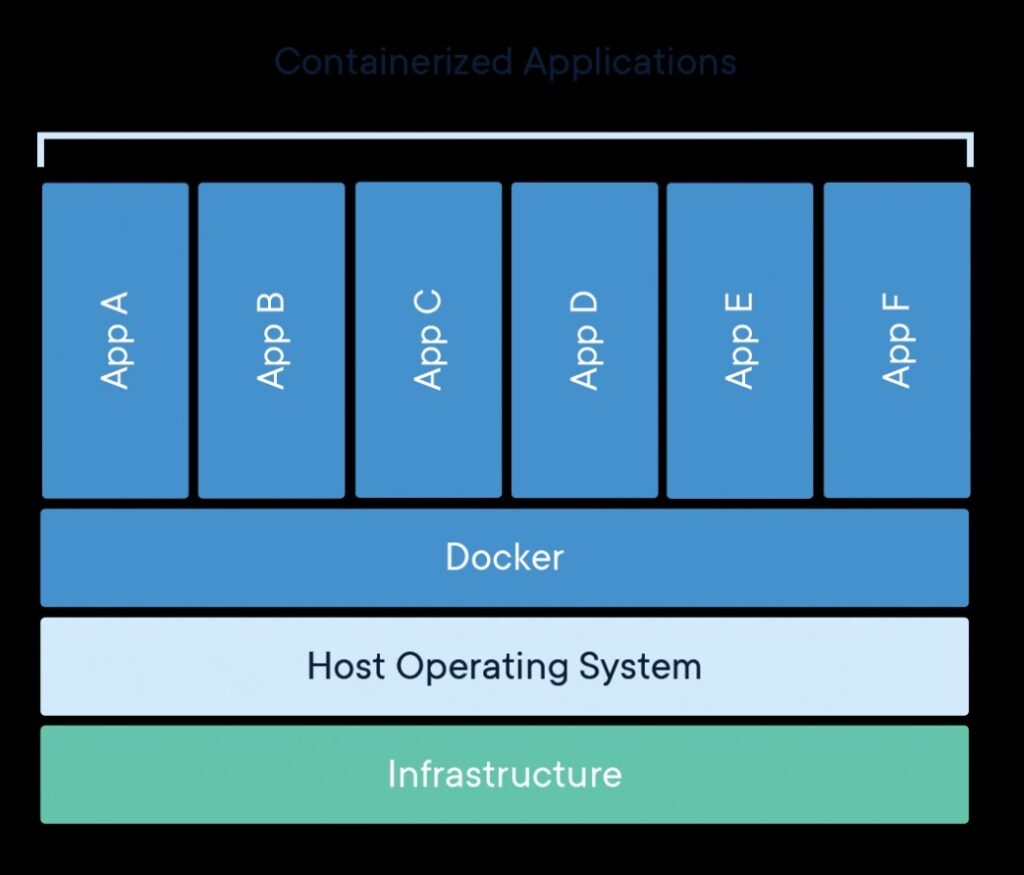
A Docker container is a self-contained collection of images that consist of applications, libraries, services, frameworks, and other necessary dependencies that you require for the deployment of your system. The self-contained environment of a Docker container is what makes it ideal for building and deploying systems and their dependencies as a self-contained environment unit a continuous integration in deployment within a DevOps process.
Below is the overview of how a Docker application is contained within the host OS:
In the next section I will explain the benefits of using Docker containers.
What are the Benefits of Using Docker Containers?
There are many benefits with using Docker for your applications. These include:
- Containing your images, which can include applications, databases, services into a manageable, portable group.
- Making testing and deployment of your application into the cloud easier to manage, maintain, and deploy.
- Lowering cost of infrastructure and storage by storing application images into containers that contain only the deliverables needed to run the application and no OS licensing overheads.
- Lower storage than VMs, which contain both the OS image and application deliverables.
- Allowing your .NET Core application OS independence with a choice Windows and Linux OS images.
- Compatibility with the major cloud providers Azure, AWS, GCP.
- Compatibility with GitHub application versioning and triggered builds.
Enabling Docker Support in a .NET Core Application
I will explain how to enable Docker support in a .NET core application.
In the example below, I will use the Linux option as it is currently a more stable implementation than the Windows container.
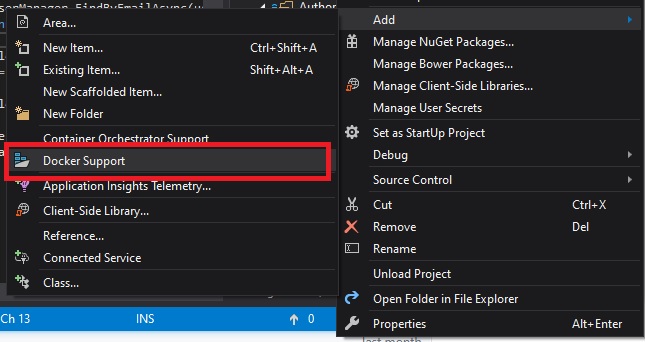
In your solution, select the project, right-click and select the Docker Support context menu option as shown:
To enable container orchestration, select the Container Orchestrator Support context menu option above the Docker Support option.
Next, select Linux as the file OS option for docker.
On the next screen, select Docker Compose as the Container Orchestrator support option.
On the next screen, select Linux as the target OS option for Orchestrator.
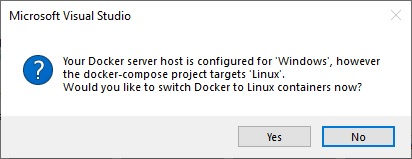
If you are on a different OS to the one selected, then the following question will be asked to confirm a switch to the same OS as your application docker configuration…
Note: Switching docker container OS can also be done from command line:
C:\Program Files\Docker\Docker\DockerCli.exe -SwitchDaemonOnce you have enabled docker support, the image dependencies which include the .NET Core libraries will be pulled from the Microsoft site.
The images will be downloaded to your machine, which could take up to half an hour depending on network bandwidth.
Next, your container image will be run.
Troubleshooting Issues During the Running of the Container
If you experience this error during launching:
Launching failed because the directory ‘/remote_debugger’ in the container is empty. This might be caused by the Shared Drives credentials used by Docker Desktop being out of date. Try resetting the credentials in the Shared Drives page of the Docker Desktop Settings and then restarting Docker.Then proceed as follows:
Open Docker desktop settings.
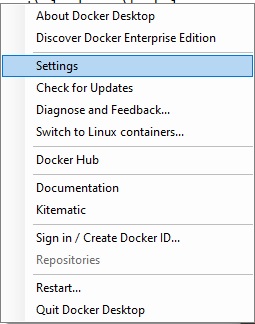
Reset the shared drives credentials:
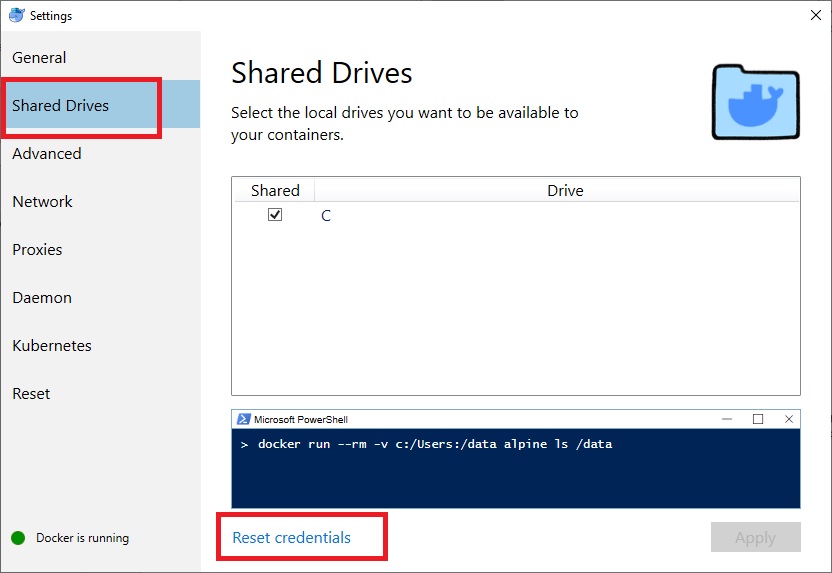
(See the GitHub issue https://github.com/Microsoft/DockerTools/issues/37 that describes the above workaround.)
After your docker compose has created the image, you can verify it’s existence from the CMD prompt:

Now try re-running the application under Docker or Docker Compose.
If you get the following exception:
“LocalDB is not supported on this Platform.”
Then you will need to make a change to application Startup.cs and amend the configuration database connection server IP address to either the docker IP address (if the database is contained within the docker image) or the host IP address (when the database is running on the host machine).
In your ConfigureServices() method just before you set the connection string for your application, You will need to enter in code as shown to detect if the application is running as a docker image container:
bool isInDockerContainer = (Environment.GetEnvironmentVariable("DOTNET_RUNNING_IN_CONTAINER") == "true");
string connStr = isInDockerContainer ? "DOCKERconnstr" : "connstr";
// Obtain configuration settings
var connection = Configuration.GetConnectionString(connStr);
services.AddDbContext<MyDbContext>
    (options => options.UseSqlServer(connection));
When running the .NET Core application, the environment variables show the container status of the application:

Also, inside your appsettings.json (or whatever your application configuration file is called), enter in an additional connection string to define the docker database image:
"DOCKERconnstr": "Server=[your host machine IP address / docker NAT address / remote server address],1433;Database=[Database Name];User Id=[User Account];Password=[Password];", If you are running the application database from outside the Docker network, then use the host machine address. This can be obtained using ipconfig.
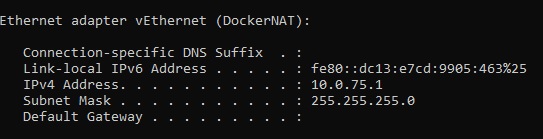
If you are running the application database as a container image within the Docker network, then use the DockerNat address. Again, this can be obtained from ipconfig and run from the command prompt as shown:
Run the application again.
The docker hosted application should run under the default browser in the URL as shown:

How is the Docker application container IP address obtained?
I will show you how this is obtained in the next section
Getting the IP Address of the Docker Container
Note: the IP address of the running image should be identical to the address within the PORTS column after running docker command:
docker ps

OR if you run:
docker inspect [container id]
where [container id] is the container name in column CONTAINER ID in the output from the previous command.
"NetworkSettings": {
...
   "Ports": {
      "80/tcp": [
      {
         "HostIp": "0.0.0.0",
         "HostPort": "32768"
      }
      ]
},
Troubleshooting Database Connection Issues
I will go through one two common issue that are common when troubleshooting database connection issues:
SQL Network Instance Issue
If you get the following error:
"A network-related or instance-specific error occurred while establishing a connection to SQL Server. The server was not found or was not accessible. Verify that the instance name is correct and that SQL Server is configured to allow remote connections. (provider: TCP Provider, error: 40 - Could not open a connection to SQL Server)"Then check the IP address of the database connection string.
If you are running the database outside of the container then the IP address is the address of the database server machine name. In a local development environment this would be the IP address of your machine name that is hosting the docker container.
The Local DB Issue
If you have tried running the docker image using an SQL Express local database with the following runtime error:
"LocalDB is not supported on this Platform."Then you can use SSMS to attach a copy of the express database to your non-express SQL server (e.g. SQL development edition) and connect to the non-express database by using your machine IP address within the docker container.
That’s all for this post. I hope you have found it informative.
In future posts, I will expand on how to use Docker with versioning control systems and cloud deployment.
Andrew Halil is a blogger, author and software developer with expertise of many areas in the information technology industry including full-stack web and native cloud based development, test driven development and Devops.

