Welcome to today’s post.
Today I will discuss form validations in reactive implemented Angular forms.
In a previous post I showed how to use validators in template implemented Angular forms.
I will be giving an overview of the following areas of reactive form validations:
- Built-in validations
- Preventative form validations and non-preventative form validations
- Control accessors for reactive forms
- Custom validations
Before I show how to implement the above, I will show how to setup our form components with the form builder and validation libraries.
FormBuilder and Validators Libraries
With the Angular reactive forms, we require the FormBuilder and Validators classes to be imported:
import { FormBuilder, Validators } from '@angular/forms';
We then declare the form group using FormBuilder with validators:
bookForm: any;

constructor(private api: ApiService, private lookupService: LookupService,
    private router: Router, private fb: FormBuilder) {
      this.initForm(fb);
    }

private initForm(fb: FormBuilder) {
    this.bookForm = fb.group({
      title: ['', Validators.required],
      author: ['', Validators.required],
      yearPublished: [0, Validators.required],
      edition: ['', Validators.required],
      isbn: ['', Validators.required],
      location: ['', Validators.required],
      genre: ['', Validators.required]
    });
}
In each form control we can include in-build validators as well as any custom validators. These are specified as an array.
On the HTML script we need to declare the form as a form group with the FormGroup instance bookForm we declared in the component:
<form [formGroup]="bookForm">
Then each form control is declared with a formControlName attribute to link the HTML control definition back to the form group we defined in the component class:
<div class="form-group">
    <label for="location">Title:</label>
    <input name="title"
        class="form-control col-sm-6" placeholder="Title"
            placement="right" ngbTooltip="Title" formControlName="title">
</div>
Notice that we do not need to bind our control to the model using the [(ngModel)] nor do we need to export the NgModel directive into a template variable. If we try binding our form control to ngModel and export ngModel in a running form we will get the following warning:
It looks like you're using ngModel on the same form field as formControlName.
    Support for using the ngModel input property and ngModelChange event with
    reactive form directives has been deprecated in Angular v6 and will be removed
    in Angular v7.
In the next section, I will show how to use built-in form validations.
Built-in Validations
The other difference you can notice is that the validation attributes do not need to be declared in the HTML input field tag, they are automatically inferred from the form control group’s field instance declared validations. The required attribute is replaced with the built-in Validators.required validator attached to the title form control field.
As we can see, with reactive forms the binding model is easier to implement on the HTML side, even though there is a need to create some coding overhead to declare the fields in the component beforehand.
We can be quite flexible with the validators in the reactive model. For example, with a numeric field we can set the limits programmatically, which we could not in the templated form validations:
yearPublished:
    [0,
      [Validators.required,
       Validators.min(1000),
       Validators.max(currentDate.getFullYear())
      ]
    ],
Reactive form validations are synchronous functions that return a value immediately, so they are required to be wrapped inside of an array as the second argument of a FormControl instantiation as they are synchronous functions. Without the array they will be treated as asynchronous functions (as we do with templated form validations) and the following error will occur:
ERROR Error: Uncaught (in promise): Error: Expected validator to return Promise or Observable.
Error: Expected validator to return Promise or Observable.
If we wish to use the validation functions asynchronously, then the functions will need to be declared as the third argument in the FormControl instantiation. Form validations are executed with synchronous validations running first then if they all pass, asynchronous validations follow.
Provided the validators are declared in the form group instance, they are accessible within the HTML as a condition:
<div *ngIf="bookForm.controls.yearPublished.invalid &&
(bookForm.controls.yearPublished.dirty ||
bookForm.controls.yearPublished.touched || submitted)"
class="alert alert-danger">
<div *ngIf="bookForm.controls.yearPublished.errors.required">
Year Published is required.
</div>
<div *ngIf="bookForm.controls.yearPublished.errors.min">
Year Published must be at least 1000.
</div>
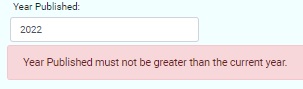
<div *ngIf="bookForm.controls.yearPublished.errors.max">
Year Published must not be greater than the current year.
</div>
</div>
When the form is run the build-in numeric validation should work as expected to check numeric input fields:

With numeric validations that we have programmatically implemented limits for the validation should also work as expected:
In the next section, I will show how to implement preventative and non-preventative form validations.
Preventative and Non-Preventative Form Validations
To display the validation errors, we use similar condition to our template form. In this case, the fields are accessible through the [form group instance].controls array constructed from the FormBuilder group:
<div *ngIf="bookForm.controls.title.invalid && (bookForm.controls.title.dirty
   	|| bookForm.controls.title.touched || submitted)" class="alert alert-danger">
    <div *ngIf="bookForm.controls.title.errors.required">
        Title is required.
    </div>
    <div *ngIf="bookForm.controls.title.errors.minlength">
        Title length must be at least 2 characters.
    </div>
</div>
I discussed submission prevention in the previous post on template forms validation so please refer that for how achieved that.
Control Accessors for Reactive Forms
As we have seen, with reactive forms we no longer require the use of the exported ngModel directive for each control. We can also simplify access to each of our form controls from the HTML view by using get accessors.
get title() { return this.bookForm.get('title'); }
get author() { return this.bookForm.get('author'); }
get yearPublished() { return this.bookForm.get('yearPublished'); }
get isbn() { return this.bookForm.get('isbn'); }
get location() { return this.bookForm.get('location'); }
get edition() { return this.bookForm.get('edition'); }
With get accessors, we can replace all [form instance].controls references with the control name itself:
<div *ngIf="title.invalid && (title.dirty || title.touched || submitted)"
  	 class="alert alert-danger">
    <div *ngIf="title.errors.required">
        Title is required.
    </div>
    <div *ngIf="title.errors.minlength">
        Title length must be at least 2 characters.
    </div>
</div>
Custom Validators
With reactive forms, custom validators require less overhead to implement as they do not require directives to be used within the HTML input form control definition.
All we require is to implement a custom validation function for the control we wish to validate.
We also need to declare the custom validator within our FormGroup form control instance’s validators array. There is no longer a need to include a maximum and minimum validator as these are now encapsulated within the validator function:
this.bookForm = fb.group({
    title: ['', Validators.required],
    author: ['', Validators.required],
    yearPublished: [
        0,
        [
            Validators.required,
            publishedYearValidator()
        ]
    ],
    edition: ['', Validators.required],
    isbn: ['', Validators.required],
    location: ['', Validators.required],
    genre: ['', Validators.required]
});
The validation function which checks the control value is within bounds is shown below:
export function publishedYearValidator(): ValidatorFn {
    return (control: AbstractControl): {[key: string]: any} | null => {
      const currDate = new Date();
      const isValidPubYear = control.value && control.value.length > 0 ?
        control.value < currDate.getFullYear() &&
        control.value >= 1000: false;
      return !isValidPubYear ? {invalidPublishedYear: {value: control.value}} : null;
    };
}
Displaying validation error messages to the user is similar to what we have with built-in validators:
<div *ngIf="yearPublished.invalid && (yearPublished.dirty ||
yearPublished.touched || submitted)" class="alert alert-danger">
<div *ngIf="yearPublished.errors.required">
Year Published is required.
</div>
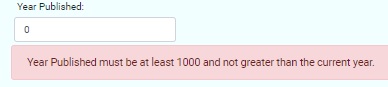
<div *ngIf="yearPublished.errors.invalidPublishedYear">
Year Published must be at least 1000 and not greater than the current year.
</div>
</div>
The last name within the fully-qualified name of our custom validation must match the key within the JSON object returned by our validation function:
return !isValidPubYear ?
       {invalidPublishedYear: {value: control.value}} : null;
When the form is run and we attempt to enter an invalid value, the custom validator is triggered detecting an invalid input:
Unlike a template-based validator that needs a directive, we don’t need to declare a reactive form custom validation function within our application module as that is exported and visible to our component code.
That is all for today.
I hope you found this post useful and informative.
Andrew Halil is a blogger, author and software developer with expertise of many areas in the information technology industry including full-stack web and native cloud based development, test driven development and Devops.