Welcome to today’s post.
I will be discussing how to implement JWT authentication in your .NET Core Web API client.
In a previous post I showed how to implement an identity server Web API, which produces JWT bearer tokens.
The most useful practical example of utilizing JSON web tokens from an identity server is to provide authenticated access to Web API methods.
I will show how we utilize the secure web tokens to gain access to our Web API.
I will go through the steps of setting up JSON web token authentication in a .NET Core application. I will also show how to add a secret to the application so that signing keys can be generated before requested tokens can be authenticated. I will then show how to decorate a web API to protect it with authorization from the web token.
Setup of JSON Web Token Authentication in .NET Core
To setup JSON web token authentication in a .NET Core application, we first create a new Web API .NET Core application in Visual Studio.
In Startup.cs, include the following namespaces:
using Microsoft.AspNetCore.Authentication.JwtBearer;
using Microsoft.IdentityModel.Tokens;
In ConfigureServices() insert the following to setup JWT authentication middleware:
services.AddAuthentication(JwtBearerDefaults.AuthenticationScheme)
.AddJwtBearer(
       options =>
       {
       	options.TokenValidationParameters = new TokenValidationParameters
            {
              	ValidateIssuerSigningKey = true,
                IssuerSigningKey = new SymmetricSecurityKey(
                   Convert.FromBase64String(
                   Configuration.GetSection(
                      "AppSettings:Secret").Value)),
                ValidateIssuer = false,
                ValidateAudience = false
            };
       });
Adding a Secret to Our Application
We will need to generate a secret string and place that within our app settings file. The secret is what we use to generate our signing key. The secret is unique to our authorization service and can be shared with each client that uses our authorization service. As stated in the OAuth 2.0 Authorization Framework RFC6749 (https://tools.ietf.org/html/rfc6749), the secret should NOT be the sole method of authentication. You should also use tokens and credential (username and password) enforced security.
To generate a secret, you can use any algorithm that gives a random series of numbers and convert these to a string. An example is shown below:
RandomNumberGenerator random = new RNGCryptoServiceProvider();
byte[] buffer = new byte[length];
random.GetBytes(buffer);
string randomtext = Convert.ToBase64String(buffer);
return randomtext;
Note: Ensure that you use the same encoding of the secret in your Web API service as the Identity service that validates your JWT tokens. In this case we are using Base 64.
Protecting a Web API with the Authorize Attribute
To protect our Web API methods in our API controllers, we use a variation of the [Authorize] attribute as shown:
[HttpGet("api/[controller]/List")]
[Authorize(AuthenticationSchemes = JwtBearerDefaults.AuthenticationScheme)]
public async Task<List<BookViewModel>> List()
{
  try
  {
    List<BookViewModel> bvm = new List<BookViewModel>();
     var books = await _db.Books.ToListAsync();
     return books;
   }
   catch (Exception ex)
   {
     ..
     throw;
   }
}
For development purposes, you can either host the Web API using IISExpress or IIS. In a previous post I showed how to setup your web application or service running within Visual Studio to launch under IIS.
Testing the Protected Web API
Now that we have implemented our JWT bearer authentication client within our Web API, our next task is to test it. We do this in the following steps:
- Run the Web API service in VS 2017 (under IIS or IISExpress) context.
- Send the POST request through POSTMAN to obtain a new token
- Create a GET request through POSTMAN with the authorization bearer token.
- Set breakpoint in the HTTP GET method.
- Submit the GET request from POSTMAN.
- When breakpoint hits. Add watch.
Check the bearer token has populated the Request.Header.
Build and run your Web API within visual studio.
The Web API will run under localhost as a blank page.
Open the POSTMAN utility.
Create an HTTP POST request to your API token provider:
http://localhost/BookLoan.Identity.API/api/Users/AuthenticateEnter the body of the request as JSON:
{
  "userName": "admin@bookloan.com",
  "password": "P@ss123"
}
Hit Send. If successful, your JWT token provider will respond with a JSON containing the token:
{
    "username": "admin@bookloan.com",
    "token": "eyJhbGciOiJIUzI1NiIsInR5cCI6IkpXVCJ9.eyJ1bmlxdWVfbmFtZSI6ImFkbWluQGJvb2tsb2FuLmNvbSIsIm5iZiI6MTU4MTQxMDkxMCwiZXhwIjoxNTgxNDEyNzEwLCJpYXQiOjE1ODE0MTA5MTB9.sUTaPk0a4z-I0n7uU0UthphdSnoZClMkizV4NafYBgY"
}
Copy the lengthy token to your clipboard.
Create a HTTP GET request to your Web API service:
http://localhost/BookLoan.Catalog.API/api/Book/ListIn the Headers tab add a new key Authorization with the token to the Headers collection as shown:
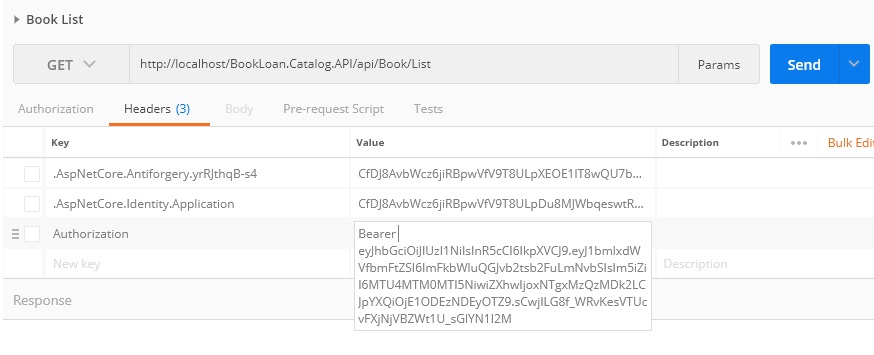
Ensure the value for the authorization key is formatted as follows:
Bearer[Space][Token]
Where
[Space] is a single white space.
[Token] is the token you copied earlier from the token provider response.
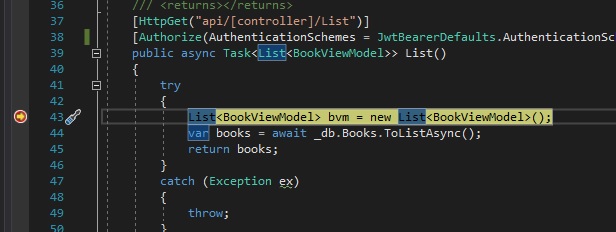
In your Web API project within Visual Studio set a breakpoint within the Web API method in your controller.
In your HTTP GET request in POSTMAN hit the SEND button.
Wait a few seconds and if successfully authenticated, the breakpoint in your controller method will be hit as shown:
Since the breakpoint has been hit and you have been able to access the protected method in the API controller, the bearer token should have been validated by the JWT middleware.
We can check the authentication header details by creating a watch on Request.Headers as shown:
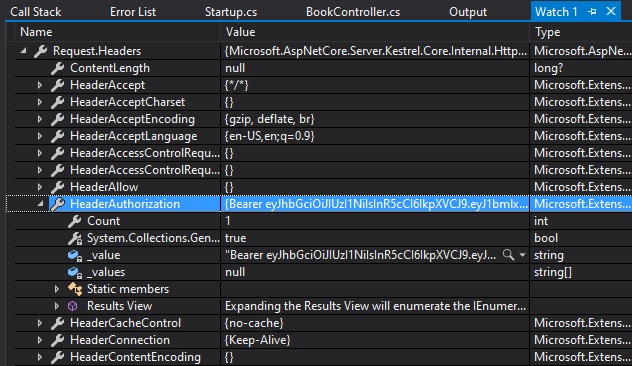
The property Request.Headers.HeaderAuthorization will be set to a value with the format:
Bearer [space] [bearer token]The authorization header can also be inspected with the property:
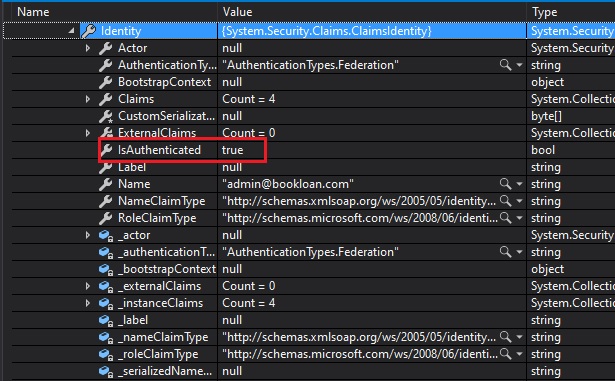
Request.Headers["Authorization"]Now add a watch for Request.Context.User. You will notice that the claims and identity will be populated as shown:
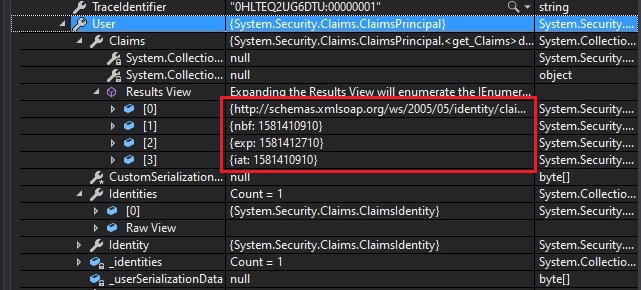
Expanding the identity property will confirm the context has been authenticated:
We have successfully managed to authenticate and protect our Web API method using JWT tokens.
In a future post I will show how to utilize our JWT token within our Web API service, and also basic troubleshooting when configuring and / or testing our token authenticated Web API.
That’s all for this post.
I hope you have found this useful and informative.
Andrew Halil is a blogger, author and software developer with expertise of many areas in the information technology industry including full-stack web and native cloud based development, test driven development and Devops.