Welcome to today’s post.
I will discuss how to create a SignalR client using Angular. In a previous post I showed how to create a SignalR server hub.
What is SignalR?
SignalR is an open-source software JavaScript library written for Microsoft ASP.NET and released in 2013 that allows server-side code to dispatch asynchronous notifications to client-side web applications. It has the capability to push content in real-time from the server to client connections. It uses the WebSocket transport library API, which is part of HTML5 to provide unidirectional communication between the server and browser client.
How does SignalR work?
A SignalR client connects to an ASP.NET Core SignalR server and can send and receive messages. A SignalR client isn’t just restricted to running as a web application, it can also run as a mobile or windows application that is able to support the SignalR protocol. The SignalR server can also broadcast asynchronous messages to each connected SignalR client simultaneously. The most common usage scenario of a SignalR client are with chat applications, where we can send messages to a single client connection or to a group of connections.
I will be using Visual Studio Code to create a SignalR Angular client application that receives changes to a table within a backend database and pushes results from the SignalR hub to the client application’s SignalR connection.
The architectural diagram for this post is shown:

Installing SignalR Library and Angular Client Setup
In the project root folder apply the following NPM commands:
Generate a new package.json:
npm init -y
Install the SignalR NPM package:
npm install @microsoft/signalr
Create a new (empty) dashboard component:
Construct a model to contain the message parameters that will be passed from the SignalR to the Angular client:
export class BookChanges {
    constructor(
        public NumBookChanges: number
    ) { }
}
Define the URL for the SignalR Hub:
export let CONFIGURATION = {
    baseUrls: {
      server: 'http://localhost:5000/',
      apiUrl: 'api/'
    }
  };
In the next section, I will show how an Angular component consumes SignalR messages.
An Angular Component to Consume SignalR Messages
Create a new (empty) book hub service:
ng generate service book-hub-service
Implement the Angular component service which will connect, disconnect and consume SignalR hub messages:
import { Injectable } from '@angular/core';
import * as signalR from '@aspnet/signalr';
import { Subject } from 'rxjs';
import { CONFIGURATION } from '../../../models/app.constants';
import { BookChanges } from '../../../models/bookchanges';

@Injectable({
  providedIn: 'root'
})
export class BookHubService {

  private connection: signalR.HubConnection;
  connectionEstablished = new Subject<Boolean>();
  bookChanges = new Subject<BookChanges>();

  connect() {
    if (!this.connection) {
      this.connection = new signalR.HubConnectionBuilder()
      .withUrl(CONFIGURATION.baseUrls.server +
 'bookloanhub')
      .build();

      this.connection.start().then(() => {
        console.log('Hub connection started');
        this.connectionEstablished.next(true);
      }).catch(err => console.log(err));

      this.connection.on('SendBookCatalogChanges', (bookchanges) => {
        console.log('Received', bookchanges);
        this.bookChanges.next(bookchanges);
      });
     }
  }

  disconnect() {
    if (this.connection) {
      this.connection.stop();
      this.connection = null;
    }
  }

  constructor() {}
}
Recall that in my blog detailing the SignalR hub, the API method prototype for pushing messages to SignalR clients is:
public async Task SendBookCatalogChanges(int numberBookLoanChanges)
with the first parameter of our SignalR client API method on() is the method name SendBookCatalogChanges.
And the output parameter bookchanges is from the corresponding input parameter numberBookLoanChanges.
Whenever we receive a value from the SignalR hub, it is stored in the Subject bookChanges and transmitted to subscribed observers:
this.connection.on('SendBookCatalogChanges', (bookchanges) => {
  console.log('Received', bookchanges);
  this.bookChanges.next(bookchanges);
In the next section, I will show how we can implement a basic dashboard to display received SignalR notifications.
An Angular Dashboard to Receive SignalR Notifications
In your dashboard component’s html file, paste in the following markup:
<p>My SignalR Dashboard</p>
<div>Number of book changes {{numBookChanges}}</div>
In the dashboard components code, paste in the following TypeScript code:
import { Component, OnInit, ViewChild, AfterViewInit, OnDestroy } from '@angular/core';
import { BookHubService } from './services/book-hub.service';
import { Subscription } from 'rxjs';
import { BookChanges } from 'src/models/bookchanges';
import { Observable, interval } from 'rxjs';

@Component({
  selector: 'app-dashboard',
  templateUrl: './dashboard.component.html',
  styleUrls: ['./dashboard.component.scss']
})
export class DashboardComponent
  implements AfterViewInit, OnDestroy, OnInit
{
  numBookChanges: number;
  bookchangeSubscription: any;
  pollingData: any;
  errorMessage: string;
  errors: any;

  constructor(private bookchanges: BookHubService) { }

  ngAfterViewInit()
  {
    this.bookchanges.connect();
    this.bookchangeSubscription = this.bookchanges.
        bookChanges.subscribe(book => {
          this.numBookChanges = book;
        });
  }

  ngOnInit()
  {
    this.pollingData = interval(1000*60).subscribe(val =>
    {
      this.bookchanges.bookChanges.subscribe(
        (book: any) => {
          this.numBookChanges = book;
          console.log(
            "DashboardComponent - book data changed to " +
              this.numBookChanges);
          },
          error => {
            this.errors = error;
          }
        );
    });
  }

  ngOnDestroy()
  {
    this.bookchanges.disconnect();
  }
}
The UI component will subscribe to received SignalR Hub messages using a subscriber and assigning to the Angular html template variable as shown:
this.bookchanges.bookChanges.subscribe(
book => {
  this.numBookChanges = book;
  console.log("DashboardComponent - book data changed");
},
error => {
  this.errors = error;
}
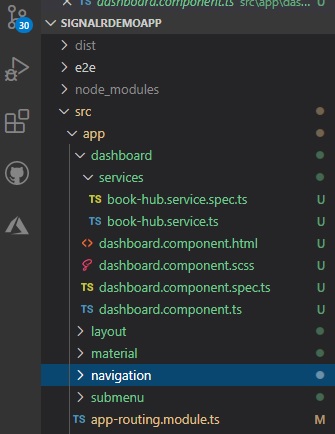
The resulting Angular application structure will be as shown:
In the next section I will show how to test the SignalR client.
Testing the SignalR Client
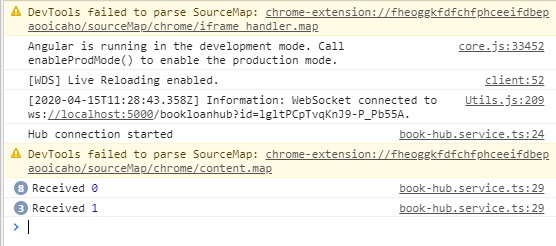
Once run the output from the Chrome console will show the client handshaking connection to the SignalR hub:
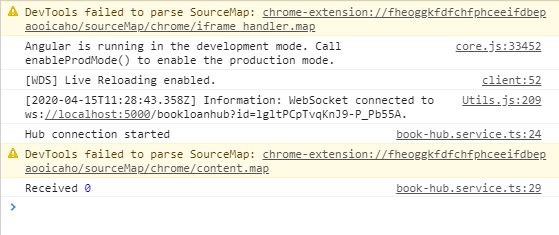
The connection to the SignalR Hub is a URL of the form:
http://localhost:5000/bookloanhub?id=[connectionid]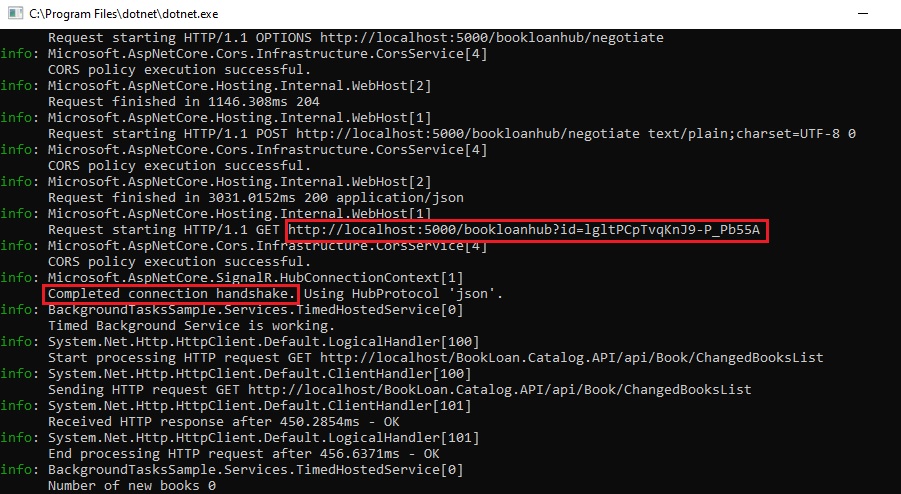
In the Chrome console the received message will show every time a changed message is sent from the Subject from the SignalR hub:
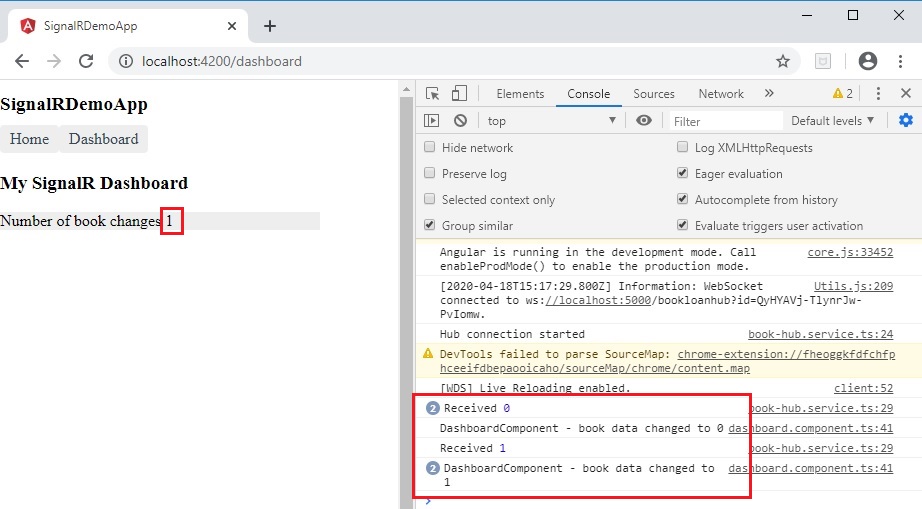
On the SignalR server hub, changes to the data that are changing are pushed to the client as shown:

On the client UI you will see the template variable change with the received server data as shown:
That’s all for today’s post.
I hope you found this post useful and informative.
In a future next post I will go through a walkthrough to test and troubleshoot SignalR server and clients.
Andrew Halil is a blogger, author and software developer with expertise of many areas in the information technology industry including full-stack web and native cloud based development, test driven development and Devops.