Welcome to today’s post.
Today I will show how to implement unit tests for Angular components.
In previous posts I showed how to implement the following tests within Angular applications:
- End to end tests using Protractor and Jasmine BDD.
- Use of Jasmine BDD to write mock tests for services.
Today I will focus on how to implement Unit Testing of Angular components.
In the first section, I will give an overview of the different areas that we will need to unit test within an application.
Areas of an Application to Unit Test
With an application we can categorize the components and services that directly depend on the external environment and those that depend on the internal application logic.
Examples of external dependencies include:
- Relational Databases.
- Web API.
- Network services.
Examples of internal dependencies include:
- Form input validations.
- Static Lookups.
- Conditional logic.
With external dependencies we cannot test these using component-based unit testing. We would need to use the mocking technique which utilizes Spies from the Jasmine BDD API.
With internal dependencies we can certainly test these using component-based unit testing. We can use Jasmine BDD API and utilize the Angular Test Framework and fixtures to test expected outputs from inputs.
We must also limit the unit testing of Angular UI components to only the most important features that need testing. The remaining features can be implemented as tests more rapidly using the Protractor E2E scripting.
When the number of application features on each component UI increases during development, the builds and unit tests will break more often, thus increasing the complexity of the testing. This would require more re-writing and implementation of unit component tests.
Bearing these factors in mind, let us progress with the implementation.
In the next section, I will start off by showing some sample file upload code that we will unit test.
Sample Angular Application Code to Apply Unit Testing
Suppose we have a user interface that allows a user to select files using the file dialog and uploads files.
Let us also assume we will be required to validate these files before they can be uploaded, including checking file types and file sizes.
We have an uploader UI component that receives as input a list of files that we wish to upload.
The input decorators for the file lists, file limit and allowed file types are shown:
@Input() fileLengthLimitation(value: number)
{
    this._filelengthLimitation = value;
}

@Input() allowableFileTypes(value: AllowedFileType[])
{
    this._allowedFileTypes = value;
}

@Input() selectedInputFiles(value: FileUploadedStatus[])
{
    let tmpInputFiles = value;

    this.fileListStatus = [];
    this.invalidFiles = [];

    tmpInputFiles.forEach(itm => {
      this.ValidateInputFile({ FileName: itm.FileName, Size: itm.Size,
          Status: itm.Status, Uploaded: itm.Uploaded });
    });
}
The method to validate each input file is shown:
ValidateInputFile(value: FileUploadedStatus)
{
    if (value.Size > this._filelengthLimitation)
    {
        let invalidFile = { FileName: value.FileName, Size: value.Size, ValidationError: "Maximum File Size Exceeded" };
        this.invalidFiles.push(invalidFile);
    }
    else
    if (!this.isFileTypeAllowed(value.FileName.match(/\.([^\.]+)$/)[1]))
    {
        let invalidFile = { FileName: value.FileName, Size: value.Size, ValidationError: "Invalid File Type" };
        this.invalidFiles.push(invalidFile);
    }
    else
    if ((value.FileName.match(/\d+/g) != null) &&
       (!this.selectedFiles.includes(value.FileName)))
    {
        let validFile = { FileName: value.FileName, Size: value.Size,
            Status:"PENDING", Uploaded:"NO" };
        this.fileListStatus.push(validFile);
    }
}
Our unit tests will consist of the following:
- Test valid files can be uploaded.
- Test invalid files cannot be uploaded.
In the next section, I will show how to implement unit tests for the above file upload functionality.
Implementation of Angular Unit Tests
The first unit test is shown which validates file types:
it('can validate input files', () => {
    const testValues: FileUploadedStatus[] =
    [
        { FileName: 'test-file-1.txt', Size: 100, Status: 'PENDING', Uploaded: 'NO' },
        { FileName: 'test-file-2.pdf', Size: 50, Status: 'PENDING', Uploaded: 'NO' }
    ];
    const testAllowedFileTypes: AllowedFileType[] =
    [
        { fileType: 'txt', description: 'Text files' },
        { fileType: 'csv', description: 'CSV files' },
        { fileType: 'pdf', description: 'PDF files' }
    ];
    component.allowableFileTypes(testAllowedFileTypes);
    component.fileLengthLimitation(100);
    component.selectedInputFiles(testValues);
    expect(component.fileListStatus.length).toEqual(testValues.length);
});
To test the inputs to match the expected outputs we use the line:
expect(component.fileListStatus.length).toEqual(testValues.length);
If our logic within the component’s ValidateInputFile() modifies then the above test will catch any changes that fail logically to satisfy the resulting test expectations.
Note: Before we could implement the above, we had to refactor the code within our component to allow the ValidateInputFile() to be used by both the test specification and the user interface HTML input control that selects files during manual testing and E2E testing.
In the next test, wetest a failure case where at least one invalid file causes the expected number of invalid files to be satisfied. The test is as shown:
it('can invalidate input files', () => {
    const testValues: FileUploadedStatus[] =
    [
        { FileName: 'test-file-1.txt', Size: 100, Status: 'PENDING', Uploaded: 'NO' },
        { FileName: 'test-file-2.txt', Size: 120, Status: 'PENDING', Uploaded: 'NO' },
        { FileName: 'test-file-3.xls', Size: 50, Status: 'PENDING', Uploaded: 'NO' }
    ];
    const testAllowedFileTypes: AllowedFileType[] =
    [
        { fileType: 'txt', description: 'Text files' },
        { fileType: 'csv', description: 'CSV files' },
        { fileType: 'pdf', description: 'PDF files' }
    ];
    component.allowableFileTypes(testAllowedFileTypes);
    component.fileLengthLimitation(100);
    component.selectedInputFiles(testValues);
    expect(component.invalidFiles.length).toEqual(2);
});
Note that in the above tests we have not used any test doubles from the Jasmine Spy class and have tested the internal logic of our file uploader component.
In the next section, I will show how to execute the unit tests and review the results.
Execution of Unit Tests with the Test Driver
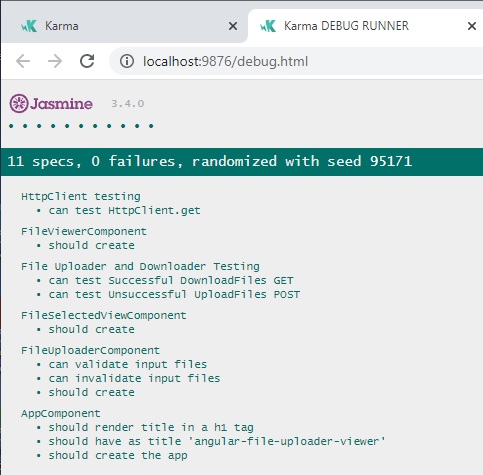
When we run our tests using the command:
ng test
the following shows the output displayed from the Karma test driver:

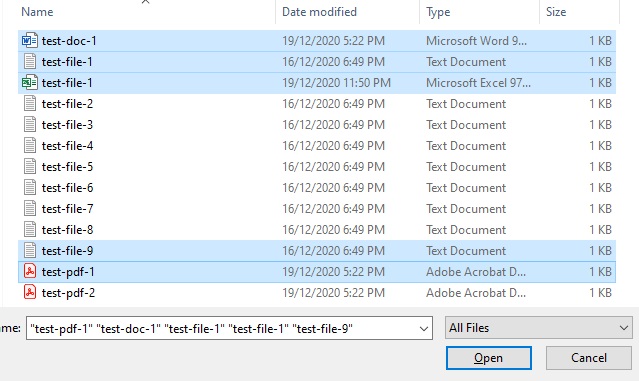
In our application if we configure the file upload configuration to handle the following file types:
TXT
CSV
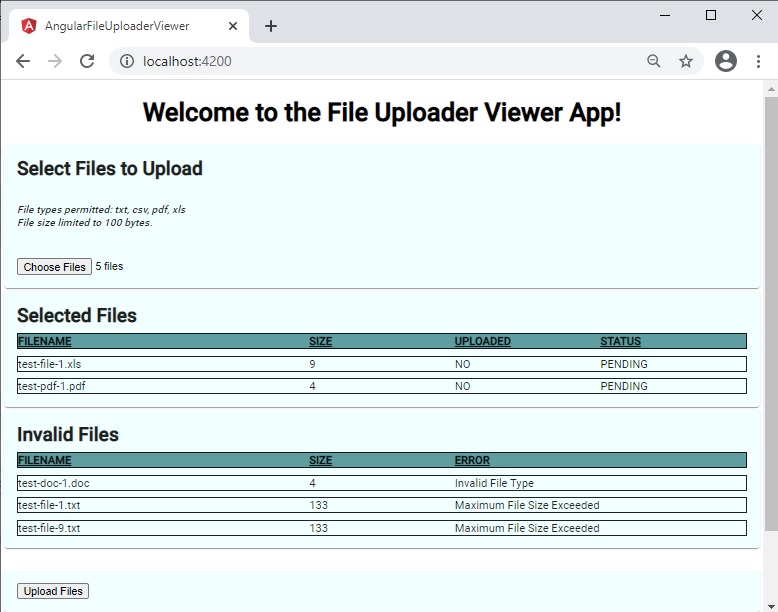
and a maximum file length of 100, then we run the application and select the files as shown:

We then try a manual test, the outcome should reflect the input validations and expected outputs generated within the component, with the output is as shown:

As we can see from the sample unit test, the Jasmine test framework is quite a powerful tool to use when testing the internal business logic within Angular components in isolation. This gives developers the capability in being able to write effective tests that can be constructed as part of end-to-end application test suites.
That is all for today.
Thank you for viewing this post and I hope you found it useful and informative.
Andrew Halil is a blogger, author and software developer with expertise of many areas in the information technology industry including full-stack web and native cloud based development, test driven development and Devops.


