
Welcome to today’s post.
In a previous post I showed how to create a Docker multi-image API container service .
Today I will be extending this by showing how to use Docker Compose to create a container that includes an API gateway container that routes to other API service containers.
With Docker Compose, the use of a YAML scripting file is used to orchestrate the build of the containers within the image. Each image within our container contains one of a collection of API services. The main challenge we overcame was the creation of each of these API services within its own respective container. The next step for us now is to build an API gateway within its own container that is referenced from each API service within their own container images.
Is this as simple as adding an additional image: definition to our YAML script? Not exactly. We will still need to determine what port our gateway API will be running under and how to secure the internal API services that are hosted within their own image containers. I will explain how this is done shortly.
Our multi-image Docker container, when complete will resemble the architecture below:
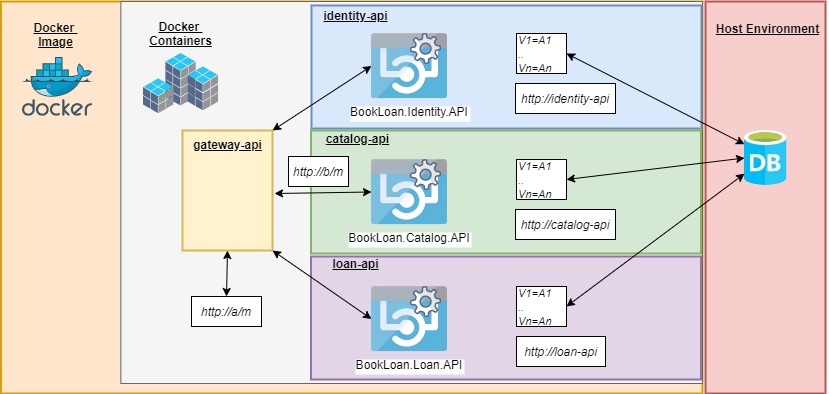
The difference between the basic container and the above multi-image container will be the following features:
- Ability to route HTTP requests into our API gateway to one of our internal API container services.
- Secure our internal API container services by using authentication tokens from our internal identity API service, identity-api.
- Decouple our client applications from the internal API services, removing dependency of the internal API references from client applications.
Defining the Container Images with Docker Compose
Below is the docker compose YAML file we can use to build the above container:
#docker-compose.yml (Base)
version: '3.4'
services:
  bookloan-gateway-api:
    image: bookloangatewayapi:${TAG:-latest}
    ports:
      - "5200:80"

  identity-api:
    image: bookloanidentityapi:${TAG:-latest}
    env_file:
      - C:\development\environment\bookloan_identity_env.env
    ports:
      - "5100:80"

  catalog-api:
    image: bookloancatalogapi:${TAG:-latest}
    env_file:
      - C:\development\environment\bookloan_cat_env.env
    ports:
      - "5110:80"

  loan-api:
    image: bookloanloanapi:${TAG:-latest}
    env_file:
      - C:\development\environment\bookloan_cat_env.env
    ports:
      - "5120:80"
Our multi-image container is started with four API service images, catalog-api, loan-api, identity-api and gateway-api. Each of the internal API services has an internal TCP port 80 that allows them to be accessed from the API gateway, and to the external TCP host ports that can be used for debugging purposes in a pre-production environment. If we want to just publish the port to internal container services, then we use the expose directive to specify which ports to hide from the container host.
The example below hides the external ports for the catalog-api, loan-api and identity-api internal API container services:
expose:
  - “5120”
  - “5110”
  - “5100”
Before we run the above container, we should ensure each of the internal images including the API gateway image is built.
After running the container using:
docker-compose up
We will see the containers created and running.
To verify the API gateway service and internal API services are started, we use the docker container ls command.
Defining the API Gateway
Our API gateway, defined using the Ocelot configuration is shown below:
{
  "Routes": [
    {
      "DownstreamPathTemplate": "/api/book/{everything}",
      "DownstreamScheme": "http",
      "DownstreamHostAndPorts": [
        {
          "Host": "catalog-api",
          "Port": 80
        }
      ],
      "UpstreamPathTemplate": "/book/{everything}",
      "UpstreamHttpMethod": [ "POST", "PUT", "GET" ],
      "AuthenticationOptions": {
        "AuthenticationProviderKey": "IdentityApiKey",
        "AllowedScopes": []
      }
    },
    {
      "DownstreamPathTemplate": "/api/loan/{everything}",
      "DownstreamScheme": "http",
      "DownstreamHostAndPorts": [
        {
          "Host": "loan-api",
          "Port": 80
        }
      ],
      "UpstreamPathTemplate": "/loan/{everything}",
      "UpstreamHttpMethod": [ "POST", "PUT", "GET" ],
      "AuthenticationOptions": {
        "AuthenticationProviderKey": "IdentityApiKey",
        "AllowedScopes": []
      }
    }
  ],
  "GlobalConfiguration": {
    "BaseUrl": http://localhost:5200
  }
}
The above routing configuration applies the following rules:
- Routing of upstream catalog API service requests of the form /book/{everything} will map to downstream API service requests of in the format /api/book/{everything}.
- For the catalog API service, the downstream host network is specified with the name of the host, catalog-api.
- The API gateway network TCP port is accessible to the container host, specified in the GlobalConfiguration key with the BaseUrl.
Authentication within the API Gateway
With the authentication options that are specified for each internal API service, the value of the AuthenticationProviderKey key must be specified as an authentication provider key within the startup of the API gateway service.
"AuthenticationOptions": {
    "AuthenticationProviderKey": "IdentityApiKey",
    "AllowedScopes": []
 }
In the example above, the provider key value is “IdentityApiKey”, which is specified as a parameter to the AddJwtBearer(..) middleware.
An example of this is shown below:
using Ocelot.DependencyInjection;
using Ocelot.Middleware;

…

// This method gets called by the runtime. Use this method to add services to the container.
public void ConfigureServices(IServiceCollection services)
{
      var authenticationProviderKey = "IdentityApiKey";

      var key = Convert.FromBase64String(Configuration.GetSection("AppSettings:Secret").Value);

      services.AddAuthentication(a =>
      {
            a.DefaultAuthenticateScheme = JwtBearerDefaults.AuthenticationScheme;
            a.DefaultChallengeScheme = JwtBearerDefaults.AuthenticationScheme;
      })
      .AddJwtBearer(authenticationProviderKey, x =>
      {
            x.RequireHttpsMetadata = false;
            x.SaveToken = true;
            x.TokenValidationParameters = new TokenValidationParameters
            {
                  ValidateIssuerSigningKey = true,
                  IssuerSigningKey = new SymmetricSecurityKey(key),
                  ValidateIssuer = false,
                  ValidateAudience = false
            };
      });

      services.AddOcelot();
}

// This method gets called by the runtime. Use this method to configure the HTTP request pipeline.
public void Configure(IApplicationBuilder app, IHostEnvironment env)
{
      if (env.IsDevelopment())
      {
          app.UseDeveloperExceptionPage();
      }
      app.UseOcelot().Wait();
}
Testing our API Gateway Container
To test our API gateway container, we run the HTTP request through our container host gateway using POSTMAN. To submit a request to http://book/list we first obtain a JWT token from our identity API service (which can either be within our container or outside of it). We then paste the token as a bearer token into the HTTP request header in the Authorization key. After submitting the HTTP request, we should see the JSON response back with data from our gateway:
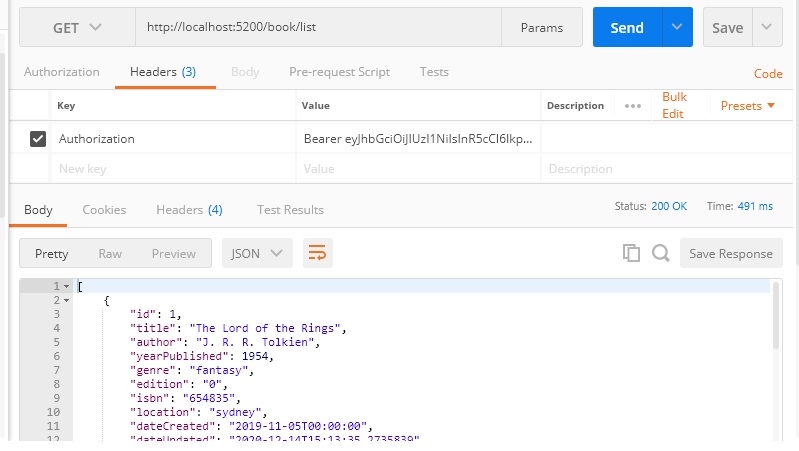
If our routing fails, then the most common error would be a 404 (not found error).
As we can see, deploying and running our container as a Docker multi-image container that includes an API gateway is quite straightforward. You have seen how to control the visibility of internal API services within an API gateway that is a within a Docker container. In addition, we learnt how to allow testing of the internal API services within our multi-image container by exposing specific ports of those API services. We also saw how to integrate token based authentication into the API gateway.
With this flexibility, we can run the container in a test environment, conduct testing, then once testing completes, deploy the image to a production environment with the external ports hidden.
That is all for today’s post.
I hope you found this post useful and informative.
Andrew Halil is a blogger, author and software developer with expertise of many areas in the information technology industry including full-stack web and native cloud based development, test driven development and Devops.

