
Welcome to today’s post.
In today’s post I will show you how to create a Windows Service using Visual Studio 2019.
Most of my blogs have been focused on the web, cloud or a backend or mid-tier technology, such as SQL server, web API or Angular SPA applications.
In this post I will start by explaining what Windows Services are. I will then explain why we would use Windows Services. I will then show how they are created and implemented within the Visual Studio development environment.
What are Windows Services?
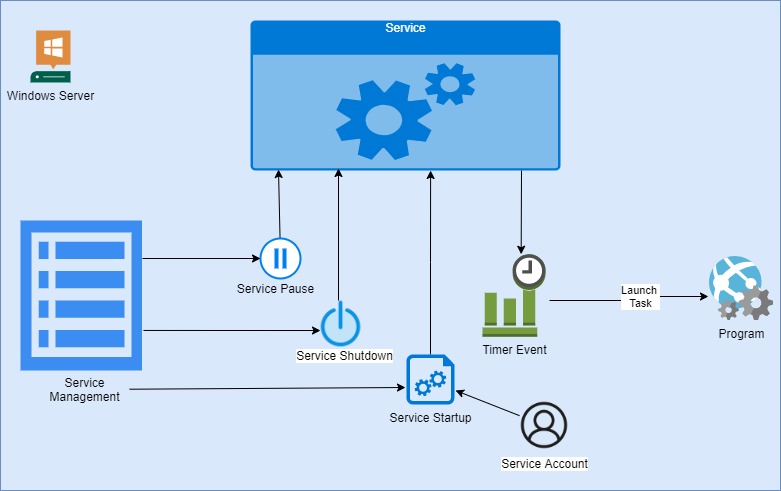
Windows Services are a type of server-based middleware that allows you to delegate a long-running process and then run a particular task when an event is triggered. The most common events that ae triggered are timer-based events as these take up the least CPU in terms of duration.
As you would gather, we can only use Windows Services within a Windows Server based environment, not in the cloud. In the cloud we use another type of service that is long-running, and that is an App Service Web Job, or a durable Azure Serverless Function.
The alternative of using a Windows Service would be to create command-line executable tasks and create these are scheduled tasks. Scheduled tasks would do the same job as a Windows Service in many scenarios; however, they do not possess the same level of encapsulation and security and a Windows Service would provide. Windows services can be run under a more secure server account, such as a domain account and restrict access to the resources the triggered task is accessing. In addition, we can restrict access to the target resources to our service and other authorized users in our domain.
Another alternative to Windows Services would be to use a Hosted Background Task that runs within a .NET Core API service running under IIS. The API service would provide both API services and run background tasks. We could also run Hosted Background Tasks in .NET Core within a console application. The console application could run as server background process or hosted as a Web Job console application within an Azure App Service.
Benefits of Using Windows Services
Why would we want to use Windows Services?
The main reasons to justify using Windows Services are tied to some architectural benefits.
These architectural benefits include the following:
- Provide a middle-tier service that can encapsulate delegated tasks that can provide useful system and application maintenance tasks that can be run during peak and off-peak hours. The target resources the service is accessing can be part of an online web application data store that contains (for example) orders or customer registrations that require ongoing maintenance to check for correcting or flagging invalid data or require data periodic clean-ups. It can also be used to process requests or queue requests using a message queue platform such as MSMQ or Azure Service Bus.
- To act as broker and decouple a messaging platform from the source of the message (database, file, message queue) from the destination resource (database, file, message queue).
Windows services are ideally suited to implementing polling services and in the following section I will show how to create a rudimentary service that can serve as the skeleton to a more substantial process that asynchronously executes a task based in a timer.
Creation of a Windows Service from the Visual Studio Templates
Below is the project template creation screen in Visual Studio showing the Windows Service project:

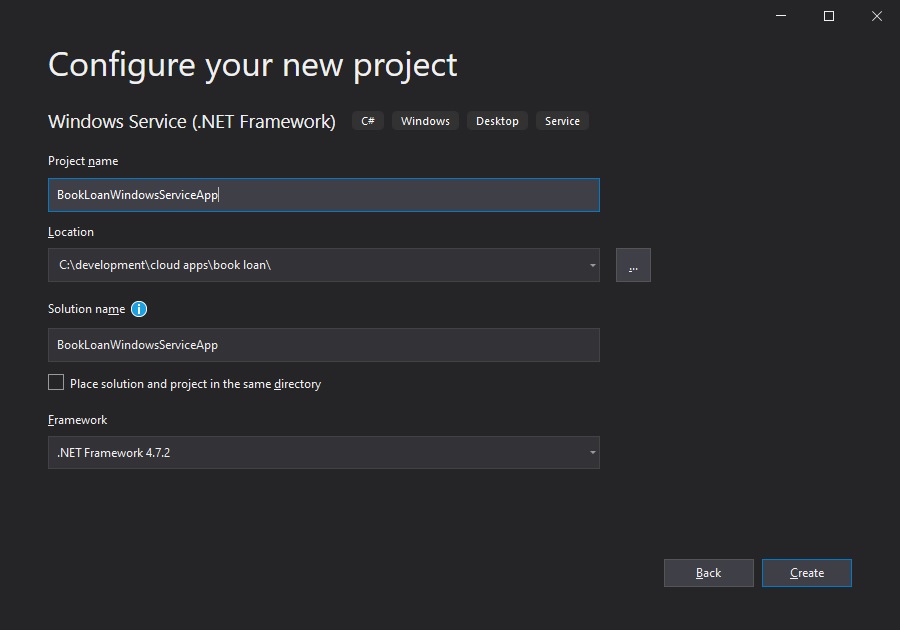
Below is the configuration screen for the Windows Service project in Visual Studio:
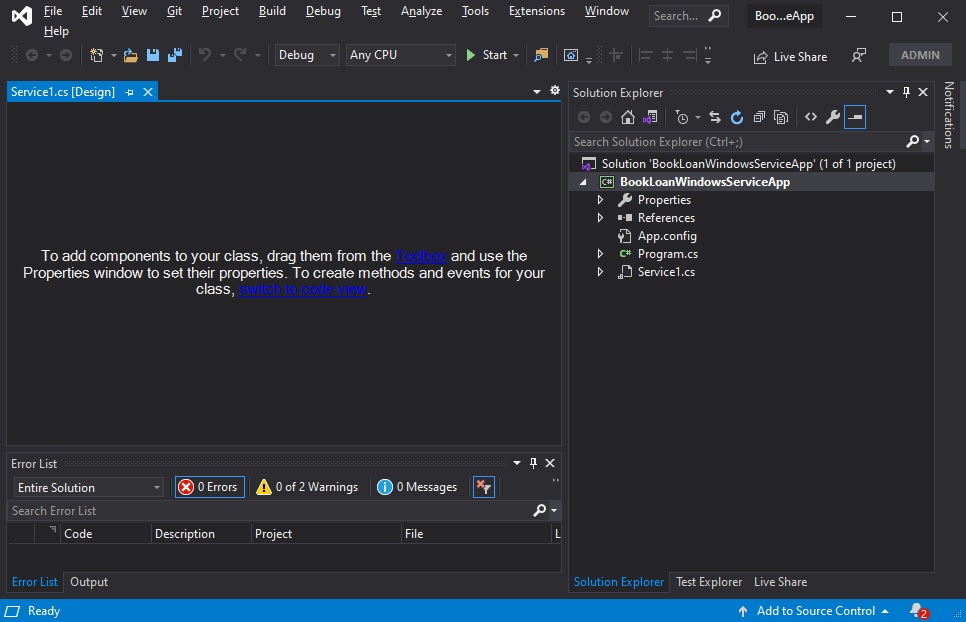
Below is the initial skeleton source and configuration files for the created Windows Service project:
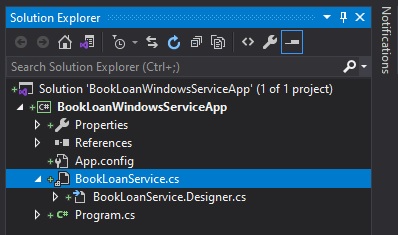
After creation you will see a default service class created of type ServiceBase. After renaming the class the solution will look as shown:
From the designer switch to the code view. The following code stubs for OnStart() and OnStop() will be visible:
using System;
using System.ServiceProcess;

namespace BookLoanWindowsServiceApp
{
    public partial class BookLoanService : ServiceBase
    {
        public BookLoanService()
        {
            InitializeComponent();
        }

        protected override void OnStart(string[] args)
        {
        }

        protected override void OnStop()
        {
        }
    }
}
Adding Diagnostic Logging to your Windows Service
Due to the nature of a Windows Service running within as a background process, we would be unaware of its state. For this reason, it is a recommended that diagnostic logging is added to the service to determine when the service has started, ended, paused and if any errors that are output while the service is running.
Knowing when the process triggered within the service runs and if it throws an exception would be ideal information to log. If we run the service under the LocalSystem account, then we can write event messages to the Windows Event Log. Ideally, we should run our service under a dedicated domain service account.
To add diagnostic logging, we include the namespace:
using System.Diagnostics;
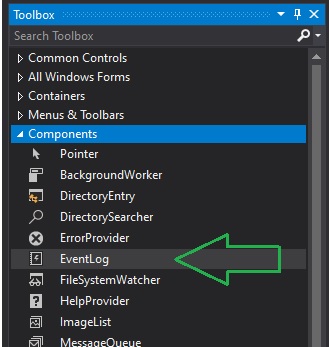
To add an event log to our service we select the designer and drag an EventLog component into the designer.
We will next add code to create an event source within the event log.
From the designer, select F7 to view code, then in the service class constructor add the following code:
bookLoanEventLog = new System.Diagnostics.EventLog();
if (!System.Diagnostics.EventLog.SourceExists("BookLoanSource"))
{
    System.Diagnostics.EventLog.CreateEventSource(
        "BookLoanSource",
        "BookLoanNewLog");
}
bookLoanEventLog.Source = "BookLoanSource";
bookLoanEventLog.Log = "BookLoanNewLog";
On the service start and stop we add event log entries:
protected override void OnStart(string[] args)
{
    bookLoanEventLog.WriteEntry("Book Loan Service Started.");
}

protected override void OnStop()
{
    bookLoanEventLog.WriteEntry("Book Loan Service Stopped.");
}
To enable timer-based polling in our service we create a new timer instance, set its interval to one minute and link it to a timer event handler that will execute a task.
First add the following namespace to the top of the service class source:
using System.Timers;
Then add the following code within the service OnStart() event handler:
Timer timer = new Timer();
timer.Interval = 60000;
timer.Elapsed += new ElapsedEventHandler(this.OnTimer);
timer.Start();
Add the event handler for the timer polling:
public void OnTimer(object sender, ElapsedEventArgs args)
{
    bookLoanEventLog.WriteEntry("Timer Polling Event Triggered.",
        EventLogEntryType.Information, eventId++);
}
Build the project.
Adding an Installer to the Windows Service
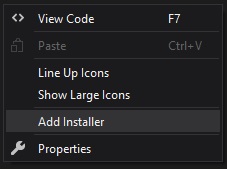
To be able to run the service, we will need to add an installer to the service.
From the designer or from the properties of the designer you can add the installer.
From the designer context menu, the installer option is shown:
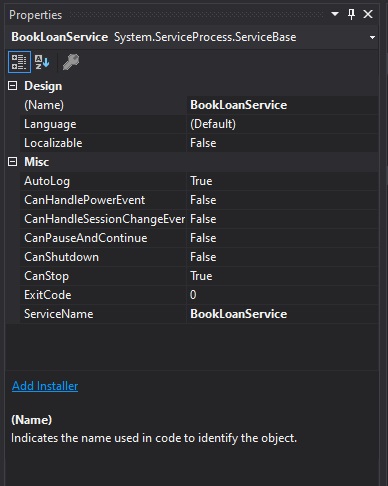
Notice from the designer properties, the installer can also be seen:
After the installer is added you will see an additional class and components added called ProjectInstaller and two components added to the installer component’s designer. Below are the components added to the installer components code:
private System.ServiceProcess.ServiceProcessInstaller serviceProcessInstaller1;
private System.ServiceProcess.ServiceInstaller serviceInstaller1;
These additional service components are used to install the service and the service process.
In the serviceInstaller1 component enter the service description and display name:
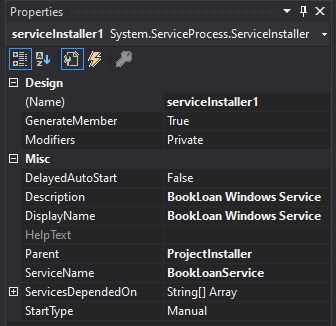
The StartType property determines how you start the service, either Automatic or Manual.
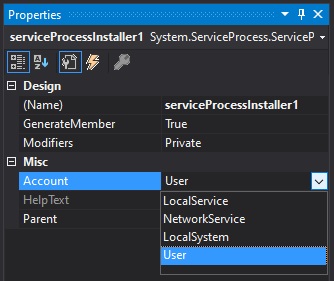
In the service process installer specify the Account as LocalSystem:
Next, build the project.
Register the Windows Service with the Service Control Manager
To be able to run the service we will next use the service installation utility to register our service with the Service Control Manager.
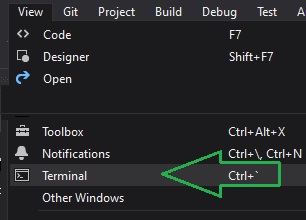
Open the command prompt as an administrator, or use the developer command prompt accessible from the VS 2019 IDE from View | Terminal as shown:
Change to the \bin\Debug subfolder, then enter the following installation command:
installutil [service app name].exe
(In the above service application created the command would be installutil BookLoanWindowsServiceApp.exe).
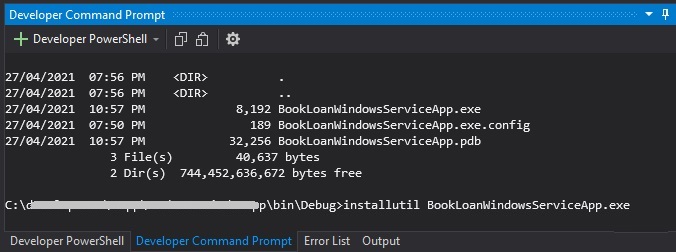
If the installation completes successfully, you will see the following trailing output from the command:
The Commit phase completed successfully.
The transacted install has completed.
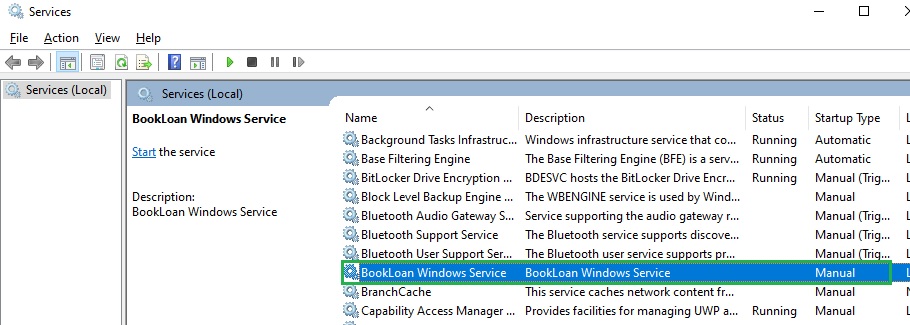
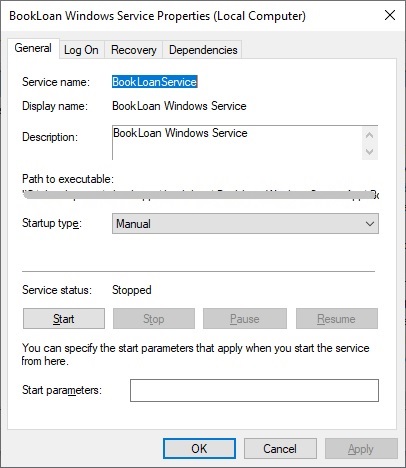
Next, we will check the installed service is listed in the windows services.
Open Services.
Locate the service matching the description.
Open the properties of the service. Confirm the Startup type. It should show as Manual:
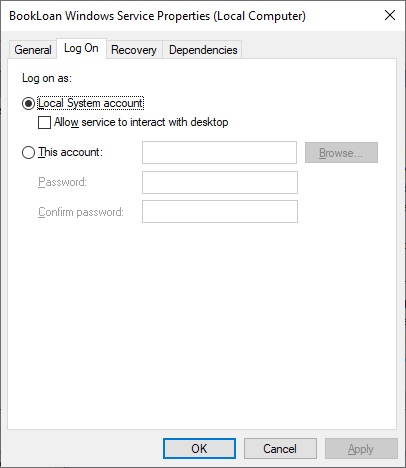
Select the LogOn tab:
It should show Log on as with LocalSystem account:
Testing the Windows Service
To be able to test our service, we will need to start the service. Once started, we can view the event logs to examine the outputs from the running service.
In the Service Control Manager, right-click on the service and start the service:

To check the diagnostic logs, we open the Event Viewer application.
Select the application log and the initial log output will be visible:
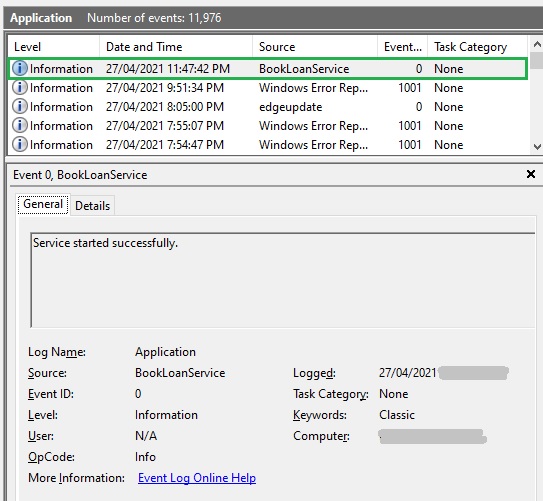
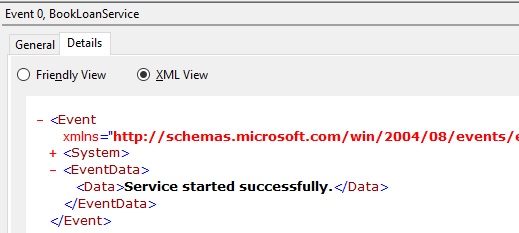
The event log message will show in the Details tab:
<Event xmlns="http://schemas.microsoft.com/win/2004/08/events/event">
<System>
<EventData>
<Data>Service started successfully.</Data>
</EventData>
</Event>
The Details showing the Friendly and XML views is shown below:
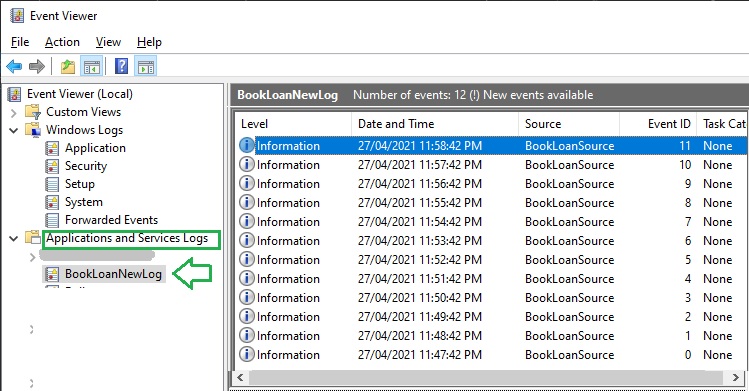
As the timer event is polled it will output events through the service event log name, BookLoanNewLog which is selectable under the Applications and Services Logs.
In the grid of events the source, BookLoanSource will show in the Source column:
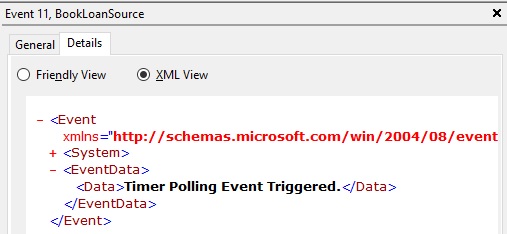
The event details will show the event generated for the polled timer event:
<Event xmlns="http://schemas.microsoft.com/win/2004/08/events/event">
<System>
<EventData>
<Data>Timer Polling Event Triggered.</Data>
</EventData>
</Event>
The Details showing the Friendly and XML views is shown below:
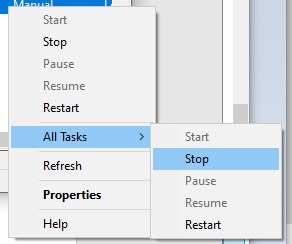
Next stop the service from the SCM:
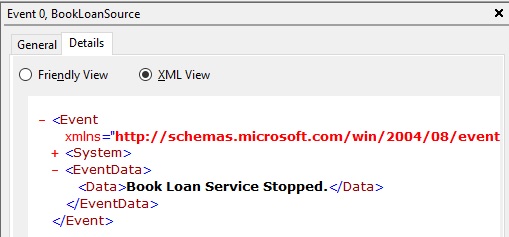
After the service has stopped, check the event log again.
The event will show the stopped message.
<Event xmlns="http://schemas.microsoft.com/win/2004/08/events/event">
<System>
<EventData>
<Data>Book Loan Service Stopped.</Data>
</EventData>
</Event>
The Details showing the Friendly and XML views is shown below:
After we have finished the above exercise, we can uninstall the service with the following command:
installutil /u [service app name].exe
You have seen how to implement a basic windows service. It seems like quite a lot of work for a basic windows service, however once the first one is created, it can be re-used to other Windows services.
In a future post I will show how to run a .NET Core Application as a Windows Service outside of IIS using a Worker Service.
That is all for today’s post.
I hope you found this post useful and informative.
Andrew Halil is a blogger, author and software developer with expertise of many areas in the information technology industry including full-stack web and native cloud based development, test driven development and Devops.

