Welcome to today’s post.
In today’s post I will be discussing how to implement a .NET Core application as a Windows Service.
In a previous post I showed how to create a Windows Service using the .NET Framework.
In both cases we achieve the same goal of running a task under a long-running background thread that periodically polls task that runs in the background. With a .NET Core application running as a Windows Service, the hosting environment is no longer within (IIS) Internet Information Services as a web service This solves one of the implementation conundrums we had whenever we implement most of our Web services using the .NET Core Web API architecture.
We find ourselves in a situation where we need to also implement additional processes that are not transient in duration, but long running (such as periodic maintenance tasks) and require to be within a different process so that they do not impact other Web API services. I have shown in a previous post how to implement background tasks in a generic host using .NET Core, however that was in the context of a console application. I also showed how to host a background task as a Web Job within an Azure App Service.
The key to creating a Windows Service using .NET Core is to initially create a new application from the Worker Service project template. If we select the Windows Service project template, the application uses .NET Framework instead of .NET Core. I will be showing how to use the Worker Service project template in the first section.
Creating the Worker Service Project
I will now show how to create a .NET Core application that is hosted within a Windows Service.
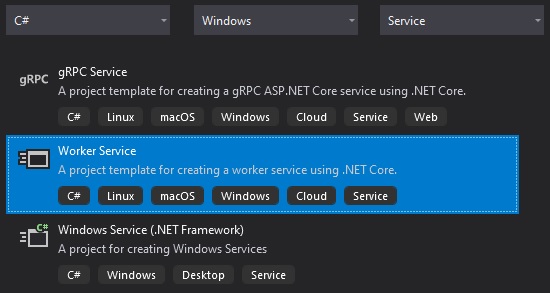
In Visual Studio 2019, create a new project, then select the Worker Service project template as shown below:
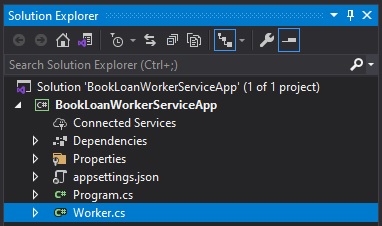
After selecting the template and moving through the defaults in the Wizard, you will see a project skeleton with a Worker.cs class created for you as shown:
The Worker class that is generated from the template is shown below:
using Microsoft.Extensions.Hosting;
using Microsoft.Extensions.Logging;
using System;
using System.Threading;
using System.Threading.Tasks;

namespace BookLoanWorkerServiceApp
{
    public class Worker : BackgroundService
    {
        private readonly ILogger<Worker> _logger;

        public Worker(ILogger<Worker> logger)
        {
            _logger = logger;
        }

        protected override async Task ExecuteAsync(CancellationToken stoppingToken)
        {
            while (!stoppingToken.IsCancellationRequested)
            {
                _logger.LogInformation("Worker running at: {time}", DateTimeOffset.Now);
                await Task.Delay(1000, stoppingToken);
            }
        }
    }
}
Currently, the scaffolded application is not ready to run as a Windows Service, I will show how this is done in the next section.
Enabling Hosted Worker Service as a Windows Service
The application will not in its current state run as a windows service. To enable it to run as a Windows Service we will apply the following changes:
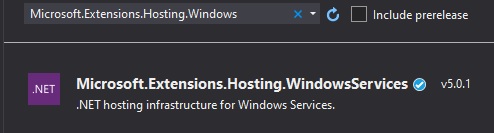
Install the NuGet package Microsoft.Extensions.Hosting.WindowsServices:
In Program.cs, use the IHostBuilder extension method UseWindowsService() to enable the application to be hosted as a Windows Service:
public static void Main(string[] args)
{
    CreateHostBuilder(args)
        .UseWindowsService()
        .Build().Run();
}
The CreateHostBuilder() static method used to configure our application setup the event logging provider as shown:
public static IHostBuilder CreateHostBuilder(string[] args) =>
    Host.CreateDefaultBuilder(args)
        .ConfigureLogging(logging =>
        {
            logging.ClearProviders();
            logging.AddEventLog();
        })
        .ConfigureServices((hostContext, services) =>
        {
            services.AddHostedService<Worker>();
        });
Before we can run the application, we will need to be aware of the different deployment variations for a .NET Core Worker Service application:
- A .NET Core web application that has a Razor Pages UI and MVC architecture.
- A .NET Core console application that has background tasks.
- A .NET Core application that runs background tasks within a Windows Service.
In this case, we are running as a Windows Service, and if we have created the application with the Worker Service template, the project file will have the following SDK deployed with the application:
<Project Sdk="Microsoft.NET.Sdk.Worker">
With a Windows Service application there is no need for a web.config configuration as we are not running under an IIS web host. In this case we will need to add the following to our project file:
<IsTransformWebConfigDisabled>true</IsTransformWebConfigDisabled>
Defining the Background Service
When run, the application settings in the appSettings.json are loaded from the application base directory. This different from a traditional Windows Service which has a current directory of c:\Windows\system32.
Recall that with a Windows service, we can have the following states:
- Stop
- Start
- Pause
The BackgroundService class from the Microsoft.Extensions.Hosting library has three public methods that will serve these functions. The definition is shown below:
using System;
using System.Runtime.CompilerServices;
using System.Threading;
using System.Threading.Tasks;

namespace Microsoft.Extensions.Hosting
{
    public abstract class BackgroundService : IHostedService, IDisposable
    {
        protected BackgroundService();
        public virtual void Dispose();
        public virtual Task StartAsync(CancellationToken cancellationToken);
        public virtual Task StopAsync(CancellationToken cancellationToken);
        protected abstract Task ExecuteAsync(CancellationToken stoppingToken);
    }
}
We will add the start and stop events to the Worker process class as shown:
public override async Task StartAsync(CancellationToken cancellationToken)
{
    _logger.LogInformation("Worker started at: {time}", DateTimeOffset.Now);
}

public override async Task StopAsync(CancellationToken cancellationToken)
{
    _logger.LogInformation("Worker dtopped at: {time}", DateTimeOffset.Now);
}
Next, we will setup the logging threshold for our eventlog logging provider:
Configure logging default threshold to be Information in the appsettings.json as shown:
{
  "Logging": {
    "LogLevel": {
      "Default": "Information",
      "Microsoft": "Warning",
      "Microsoft.Hosting.Lifetime": "Information"
    },
    "EventLog": {
      "LogLevel": {
        "Default": "Information",
        "Microsoft.Hosting.Lifetime": "Information"
      }
    }
  }
}
Save changes.
Next, we will build and publish the application to a release folder.
Select the Publish.. option in the project context menu. Select the Folder target.
Determining the Publish Profile Settings
In the Publish screen edit Configuration (where Release is shown)
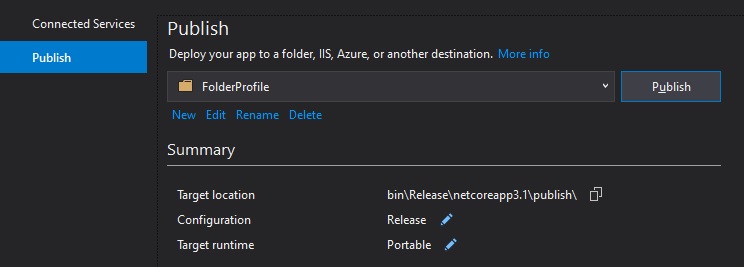
In the Profile Settings modify the Deployment mode and Target runtime options with Self-contained and the windows runtime to win_x64:
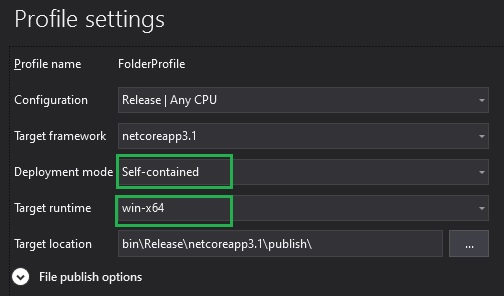
We chose framework the self-contained option because we would like the service to run with deliverables that will run irrespective and independent of the .NET Core library installed on the server.
For a framework-dependent option the service will depend on an installed version of .NET Core framework in the server.
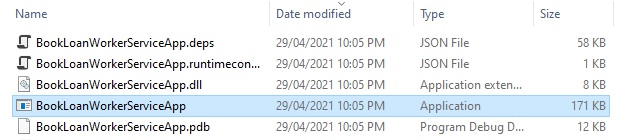
After publishing the application is completed, the release files will be deployed to the following sub-folder in your project:
\bin\Release\netcoreapp3.1\publish
The executable, which is required to create a Windows service is in the above folder as shown:
Currently, the binaries cannot be run directly from the development environment to start the service. I will show how to start the windows service from the command prompt.
Starting the Windows Service from the Command Line
A useful command that creates a Windows service entry from an application executable is shown below:
sc create [name of service app] binPath= "[full path to your application EXE]"
The command must be run in administrator mode. In our service above, our command would be (with abbreviated path):
sc create BookLoanWorkerServiceApp binPath= "C:\...\ BookLoanWorkerServiceApp \bin\Release\netcoreapp3.1\win-x64\ BookLoanWorkerServiceApp.exe"
If successful, we will get the following response:
[SC] CreateService SUCCESS
Start the service.
sc start BookLoanWorkerServiceApp
C:\WINDOWS\system32>sc start BookLoanWorkerServiceApp
SERVICE_NAME: BookLoanWorkerServiceApp
        TYPE               : 10  WIN32_OWN_PROCESS
        STATE              : 2  START_PENDING
                                (NOT_STOPPABLE, NOT_PAUSABLE, IGNORES_SHUTDOWN)
        WIN32_EXIT_CODE    : 0  (0x0)
        SERVICE_EXIT_CODE  : 0  (0x0)
        CHECKPOINT         : 0x0
        WAIT_HINT          : 0x7d0
        PID                : 1276
        FLAGS              :
Open Services. Check the application is running.

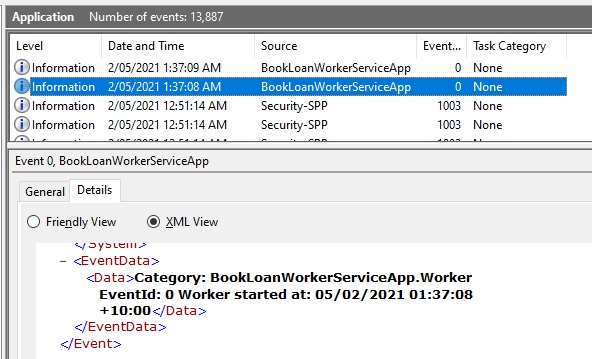
Open the Windows Event Log Viewer.
The event, if logging correctly should show in the event with the event logged from the background service StartAsync() method:
Check the service has started.
Stop the service.
sc stop BookLoanWorkerServiceApp
C:\WINDOWS\system32>sc stop BookLoanWorkerServiceApp
SERVICE_NAME: BookLoanWorkerServiceApp
        TYPE               : 10  WIN32_OWN_PROCESS
        STATE              : 3  STOP_PENDING
                                (STOPPABLE, NOT_PAUSABLE, ACCEPTS_SHUTDOWN)
        WIN32_EXIT_CODE    : 0  (0x0)
        SERVICE_EXIT_CODE  : 0  (0x0)
        CHECKPOINT         : 0x0
        WAIT_HINT          : 0x0
Go back to the Windows Event Log Viewer.
The event, if logging correctly should show in the event with the event logged from the background service StopAsync() method:

The service can be, if no longer needed be deleted using the following command:
sc delete BookLoanWorkerServiceApp
You have seen how to create a .NET Core Worker Service hosted as a Windows Service with basic logging to the Windows Event log.
There seem to be numerous steps to get a basic service running in .NET Core, however, once we have built our first service using the template in Visual Studio, subsequent services will be straightforward. From there we can elaborate on the basic service application and produce more complex services that integrate our application components.
That is all for this post.
I hope you have found this post to be useful and informative.
Andrew Halil is a blogger, author and software developer with expertise of many areas in the information technology industry including full-stack web and native cloud based development, test driven development and Devops.