Welcome to today’s post.
In today’s post I will explain how to update Angular Reactive Forms data using some useful methods within the Reactive Forms API.
Angular form controls within a HTML template can be mapped to form control variables within the component source. The instantiation and definition of FormGroup and FormControl classes within our component allows us to achieve this. I will be showing you how data can be patched and updated within our form controls later. I first will explain when Angular forms can be patched in the next section.
When Angular Forms Can be Patched
In many Angular user interfaces that make use of data entry form, they will require to be pre-populated with either default place holder values or populated with data from a web API service or dependent component.
In most cases our forms will have sufficiently complex structure to require that can be mapped to a JSON structure. An example of a typical HTML Reactive form declaration is shown below:
<p class="heading">User Details</p>

<form [formGroup]="userdetailsForm">
  <div>
    <label for="first-name">First Name: </label>
  </div>
  <div>
    <input id="first-name" type="text" formControlName="firstName" />
  </div>

  <br />

  <div>
    <label for="last-name">Last Name: </label>
  </div>
  <div>
    <input id="last-name" type="text" formControlName="lastName" />
  </div>

  <br />

  <div>
    <label for="login">Login: </label>
  </div>
  <div>
    <input id="login" type="text" formControlName="login" />
  </div>

  <br />

  <div>
    <label for="email">Email: </label>
  </div>
  <div>
    <input id="email" type="text" formControlName="email" />
  </div>
</form>
A declaration of the above form is defined in the typescript component source as a Reactive form declaration using FormGroup and FormControl forms classes. To be able to reference the reactive controls within the HTML template we create an instance of the form from the FormGroup class, then include the form controls as FormControl instances within the form group object.
import { Component } from '@angular/core';
import { FormControl, FormGroup } from '@angular/forms';

@Component({
  selector: 'my-app',
  templateUrl: './app.component.html',
  styleUrls: ['./app.component.css'],
})
export class AppComponent {
  name = 'Angular';

  userdetailsForm = new FormGroup({
    login: new FormControl(''),
    email: new FormControl(''),
    firstName: new FormControl(''),
    lastName: new FormControl(''),
  });
  ...
By default, we have set the form control values to blank strings as shown:
login: new FormControl(''),
In the next section, I will show how form controls can have their values patched and updated with useful API methods.
How to Patch and Set Values of Form Controls
To be able to set values of more than one form control, set can make use of the two Angular Reactive Forms API methods:
setValue()
patchValue()
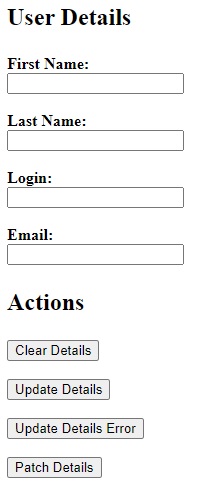
Initially, the form has blank values set for its controls as shown:
For reference, below is the HTML to apply the above actions:
<p class="heading">Actions</p>

<div>
  <button (click)="clearDetails()">Clear Details</button>
</div>

<br />

<div>
  <button (click)="updateDetails()">Update Details</button>
</div>

<br />

<div>
  <button (click)="updateDetailsError()">Update Details Error</button>
</div>

<br />

<div>
  <button (click)="patchDetails()">Patch Details</button>
</div>
I will detail how I use each of the above methods in updating the form control values within the form group.
Using setValue()
To clear a set of controls we can use the setValue() API method. The parameter we use will have an object JSON structure that matches the object property key and object values such as the one below:
{
  firstName: '',
  lastName: '',
  login: '',
  email: '',
}
Two important restriction of setValue() are with the object we specify as an input parameter. These are:
- All the object key names must match corresponding field control names in the form group.
- The number of object keys matches the number of field control names in the form group.
If the above conditions are satisfied, then the values of an object specified within setValue() will be applied without error.
Below is an example of how to properly apply setValue() to clear the form control values:
clearDetails() {
  this.userdetailsForm.setValue({
    firstName: '',
    lastName: '',
    login: '',
    email: '',
  });
}
As I mentioned above, setValue() Requires all properties within the object structure to be amended, allowing strict checking of properties when set.
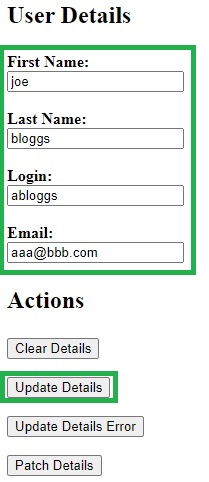
Below is an example of setting non-empty values for each control:
updateDetails() {
  this.userdetailsForm.setValue({
    firstName: 'joe',
    lastName: 'bloggs',
    login: 'abloggs',
    email: 'aaa@bbb.com',
  });
}
When populated, the form controls will appear as shown:
Due to the restrictions imposed on the object being passed within setValue(), passing fewer or more object key value pairs than the form group contains will cause an error. An example of an update that will fail is shown below:
updateDetails() {
  this.userdetailsForm.setValue({
    login: 'abloggs',
    email: 'aaa@bbb.com',
  });
}
When at least one of the required object key value pairs is missing in the JSON object being set, an error requiring the missing value for the corresponding control is displayed:

Next, I will discuss the other way we can update control values within a form group.
Using patchValue()
To clear a set of controls we can also use the patchValue() API method. The parameter we use will have an object JSON structure that matches the object property key and object values such as the one below:
{
  firstName: '',
  lastName: '',
  login: '',
  email: '',
}
Unlike setValue(), where there are key names and key length restrictions on the object that is being used to update corresponding form control values, with patchValue(), the only restriction we have is as follows:
Any object key names specified must match at least one corresponding field control name in within the form group.
With the above condition, there only needs to be at least one object key and value for an update to occur.
If the above condition is satisfied, then the object key and values within an object specified within patchValue() will be applied without error.
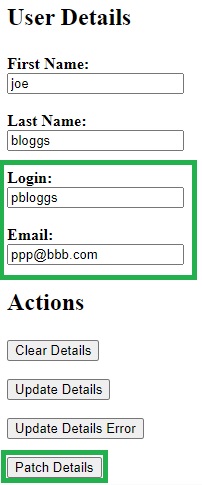
Below is an example of how to properly apply patchValue() to set the form control values:
patchDetails() {
  this.userdetailsForm.patchValue({
    login: 'pbloggs',
    email: 'ppp@bbb.com',
  });
}
The patchValue() method allows us more flexibility in being able to apply updates to the controls within a form group using any combination of the object key value pairs for matching corresponding form controls. This allows the partial object structure within the form to be amended, allowing loose checking of object properties.
An example of applying patching is shown below with just two of matching object keys being patched:
patchDetails() {
  this.userdetailsForm.patchValue({
    login: 'pbloggs',
    email: 'ppp@bbb.com',
  });
}
The resulting patched form control object structure is shown below:
To summarize, from the above example with a basic form control structure, we have seen how to apply two basic, yet powerful Reactive Forms API methods to allow us to update a Reactive Form structure within an Angular application.
For some more details on Angular Reactive Forms and applying changes to the form structure you can refer to the Reactive Forms section on the Angular developer site.
I have omitted control validations from the above to simplify the examples.
That is all for today’s post.
I hope you have found this post both useful and informative.
Andrew Halil is a blogger, author and software developer with expertise of many areas in the information technology industry including full-stack web and native cloud based development, test driven development and Devops.