
Welcome to today’s post.
In today’s post I will be giving an overview of form validations within .NET Core Blazor applications. I will also be showing how to validate fields within an edit form using the explicit (or imperative) method of field validation.
In the previous post I showed how to use Entity Framework Core to provide data access and data manipulation of data presented within an ASP.NET Core Blazor application. In the another post I showed how to use the implicit method of forms validation in ASP.NET Core Blazor Server Applications. In the post I showed how to use ASP.NET data annotations on properties within a model class to validate corresponding control fields within a data entry form.
In the previous post I mentioned the different approaches we can use to validate .NET Core Blazor data entry forms. In this post I will show how to use the approach where we validate input fields after submission.
Before I explain how explicit form validations work, I will explain what pre and post submission validations are.
Explaining Pre and Post Submission Form Validations
With post-submission field validations, we know that the data can be validated in a separate segment of code in the client form before it can reach the backend data or service. In this case, the user is permitted to submit the client form using the submission button. If the input data is valid, then the submission then runs client-side code, or the service is called for data processing or execution.
With post-submission field validations, we know that the data is entered unvalidated on the client form and the user is permitted to submit the input data to intermediate client validation code. When the input data reaches the intermediate validation function, it determines the errors, and sends error messages back to the client form. If the validation check succeeds within the intermediate client validation function, then the input data is permitted to be dispatched to the destination method where the data request is processed, or service is executed.
What are some of the benefits of post-submission form validation?
The main benefit here is that the validation process is confined to the client, reducing load on the server.
One other benefit here is that client and server round trips are limited, with the only server trip confirmed to a submission to the server.
An additional benefit is that more complex validations can be recoded with the intermediate client function, such as cross-field validations.
There are some events that we will need familiarization with. These allow us to divert submissions to an event handler method depending on the validation status of our entered field values. In the event below:
OnValidSubmit()
The event handler is triggered when all the input fields pass the validation rules. With the next event handler:
OnInvalidSubmit()
This event handler is triggered when any of the input fields fail the validation rules. With the final event handler:
OnSubmit()
This event handler is triggered irrespective of any of the input fields passing or failing the validation rules.
If none of the control fields have any validations declared within the markup, then only the OnSubmit() event handler will trigger. As we are defining the validations within the custom submission event handler, only the OnSubmit() event handler needs to be defined. If we had declared at least one validation within the markup, then we could use define either or both of the OnValidSubmit() and OnInvalidSubmit() handlers.
In the following steps that I will walk though, I will show how to use post-validation submission with the explicit (or imperative) method of validation. This involves using a custom validation class, an intermediate client function within the Razor component, and a validation summary within the data entry form.
Preparing Blazor Razor Forms to Handle Explicit Validations
There are seven steps I will go through to show how to convert a basic HTML Razor form into a Razor form that supports explicit input validation.
Step 1: Wrap HTML Controls in EditForm tags
Before we can use field validations in Blazor Razor forms, we will need to convert forms that use HTML forms to use <EditForm> tags:
We go from:
<div class="form-field">
    <label>ID:</label>
        <div>
            <label>@book.ID</label>
        <div>
</div>
…
to
<EditForm Model="@editbook" OnSubmit="@Submit">
    …
    <div class="form-field">
        <label>ID:</label>
        <div>
            <label>@editbook!.ID</label>
        </div>
    </div>
	…
</EditForm>
Note the differences between the above markup and the implicit validation form:
- We use Model instead of EditContext to tie the model to the form controls.
- The intermediate validation function is referenced from the OnSubmit event handler.
- Use a custom validation instead of the data annotations validator.
The CustomBookValidation tag is the name of a custom validation class that will be implemented and used to reference a custom validation class instance, customValidation declared within the code segment of the form. The custom validation instance, customValidation is then used within the submission validation method to check values within each field control, build a list of validation errors, then display them through the validation summary. We will see how this functions later.
We no longer need to declare the EditContext tag in the markup as I will show later, it will be declared in the custom validation class.
Step 2: Convert remaining HTML Controls to EditForm Controls
There is no difference between how implicit and explicit validations are marked up.
Below is one examples of how we replace HTML input controls with a text Blazor input control:
Replacing HTML text inputs to InputText controls:
<div class="form-field">
    <label>Title:</label>
    <div>
            <input @bind="book!.Title" />
     </div>
</div>
to:
<div class="form-field">
    <label>Title:</label>
    <div>
        <InputText @bind-Value=book.Title></InputText>
    </div>
</div>
For numeric controls refer to the previous post.
Step 3: Remove annotations from the model class
We know that validations will be checked with a custom validation method, so, if the class is not used in any other forms in the application, then [Required] and [Range ..] annotations can be removed from the model class.
Step 4: To display validation summaries, add the ValidationSummary element within and near the top of the EditForm tags
To display validation summaries, we add a <ValidationSummary /> element within and near the top of the <EditForm> tags as shown below:
<EditForm Model="@editbook" OnSubmit="@Submit">
<ValidationSummary />
...
Step 5: Implement the custom validation class
This step involves creating a new class then adding the following code:
CustomBookValidation.cs:
using Microsoft.AspNetCore.Components;
using Microsoft.AspNetCore.Components.Forms;

namespace BookLoanBlazorServerApp.Validations
{
    public class CustomBookValidation: ComponentBase
    {
        private ValidationMessageStore? messageStore;

        [CascadingParameter]
        private EditContext? CurrentEditContext { get; set; }

        protected override void OnInitialized()
        {
            if (CurrentEditContext is null)
            {
                throw new InvalidOperationException(
                    $"The custom validation {nameof(CustomBookValidation)} requires a " +
                    $"parameter of type {nameof(EditContext)}.");
            }

            messageStore = new(CurrentEditContext);

            CurrentEditContext.OnValidationRequested += (s, e) =>
                messageStore?.Clear();
            CurrentEditContext.OnFieldChanged += (s, e) =>
                messageStore?.Clear(e.FieldIdentifier);
        }

        public void DisplayErrors(Dictionary<string, List<string>> errors)
        {
            if (CurrentEditContext is not null)
            {
                foreach (var err in errors)
                {
                    messageStore?.Add(CurrentEditContext.Field(err.Key), err.Value);
                }

                CurrentEditContext.NotifyValidationStateChanged();
            }
        }
        public void ClearErrors()
        {
            messageStore?.Clear();
            CurrentEditContext?.NotifyValidationStateChanged();
        }
    }
}
The above class includes the following utility methods:
ClearErrors()
This method clears any validation errors before applying another round of validation checks on the form controls.
DisplayErrors()
This method displays any errors in the ValidationMessageStore errors list to the validation summary by notifying the edit context, CurrentEditContext.
In the OnInitialized() method, the OnValidationRequested and OnFieldChanged events of the edit context clear the validation error list of all errors when the validation request is triggered, and the validation error for the currently changed field.
Step 6: Declare an instance of the custom validation class within the Razor code segment
To access the custom validation from the Razor form code, declare the custom validation class as shown:
private CustomBookValidation? customValidation;
Step 7: Add a CustomBookValidation element within and near the top of EditForm tags
Add the <CustomBookValidation /> element within and near the top of the <EditForm> tags as shown below:
<EditForm Model="@editbook" OnSubmit="@Submit">
    <CustomBookValidation @ref="customValidation" />
    <ValidationSummary />
The @ref attribute references the customValidation variable instance of the CustomBookValidation class.
We reference the intermediate client validation function from the @OnSubmit event.
Step 8: Set the Update button type to a submit type
Our update button will need to be defined with a submit type as shown:
<button class="btn btn-primary" type="submit">
    Update Changes
</button>
Note: This is different from the update button in the implicit validation, where we had the @onclick event handler assigned, and the disabled attribute set to an invalid status Boolean variable.
Step 9: Implement the custom validation logic
In the Razor code segment we declare the Submit() method handler and implement code to do the following:
- Clear all validation errors.
- Check each field value restriction and add to a string dictionary of the validation errors.
- Display the errors through the custom validation instance.
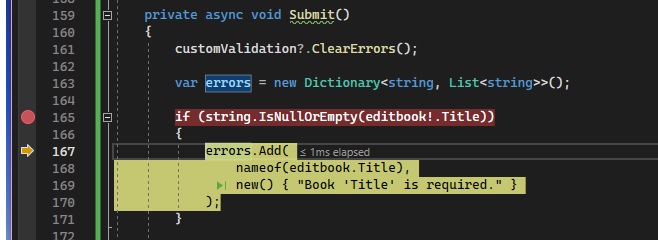
Below is our submission method with validation checking:
private async void Submit()
{
    customValidation?.ClearErrors();

    var errors = new Dictionary<string, List<string>>();

    if (string.IsNullOrEmpty(editbook!.Title))
    {
        errors.Add(
            nameof(editbook.Title),
            new() { "Book 'Title' is required." }
        );
    }

    if (string.IsNullOrEmpty(editbook!.Author))
    {
        errors.Add(
            nameof(editbook.Author),
            new() { "Book 'Author' is required." }
        );
    }

    if (string.IsNullOrEmpty(editbook!.MediaType))
    {
        errors.Add(
            nameof(editbook.MediaType),
            new() { "Book 'MediaType' is required." }
        );
    }

    if (string.IsNullOrEmpty(editbook!.Genre))
    {
        errors.Add(
            nameof(editbook.Genre),
            new() { "Book 'Genre' is required." }
        );
    }

    if (editbook!.YearPublished < 1000 || editbook!.YearPublished > 3000)
    {
        errors.Add(
            nameof(editbook.YearPublished),
            new() { "Book 'YearPublished' range must be between 1000 and 3000." }
        );
    }

    if (errors.Any())
    {
        customValidation?.DisplayErrors(errors);
    }
    else
    {
        this.UpdateBook();
    }
}
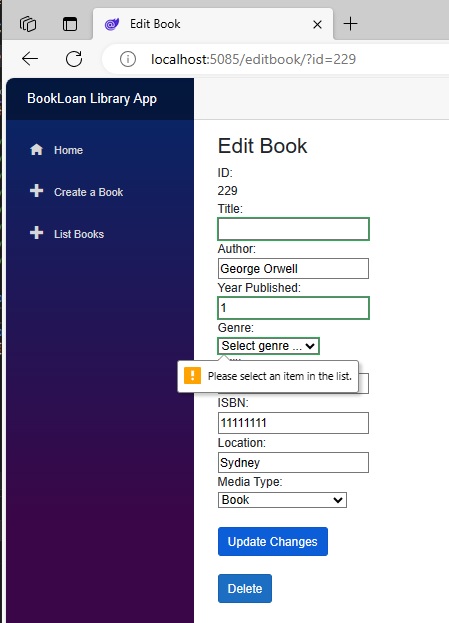
When the above tasks are implemented and the application built, the edit form when we tab off the first field will display as shown:

We managed to capture the validation error for the Title field, which is a blank string, as it is a checked as a required field within the validation handler as shown:
If we forget to remove any declarative validations from any of the field control markup, then attempt to click on the Update Changes button, then the built-in ASP.NET Core Blazor field validations will trigger, showing the error as shown:
To avoid the above situation, we need to remove the declarative required validation shown:
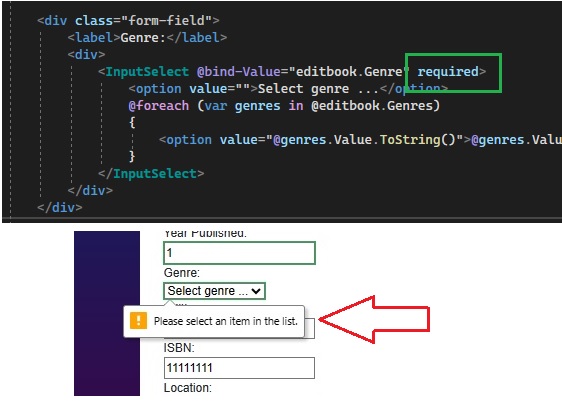
Once we remove the declarative validation and re-run the application, and modify field values, then attempt submission, the drop-down lists will correctly display the red rectangular boundary on error:
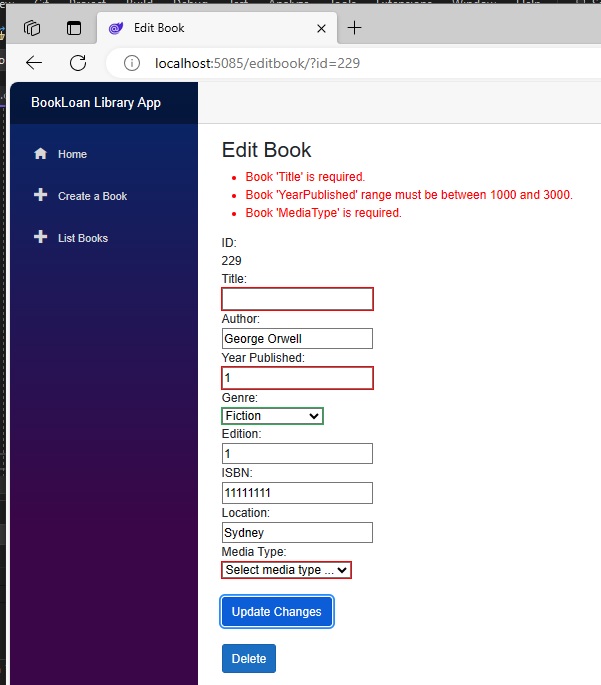
We also managed to capture the validation error for the date published range, which was trapped within the validation handler as shown:

We can see for each un-selected drop-down list, the corresponding value in the model is a blank string with corresponding validation errors when submitted:

Our custom validation handler simply catches this as a blank string as shown:
The entirety of the Razor component markup and code is shown below:
@page "/editbook"
@using Microsoft.AspNetCore.Components
@using BookLoanBlazorServerApp.Services
@using BookLoanBlazorServerApp.Models
@using BookLoanBlazorServerApp.Validations
@inject IBookService LibraryBookService
@inject NavigationManager PageNavigation
@inject IJSRuntime JS

<PageTitle>Edit Book</PageTitle>

<h3>Edit Book</h3>

@if (book == null)
{
    <p><em>Loading...</em></p>
}
else
{
    <EditForm Model="@editbook" OnSubmit="@Submit">
        <CustomBookValidation @ref="customValidation" />
        <ValidationSummary />

        <div class="form-field">
            <label>ID:</label>
            <div>
                <label>@editbook!.ID</label>
            </div>
        </div>

        <div class="form-field">
            <label>Title:</label>
            <div>
                <InputText @bind-Value=editbook.Title></InputText>
            </div>
        </div>

        <div class="form-field">
            <label>Author:</label>
            <div>
                <InputText @bind-Value=editbook.Author></InputText>
            </div>
        </div>

        <div class="form-field">
            <label>Year Published:</label>
            <div>
                <InputNumber @bind-Value=editbook.YearPublished></InputNumber>
            </div>
        </div>

        <div class="form-field">
            <label>Genre:</label>
            <div>
                <InputSelect @bind-Value="editbook.Genre">
                    <option value="">Select genre ...</option>
                    @foreach (var genres in @editbook.Genres)
                    {
                        <option value="@genres.Value.ToString()">@genres.Value.ToString()</option>
                    }
                </InputSelect>
            </div>
        </div>

        <div class="form-field">
            <label>Edition:</label>
            <div>
                <InputText @bind-Value=editbook.Edition></InputText>
            </div>
        </div>

        <div class="form-field">
            <label>ISBN:</label>
            <div>
                <InputText @bind-Value=editbook.ISBN></InputText>
            </div>
        </div>

        <div class="form-field">
            <label>Location:</label>
            <div>
                <InputText @bind-Value=editbook.Location></InputText>
            </div>
        </div>

        <div class="form-field">
            <label>Media Type:</label>
            <div>
                <InputSelect @bind-Value="editbook.MediaType">
                    <option value="">Select media type ...</option>
                    @foreach (var mediatypes in @editbook.MediaTypes)
                    {
                        <option value="@mediatypes.Value.ToString()">@mediatypes.Value.ToString()</option>
                    }
                </InputSelect>
            </div>
        </div>

        <br />

        <button class="btn btn-primary" type="submit">
            Update Changes
        </button>

        <br />
        <br />

        <button class="btn btn-primary"
            @onclick="DeleteBook">
            Delete
        </button>
    </EditForm>

    <br />
}

@code {
    [Parameter]
    [SupplyParameterFromQuery]
    public int ID { get; set; }

    private CustomBookValidation? customValidation;

    private BookViewModel? book;
    private BookEditModel? editbook;

    protected override async Task OnInitializedAsync()
    {
        book = await LibraryBookService.GetBook(ID);
        editbook = new BookEditModel(book);
    }

    private async void Submit()
    {
        customValidation?.ClearErrors();

        var errors = new Dictionary<string, List<string>>();

        if (string.IsNullOrEmpty(editbook!.Title))
        {
            errors.Add(
                nameof(editbook.Title),
                new() { "Book 'Title' is required." }
            );
        }

        if (string.IsNullOrEmpty(editbook!.Author))
        {
            errors.Add(
                nameof(editbook.Author),
                new() { "Book 'Author' is required." }
            );
        }

        if (string.IsNullOrEmpty(editbook!.MediaType))
        {
            errors.Add(
                nameof(editbook.MediaType),
                new() { "Book 'MediaType' is required." }
            );
        }

        if (string.IsNullOrEmpty(editbook!.Genre))
        {
            errors.Add(
                nameof(editbook.Genre),
                new() { "Book 'Genre' is required." }
            );
        }

        if (editbook!.YearPublished < 1000 || editbook!.YearPublished > 3000)
        {
            errors.Add(
                nameof(editbook.YearPublished),
                new() { "Book 'YearPublished' range must be between 1000 and 3000." }
            );
        }

        if (errors.Any())
        {
            customValidation?.DisplayErrors(errors);
        }
        else
        {
            this.UpdateBook();
        }
    }

    // Update entered book properties.
    private async void UpdateBook()
    {
        var result = await LibraryBookService.UpdateBook(ID, editbook! as BookViewModel);
        if (result != null)
            message = "Record has been successfully updated!";
        else
            message = "Unable to update record.";
        await JS.InvokeVoidAsync("alert", message);
    }

    // Delete book on confirmation.
    private async void DeleteBook()
    {
	// Omitted: see previous posts
    }
}
The above has shown us how to construct explicit form validation within an ASP.NET Core Blazor application. This involved first implementing a custom validation class. Then, within our Blazor form code we declared an instance of the custom validation class. Finally, within a submission method we determined any errors from our form and then displayed them using the custom validation class.
That is all for today’s post.
I hope you have found this post useful and informative.
Andrew Halil is a blogger, author and software developer with expertise of many areas in the information technology industry including full-stack web and native cloud based development, test driven development and Devops.

