
Welcome to today’s post.
In today’s post I will be discussing how to execute calls of HTTP POST methods to a Web API from a .NET Core Blazor WebAssembly application.
Within a Blazor WebAssembly application, we are running all the application logic within the client itself.
This is unlike a Blazor Server application, where we are running all the application logic from a server environment, where the externally available services, including data stores are directly accessible to the front-end part of the application through NuGet libraries that are directly embedded within the server application deliverables at compile time within the application binaries that consist mainly of DLLs.
In one of my previous posts, I showed how to execute calls to HTTP GET Web API methods from within a Blazor WebAssembly. In that post, I showed how to execute a HTTP GET call to an external Web API method to retrieve results as a list of records. We executed HTTP GET calls by using the GetFromJsonAsync() method. In a previous post I showed how to implement a basic minimal Web API service that included an HTTP POST method. I then showed how to implement a Web API service with Entity Framework Core integration to a backend database.
In this post I will show how to execute a HTTP POST call to a web API from within a .NET Core Blazor WebAssembly application. I will also show how to trace the call through the browser development tools. In addition, I will show how to validate that the posting call has successfully added data to your backend data store.
Creating a Form to Post Data to a Backend Datastore
One of the first requirements we have before we can post a record is to provide an interface within our application for the user to be able to enter data then submit it to the web API.
If you have already written a CRUD application as a .NET Core Blazor Server application with a data entry form that could be submitted, then you are already there in terms of implementation, as almost the same Razor code can be reused within a WebAssembly web client application.
In a previous post where I showed how to use Entity Framework Core within ASP.NET Core Blazor Server applications, I can take the same Razor data entry form components and re-use most of the markup and code in our WebAssembly. If you had refactored calls to your data access logic into service classes, then the Razor component itself can be copied into your WebAssembly project Pages sub-folder with a few minor changes. Once that is done, then the service classes would just include calls to your external web API methods. I will show how this is done in the next section.
With the Razor component I reused from the Server application, what I did is to include my model classes and service class with slight change to the namespace for my application. There are no changes to the HTML markup. The resulting Razor markup is as shown:
CreateBook.razor
@page "/createbook"
@using Microsoft.AspNetCore.Components
@using BookLoanBlazorWASMApp.Services
@using BookLoanBlazorWASMApp.Models
@inject IBookService LibraryBookService
@inject NavigationManager PageNavigation

<PageTitle>Create Book</PageTitle>

<h3>Create Book</h3>

<EditForm EditContext="@editContext">
    <DataAnnotationsValidator />
    <ValidationSummary />

    <div class="form-field">
        <label>Title:</label>
        <div>
            <InputText @bind-Value=createbook!.Title></InputText>
        </div>
    </div>

    <div class="form-field">
        <label>Author:</label>
        <div>
            <InputText @bind-Value=createbook.Author></InputText>
        </div>
    </div>

    <div class="form-field">
        <label>Year Published:</label>
        <div>
            <InputNumber @bind-Value=createbook.YearPublished></InputNumber>
        </div>
    </div>

    <div class="form-field">
        <label>Genre:</label>
        <div>
            <InputSelect @bind-Value="createbook.Genre" required>
                <option value="">Select genre ...</option>
                @foreach (var genres in createbook.Genres)
                {
                    <option value="@genres.Value.ToString()">@genres.Value.ToString()</option>
                }
            </InputSelect>
        </div>
    </div>

    <div class="form-field">
        <label>Edition:</label>
        <div>
            <InputText @bind-Value=createbook.Edition></InputText>
        </div>
    </div>

    <div class="form-field">
        <label>ISBN:</label>
        <div>
            <InputText @bind-Value=createbook.ISBN></InputText>
        </div>
    </div>

    <div class="form-field">
        <label>Location:</label>
        <div>
            <InputText @bind-Value=createbook.Location></InputText>
        </div>
    </div>

    <div class="form-field">
        <label>Media Type:</label>
        <div>
            <InputSelect @bind-Value="createbook.MediaType">
                <option value="">Select media type ...</option>
                @foreach (var mediatypes in createbook.MediaTypes)
                {
                    <option value="@mediatypes.Value.ToString()">@mediatypes.Value.ToString()</option>
                }
            </InputSelect>
        </div>
    </div>

    <br />

    <button class="btn btn-primary"
        @onclick="SaveBook" disabled="@isFormInvalid">
        Save Book
    </button>
</EditForm>

<br />
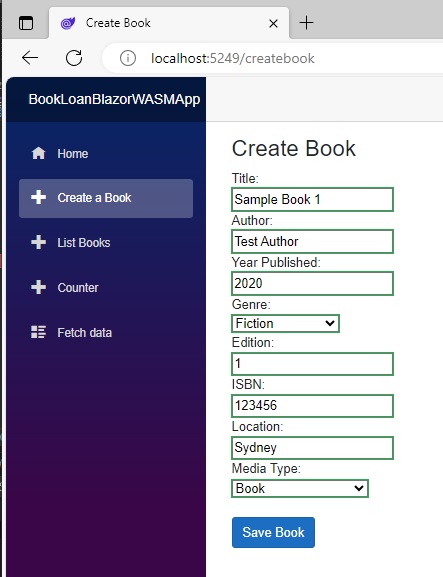
So, once you have the Razor component transplanted into your application and running, it will resemble something like this:
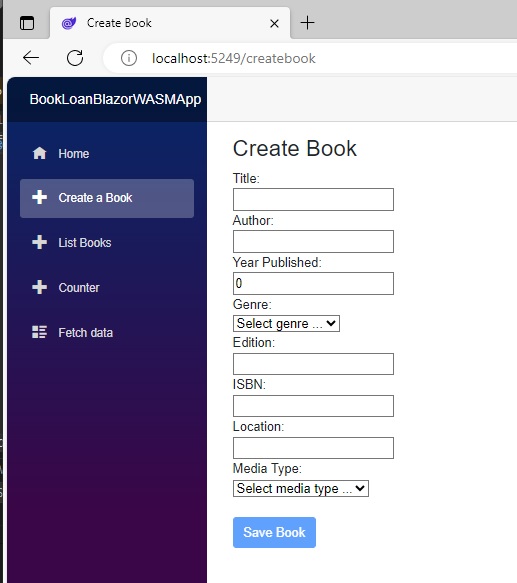
As I mentioned, if you had refactored any API calls into a separate service class, then the Razor form component C# code segment should resemble the code I have below:
@code {
    private BookViewModel book = new();

    private BookCreateModel? createbook;

    private bool isFormInvalid = true;
    private EditContext? editContext;

    protected override async Task OnInitializedAsync()
    {
        createbook = new BookCreateModel(book);
        editContext = new(createbook!);
        editContext.OnFieldChanged += HandleFieldChanged;
    }

    private void HandleFieldChanged(object? sender, FieldChangedEventArgs e)
    {
        if (editContext is not null)
        {
            isFormInvalid = !editContext.Validate();
            StateHasChanged();
        }
    }

    private string Message = String.Empty;

    // Create entered book.
    private async void SaveBook()
    {
        var status = await LibraryBookService.SaveBook(createbook!);
        PageNavigation.NavigateTo($"poststatuspage/?id={status}");
    }

    public void Dispose()
    {
        if (editContext is not null)
        {
            editContext.OnFieldChanged -= HandleFieldChanged;
        }
    }
}
In the next section I will show how calls are made directly to a HTTP POST method within a Web API. In a later section, we will see how our Blazor code makes calls to the Web API POST method.
Executing Calls to a Web API HTTP POST Method
Before I show how the API calls are executed from the service class, I will explain how an HTTP POST call to a web API service would be called directly.
In a previous post I showed how to implement a minimum Web API service that contained REST API methods for GET, POST, PUT and DELETE. I then showed how to integrate data access into the minimal Web API using Entity Framework Core.
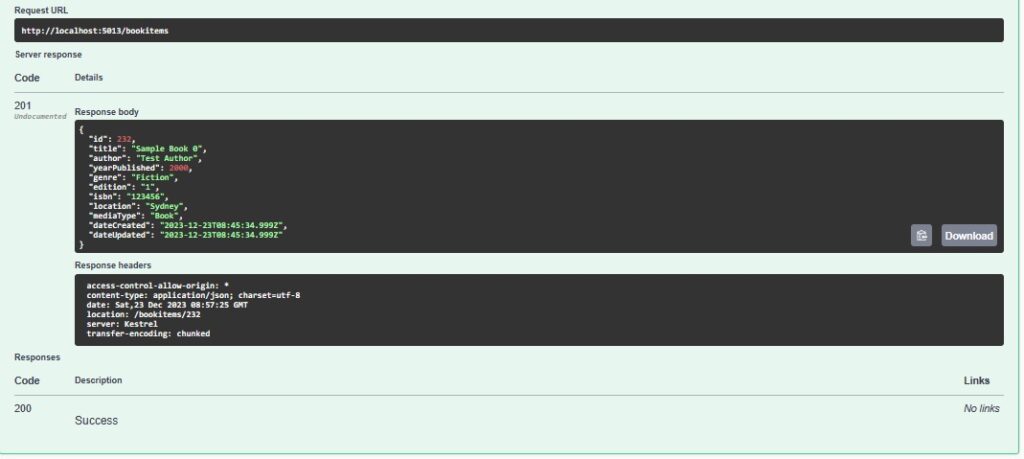
Below is the HTTP POST method /bookitems of the Swagger UI of the minimal Web API:
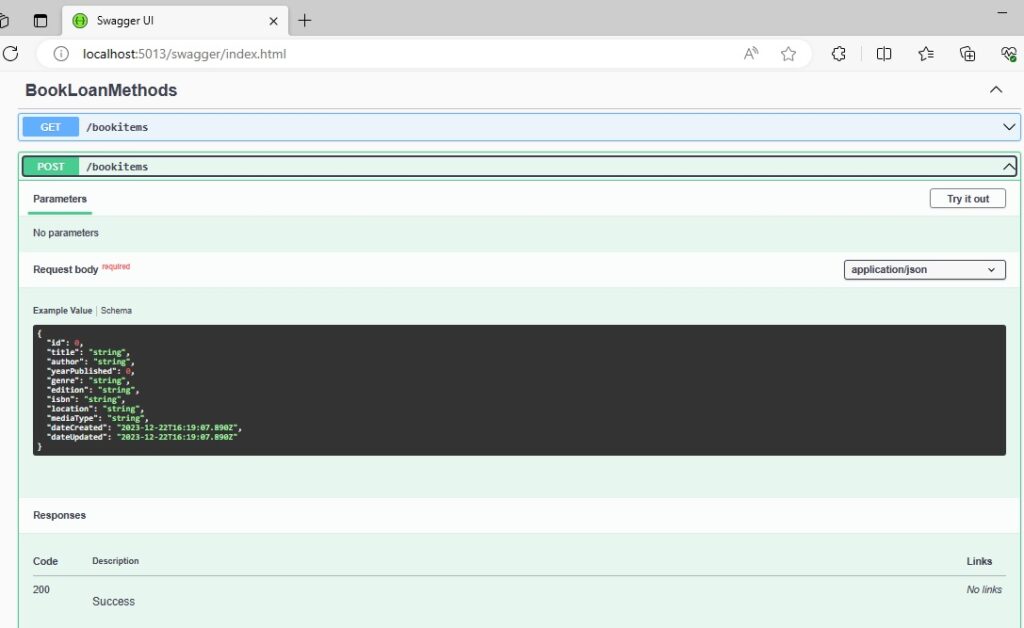
The way in which data is transmitted into the POST method is through a payload. The payload is a JSON formatted object that contains key and value pairs. As we can see, the POST method has a sole parameter that is passed into the method.
The keys within the JSON payload will need to match the fields that are in the entity that the POST method will be updating. If any of the fields do not match, then you may receive a backend error when the API method inserts data into the database. For this reason, we use a typed model class or DTO class for the parameter. The property names within the class will correspond to the fields within the backend data source that we will be inserting data into.
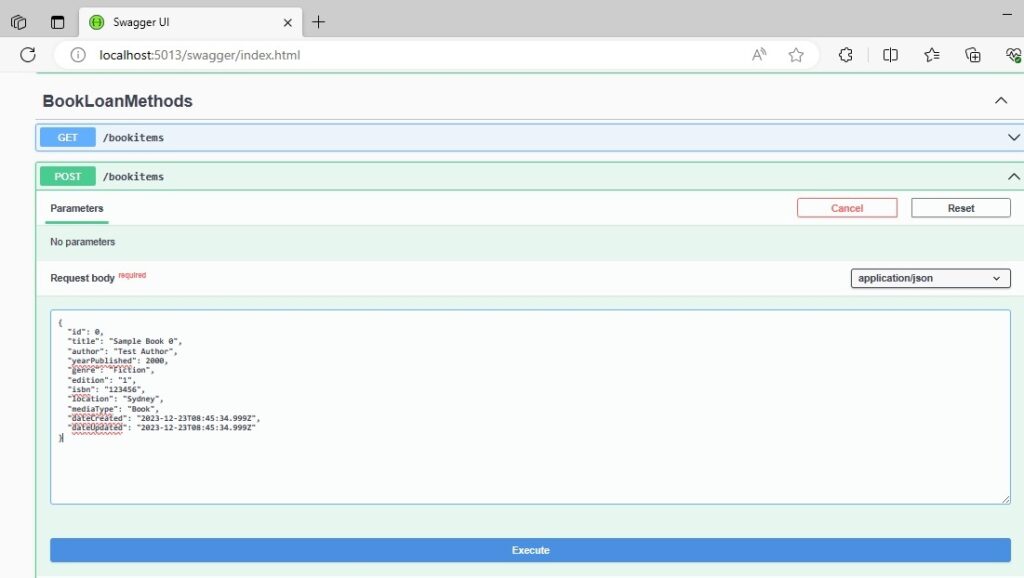
Below is a screenshot displaying the JSON payload in the step-through debugger with correct values:
Notice that the ID key within the payload has a value of zero when it is passed into the API method.
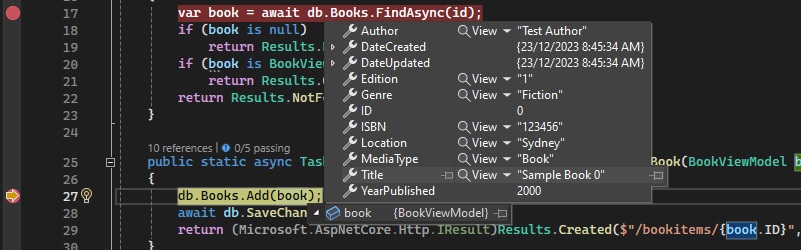
When the data is inserted into the backend database, Entity Framework Core retrieves the identity key value of the inserted record and returns it back to the client application. In this case, the ID of the payload object is set to the new record identifier.
In the screenshot below, we can see the identifier, bookID has been set to the new record identity key after the SaveChangesAsync() call has been executed on the data context:

Below is the result of the POST execution call within the Swagger UI of the Web API service:
We could also execute the HTT POST call to the API service by using CURL with the payload as follows:
curl -X 'POST' \
  'http://localhost:5013/bookitems' \
  -H 'accept: */*' \
  -H 'Content-Type: application/json' \
  -d '{
  "id": 0,
  "title": "Sample Book 0",
  "author": "Test Author",
  "yearPublished": 2000,
  "genre": "Fiction",
  "edition": "1",
  "isbn": "123456",
  "location": "Sydney",
  "mediaType": "Book",
  "dateCreated": "2023-12-23T08:45:34.999Z",
  "dateUpdated": "2023-12-23T08:45:34.999Z"
}'
In the next section, I will show how to create a wrapper for the Web API calls through a service class within the WebAssembly.
A Service Class for the API Calls
Now that we know how to make API calls to the HTTP POST method directly, lets see how to make the same calls through a service class within our WebAssembly.
Calls to HTTP POST REST API methods are required to use the method PostAsJsonAsync(), which is within the System.Net.Http.Json namespace. The parameters passed into the method are as shown:
PostAsJsonAsync(Uri, object);
where:
Uri is the URL to the API POST method.
object is the JSON payload object.
The service class containing the method, SaveBook() that calls our HTTP POST method is shown below:
BookService.cs:
using BookLoanBlazorWASMApp.Models;
using System.Net.NetworkInformation;
using System.Net.Http;
using System.Net.Http.Json;
using static System.Net.WebRequestMethods;

namespace BookLoanBlazorWASMApp.Services
{
    public class BookService : IBookService
    {
        private readonly ILogger _logger;
        private readonly HttpClient _http;
        private readonly string _apiUri = "http://localhost:5013/";

        public BookService(
            ILogger<BookService> logger, HttpClient http)
        {
            _logger = logger;
            _http = http;
        }

        /// <summary>
        /// GetBooks()
        /// </summary>
        /// <returns></returns>
        public async Task<List<BookViewModel>> GetBooks()
        {
            var books = await _http.GetFromJsonAsync<List<BookViewModel>>(_apiUri + "bookitems");
            return books!.ToList();
        }


        /// <summary>
        /// GetBook()
        /// </summary>
        /// <param name="id"></param>
        /// <returns></returns>
        public async Task<BookViewModel> GetBook(int id)
        {
            var book = await _http.GetFromJsonAsync<BookViewModel>(_apiUri + "bookitem/" + id);
            return book!;
        }


        /// <summary>
        /// SaveBook()
        /// </summary>
        /// <param name="vm"></param>
        /// <returns></returns>
        public async Task<int> SaveBook(BookViewModel vm)
        {
            try
            {
                await _http.PostAsJsonAsync(_apiUri + "bookitems", vm);
                return 1;
            }
            catch
            {
                return 0;
            }
        }
    }
}
In the next section, I will show how to test the Web API POST calls from a Razor component.
Testing the Web API HTTP POST Call from the Razor Component
Below is our data entry form within the Razor component with entered data for a new Book record:
To trace the REST call within the browser, we open the developer tools first.
Following submission, we will be taken to the record post notification page:

The Razor component for the notification page is shown below:
PostStatusPage.razor:
@page "/poststatuspage"

<PageTitle>Record Status Page</PageTitle>

<h1>Record Status Page</h1>

@if (ID == 0)
{
    <p>Book cannot be added.</p>
}
else
{
    <p>Book has been created!</p>
}

@code {
    [Parameter]
    [SupplyParameterFromQuery]
    public int? ID { get; set; }
}
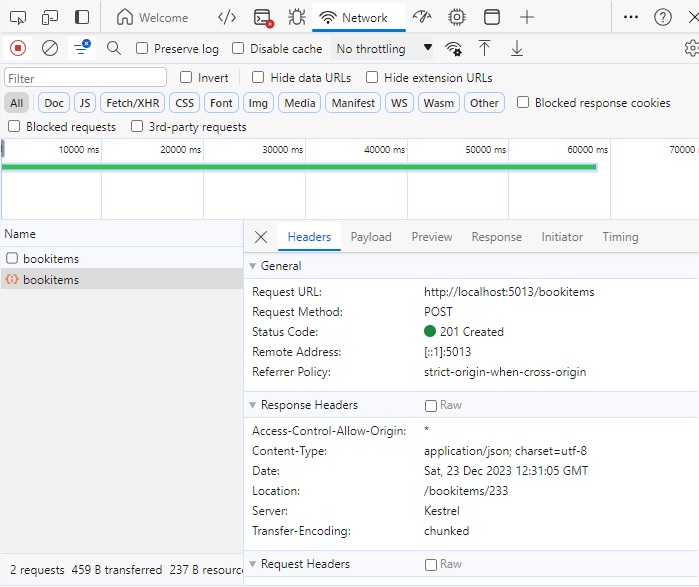
Following the HTTP POST call, we see the response result status code of 201 Created of the HTTP REST call within the Network tab of the Edge browser:
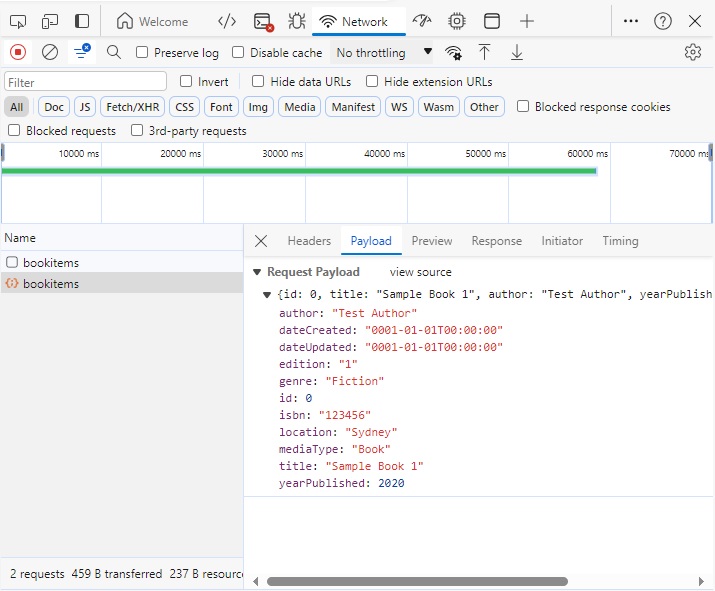
Next, selecting the Payload tab shows the JSON of the payload parameter we have sent to the API method:
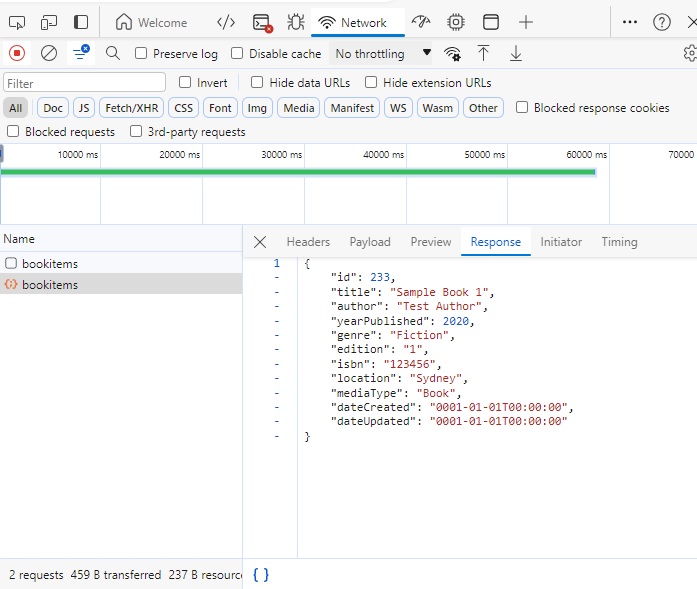
Next, selecting the Response tab shows the JSON of the record with the identifier corresponding to the new identity key:
In the Blazor WebAssembly service method we could still retrieve the new identity value by returning the response and obtaining the Content property of the response as shown:
var response = await _http.PutAsJsonAsync(_apiUri + $"bookitems/{Id}", vm);
var content = response.Content;
To verify the data has been inserted into the database, we could view the debug log output from the Web API:
info: Microsoft.EntityFrameworkCore.Database.Command[20101]
      Executed DbCommand (1,651ms) [Parameters=[@p0='?' (Size = 4000), @p1='?' (DbType = DateTime2), @p2='?' (DbType = DateTime2), @p3='?' (Size = 4000), @p4='?' (Size = 4000), @p5='?' (Size = 4000), @p6='?' (Size = 4000), @p7='?' (Size = 4000), @p8='?' (Size = 4000), @p9='?' (DbType = Int32)], CommandType='Text', CommandTimeout='30']
      SET IMPLICIT_TRANSACTIONS OFF;
      SET NOCOUNT ON;
      INSERT INTO [Books] ([Author], [DateCreated], [DateUpdated], [Edition], [Genre], [ISBN], [Location], [MediaType], [Title], [YearPublished])
      OUTPUT INSERTED.[ID]
      VALUES (@p0, @p1, @p2, @p3, @p4, @p5, @p6, @p7, @p8, @p9);
info: Microsoft.EntityFrameworkCore.Database.Command[20101]
      Executed DbCommand (2,525ms) [Parameters=[], CommandType='Text', CommandTimeout='30']
      SELECT [b].[ID], [b].[Author], [b].[DateCreated], [b].[DateUpdated], [b].[Edition], [b].[Genre], [b].[ISBN], [b].[Location], [b].[MediaType], [b].[Title], [b].[YearPublished]
      FROM [Books] AS [b]
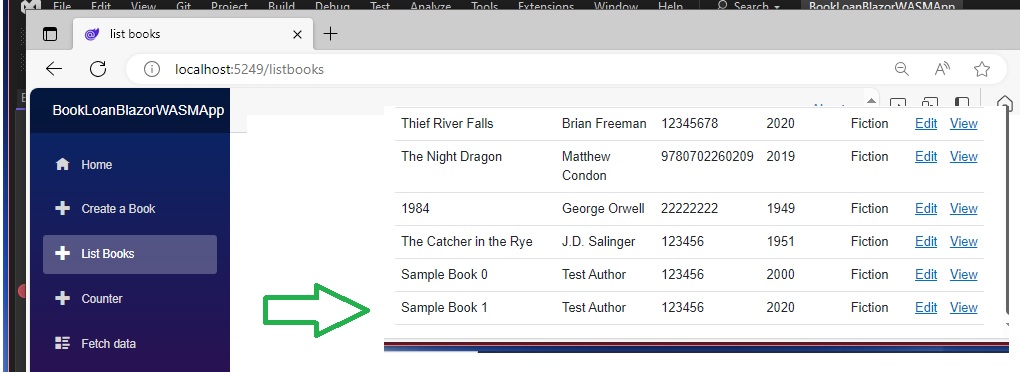
Alternatively, we can select the listing of books in our application, which will re-query the data from the API using the HTTP REST GET call:
We have seen how to execute a call to an HTTP REST POST call to a web API method from a Blazor WebAssembly application.
In the next post I will show how to execute a HTTP REST PUT call to the web API method from a WebAssembly application.
That is all for today’s post.
I hope you have found this post useful and informative.
Andrew Halil is a blogger, author and software developer with expertise of many areas in the information technology industry including full-stack web and native cloud based development, test driven development and Devops.

