
Welcome to today’s post.
In today’s post I will be showing you can post messages to an Azure Storage Queue using the Azure Storage Queue API with .NET Core. I will then show how to add structured data to the storage queue.
In the previous post I explained and compared the differences between Azure Storage Queue and Azure Service Bus. I also showed how you would decide which of the two queuing services you would use.
Before I show how to queue requests using storage queues, I will cover some considerations on using Azure Storage Queues in application scenarios.
Considerations for the use of Azure Storage Queues
Adding structured data to the message queue allows us to provide more meaningful data to a consumer of our queue message. The consumer, an Azure function can then construct an orchestration or workflow from the message item.
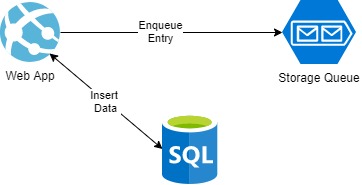
The other use for an Azure Storage Queue is to enable a client web application or a web API service to be decoupled from an external Web Job that is used to run background tasks. The jobs would be triggered by new or modified data that is enqueued into the storage queue.
Another reason is to remove server load from the application by making the queue posting asynchronous so that the web application or API is responsive to end users.
If we wanted to use queuing and guarantee that our messages were delivered to the queue, then we would use Azure Service Bus, which is a transactional queuing solution. Where the size of the queue is almost unlimited, and with indefinite retention of messages, we can use Azure Storage Queue, with its maximum queue size of 200TB which is the maximum size of an Azure Storage Account.
One significant benefit of using Azure Storage Queue messaging is that the throughput is 20000 messages per second, which exceeds the throughput of 2000 messages per second for Azure Service Bus queues. However, for this increase in throughput, we give up some fault-tolerance.
Adding an Azure Storage Queue to a .NET Core Application
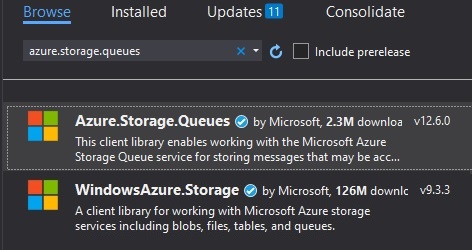
To develop Azure Storage Queues in .NET Core applications we will need to install the NuGet package:
Azure.Storage.Queues
I will go through the process of building the application to submitting messages to an Azure storage queue.
We can submit messages through different sources including a web application or web API method. I will show how this is done using an existing API method.
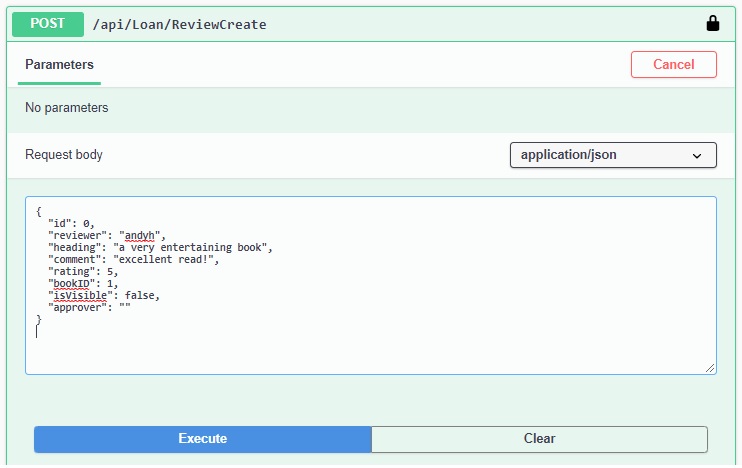
In this case we are posting a new record into a review table, keeping the isVisible flag to false.
We can do this using POSTMAN or through an API service using the Swagger UI.
An abbreviated form for our class that will contain our payload data is shown:
public class ReviewViewModel
{
    public int ID { get; set; }
    public string Reviewer { get; set; }
    public string Author { get; set; }
    public string Title { get; set; }
    public string Heading { get; set; }
    public string Comment { get; set; }
    public int Rating { get; set; }
    public int BookID { get; set; }
    public bool IsVisible { get; set; }
    public string Approver { get; set; }
	..
}
Once posted the data is shown. We will then proceed to post some data to our storage queue.
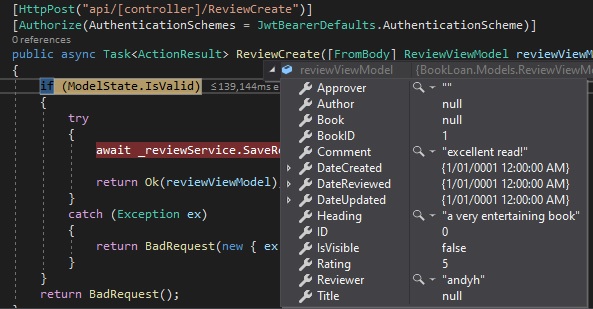
Our review service method to insert new data and call our storage queue service is shown:
public async Task SaveReview(ReviewViewModel vm)
{
    ReviewViewModel reviewViewModel = new ReviewViewModel()
    {
        BookID = vm.BookID,
        Heading = vm.Heading,
        Comment = vm.Comment,
        Rating = vm.Rating,
        DateReviewed = vm.DateReviewed,
        DateCreated = DateTime.Now,
        Reviewer = vm.Reviewer,
        IsVisible = false,
        Approver = ""
    };
    _db.Add(reviewViewModel);
    await _db.SaveChangesAsync();
    _azureStorageQueueService.InsertMessage(reviewViewModel);
}
In the next section, I will show how the service class for the Azure Storage Queue is implemented.
Providing Azure Storage Queue Messaging in a Service Class
Before we can push messages into our queue, we will need to either create or use an existing queue.
This is done by creating a service for our Azure Storage Queue.
It is shown below (the details of code for the CreateQueue() and InsertMessage() methods will be explained as little later):
using System.Collections.Generic;
using System.Linq;
using System;
using System.Configuration;
using System.Threading.Tasks;
using Azure.Storage.Queues;
using Azure.Storage.Queues.Models;
using Newtonsoft.Json;
using Microsoft.Extensions.Options;
using System.Text;
using BookLoan.Models;
using BookLoan.Services;

namespace BookLoan.Loan.API.Services
{
    public class AzureStorageQueueService: IAzureStorageQueueService
    {
        private readonly IOptions<AppConfiguration> _appConfiguration;
        private QueueClient _queueClient;
        private readonly string _queueName;

        public AzureStorageQueueService(IOptions<AppConfiguration> appConfiguration)
        {
            _appConfiguration = appConfiguration;
            _queueName = _appConfiguration.Value.QueueName;
        }

        public bool CreateQueue()
        {
            …
        }

        public void InsertMessage(ReviewViewModel message)
        {
            …
        }
}
We will also need to declare a variable to hold our queue client instance:
private QueueClient _queueClient;
A method to create or use an existing queue is shown:
public bool CreateQueue()
{
    try
    {
        string connectionString = _appConfiguration.Value.StorageConnectionString;

        _queueClient = new QueueClient(connectionString, _queueName);

        _queueClient.CreateIfNotExists();

        if (_queueClient.Exists())
        {
            Console.WriteLine($"Queue created: '{_queueClient.Name}'");
            return true;
        }
        else
        {
            Console.WriteLine($"Make sure the Azure storage emulator is running and try again.");
            return false;
        }
    }
    catch (Exception ex)
    {
        Console.WriteLine($"Exception: {ex.Message}\n\n");
        Console.WriteLine($"Make sure the Azure storage emulator is running and try again.");
        return false;
    }
}
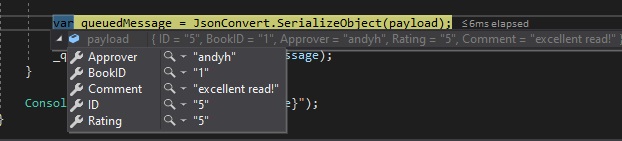
Our method to push the message into our queue in a structured format is shown below:
public void InsertMessage(ReviewViewModel message)
{
    if (!this.CreateQueue())
        return;

    if (_queueClient.Exists())
    {
        var payload = new {
            ID = message.ID.ToString(),
            BookID = message.BookID.ToString(),
            Approver = message.Reviewer.ToString(),
            Rating = message.Rating.ToString(),
            Comment = message.Comment.ToString()
        };

        var queuedMessage = JsonConvert.SerializeObject(payload);

        _queueClient.SendMessage(queuedMessage);
    }

    Console.WriteLine($"Inserted: {message}");
}
Before we can push the data across to the queue, we will deserialize the data into JSON format:
We then call the Azure Queue Storage client API method to push a message into the queue:
SendMessage(string queuedMessage);
Next, we check our Azure storage queue in the Azure portal.
The message should be there with a unique message id:

You have seen how to post a message to the Azure storage queue.
In future posts I will be making use of the storage queue for more interesting application integrations including Azure function orchestrations.
That is all for today’s post.
I hope you have found this post useful and informative.
Andrew Halil is a blogger, author and software developer with expertise of many areas in the information technology industry including full-stack web and native cloud based development, test driven development and Devops.

