
Welcome to today’s post.
In today’s post I will show how to use role-based claims authorization with the AuthorizeView authorization tag in ASP.NET Core Blazor Server applications.
In the previous post, I showed how to use the AuthorizeView authorization tag within a Blazor component HTML markup to protect a region of HTML content from being displayed when the user is unauthenticated (not logged in).
The account I created was a basic account with an email address and user details. Because the account was not defined with any roles, I could not test role-based authorization within the application.
In this post I will extend the user account to contain the following data:
- Roles
- Claims
Then I will show how to use the user role within an AuthorizeView element within a Razor component within an ASP.NET Core Blazor server application to show how to filter out content access based on the role.
Defining Roles in the Identity Store
With the ASP.NET Core Identity Entity Framework libraries, we can manipulate data within the identity data store to allow us to do the following:
- Create and maintain user accounts.
- Create and maintain user roles.
- Create and maintain role claims.
- Create and maintain user claims.
In a previous post, I showed how to add user accounts with roles into a SQL Server identity store.
Before you can add data into your identity store, you will need to setup a database connection and a data context.
If your database was modified as part of the scaffolding and data migration as I showed in a previous post where we added Identity UI security to our application, then the data context and startup code for connection to your identity store will have been generated. In addition, the following libraries will be in your imported NuGet packages:
Microsoft.AspNetCore.Identity
Microsoft.AspNetCore.Identity.EntityFrameworkCore
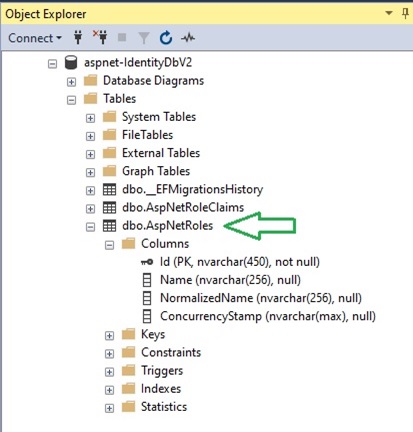
In our identity data store, the table that stores application roles is the table [AspNetUserRoles]. This is shown in the SQL SSMS object explorer:
To add an Admin role into your identity store, we will need to use the roleManager service. This is shown in the following code excerpt:
using Microsoft.AspNetCore.Identity;
using Microsoft.AspNetCore.Authentication;
using Microsoft.AspNetCore.Identity.EntityFrameworkCore;
using System.Security.Claims;

namespace BookLoanBlazorServerAppAuth.Data
{
    public class SeedAccounts
    {
        private AppIdentityDbContext db;
        private string AdminEmail = "admin@anycorp.com";
        private string AdminPass = "[whatever I choose!]";

        public SeedAccounts(AppIdentityDbContext _db)
        {
            db = _db;
        }

        public async Task GenerateUserAccounts()
        {
            var userManager = new UserStore<IdentityUser>(db);
            var roleManager = new RoleStore<IdentityRole>(db);

            // Create Admin Role
            if (!roleManager.Roles.Where(a => a.Name == "Admin").Any())
            {
                // first we create Admin role
                var role = new Microsoft.AspNetCore.Identity.IdentityRole();
                role.Name = "Admin";
                role.NormalizedName = role.Name.ToUpper();
                await roleManager.CreateAsync(role);
                await db.SaveChangesAsync();
            }
            …
        }
}
Where AppIdentityDbContext is the data context of our identity data store.
The above code excerpt is a small part of what we do when we create the user account with a role. In the next section, I will show how to create the user account with the role we have just created.
To execute the seeding service class, we can do this in a few different ways:
- Create a separate ASP.NET Core configuration user interface application that runs the seeding.
- Run the seeding as a background thread after application startup.
- Run the seeding in the initialization of the landing page of the application.
The best option is through a configuration application, however for convenience, I am using option 3.
In the Index.Razor component, I am making the call to the seeding method as follows:
Index.razor:
@using BookLoanBlazorServerAppAuth.Data
@using Microsoft.Extensions.DependencyInjection;
@using System.Threading;
@using System.Threading.Tasks;
@inject SeedAccounts SeedAccountsService
@page "/"
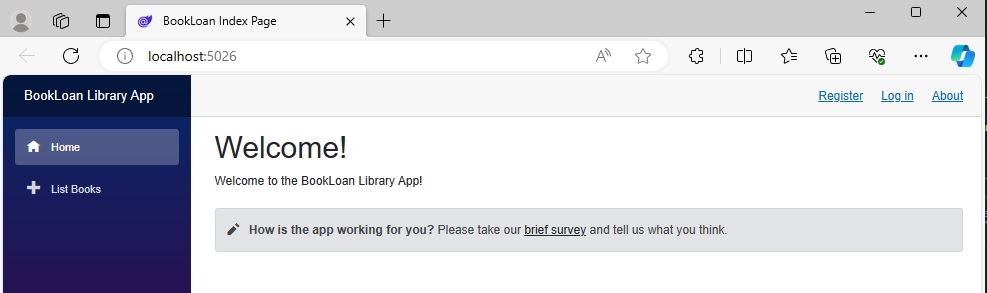
<PageTitle>BookLoan Index Page</PageTitle>
<h1>Welcome!</h1>
Welcome to the BookLoan Library App!
<SurveyPrompt Title="How is the app working for you?" />
@code
{
protected override async Task OnInitializedAsync()
{
await SeedAccountsService.GenerateUserAccounts();
}
}
Then add the class to the service collection in the program startup as shown:
builder.Services.AddTransient<SeedAccounts, SeedAccounts>();
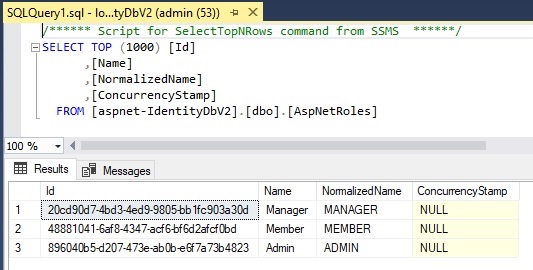
After the above seeding code is executed, the [AspNetRoles] table will have the new role added as shown:
In the next section, I will show how to add a user account with the above defined role.
Generating a New User Account
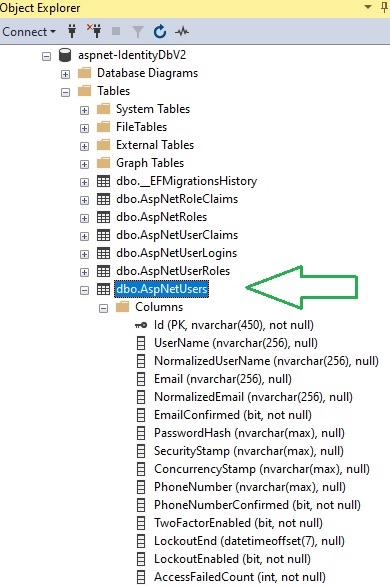
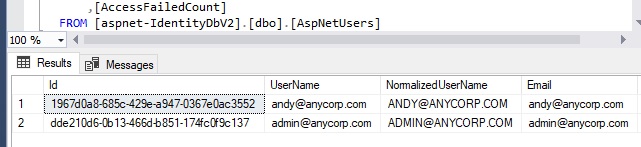
In our identity data store, the table that stores application users is [AspNetUsers] table. This is shown in the SQL SSMS object explorer:
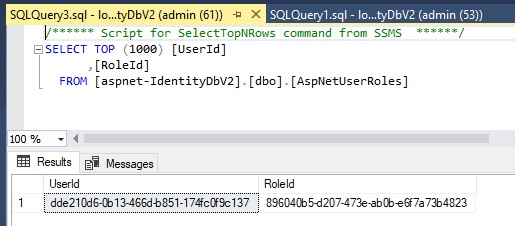
To associate the user with a role, we will need to add an additional record into the [AspNetUserRoles] table. This is shown in the SQL SSMS object explorer:
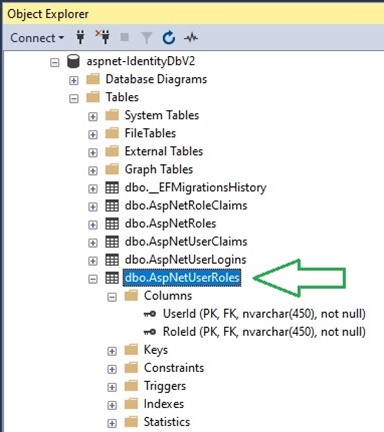
Based on the foreign key dependency relationship, we will need to add the user account first, then with the generated identity key of the [AspNetUsers] table, and the identity key of the nominated role in the [AspNetRoles] table, we add a record with this key pair into the [AspNetUserRoles] table to provide the association of the user account to the role.
To add user accounts into our identity data store, we will need to use the userManager service.
In the code excerpt below, we first check if the user does not already exist in the database, then create an IdentityUser() entity object, assign the minimum required fields for the account (email, user name, password, security stamp and hash), then execute the CreateAsync(user) method of the UserManager service.
// create Admin user
if (!userManager.Users.Where(a => a.UserName == AdminEmail).Any())
{
    try
    {
        // Create a Admin super user who will maintain the website
        var user = new IdentityUser();
        user.UserName = AdminEmail;
        user.Email = AdminEmail;
        user.NormalizedEmail = AdminEmail.ToUpper();
        user.NormalizedUserName = AdminEmail.ToUpper();
        user.SecurityStamp = Guid.NewGuid().ToString("D");
        var password = new PasswordHasher<IdentityUser>();
        var hashed = password.HashPassword(user, AdminPass);
        user.PasswordHash = hashed;
        var chkUser = await userManager.CreateAsync(user);
        ...
The final line above has a chkUser return value, which is of type Boolean, and can be used to confirm if should add any additional data for the created user. In this case, it will be used to allow us to create a record in the [AspNetUserRoles] table, as it is a dependency of the user account record.
When the above code has completed execution, we will have a record added to the [AspNetUser] as is shown in the query output below:
In the next section, I will show how we add the Admin role we created earlier to the user account we have just created.
Adding Roles to an Existing User Account
In this section, I will show how to add the role we create in an earlier section to the user account we create in the previous section.
As I mentioned in the previous section, an additional record needs to be added to the [AspNetUserRoles] table. As there is no existing method in the ASP.Net Core Entity Framework Identity Core library to allow us to directly add a role to the user object, we will use the UserRoles entity to add the identity keys from the user account and the role.
This is done in the following code excerpt:
//Add default User to Role Admin
if (chkUser.Succeeded)
{
    var adminRole = await roleManager.FindByNameAsync("Admin");
    var adminUser = await userManager.FindByEmailAsync(AdminEmail);
    if (adminRole != null && adminUser != null)
    {
        db.UserRoles.Add(new IdentityUserRole<string>()
        {
            RoleId = adminRole.Id.ToString(),
            UserId = adminUser.Id.ToString()
        });
        await db.SaveChangesAsync();
    }
}
After the above code has completed execution, the user roles will have additional record as shown in the query output:
At this point, we can be reasonably confident (or can we?) that what we have done is sufficient for us to be able to login with our newly minted user admin account without a hitch. We will test this in the next section and see the result.
Testing the Login for the User Account with Roles
In this section, I will attempt to login with the admin account we generated earlier.
When we get to the login page, enter the email address of the admin account and the password.

After logging in, you will see the following screen requesting registration confirmation:
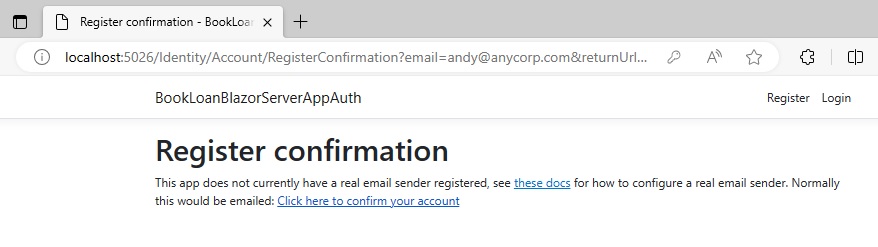
Recall from the previous post, where we had the RequireConfirmedAccount option set in the SignIn property of our identity service:
builder.Services.AddDefaultIdentity<IdentityUser>(
    options => options.SignIn.RequireConfirmedAccount = true
)
.AddEntityFrameworkStores<ApplicationDbContext>();
In the previous post when we created the initial user account, I clicked on a link on the registration confirmation page, and it set a confirmation field in the user account and subsequent logins were permitted.
In the next section, I will show how to enable the account with some custom code.
Enabling the Account Email Confirmation
To enable the account, we locate the account, then amend the EmailConfirmed field to true:
// Confirm the user email is valid.
var adminUserUpdate = await userManager.FindByEmailAsync(AdminEmail);
if (adminUserUpdate != null)
{
    adminUserUpdate.EmailConfirmed = true;
    await db.SaveChangesAsync();
}
After the above code is executed, we can re-test the login to check if the confirmation still appears.
After we re-attempt the login for our admin user, you will see that the login will be successful without the additional confirmation screen:
In the next section, I will show how to setup the content within a Razor component to filter out content based on the currently logged in user’s roles.
Applying Role Based Authorisation with AuthorizeView
To apply role-based authorisation in the HTML content of a Razor component, we use the <AuthorizeView> tag as I showed in my previous post for gating content for authenticated and unauthenticated user accounts. To filter out roles, we use the Roles and Context attributes as shown:
<AuthorizeView Roles="Admin" Context="InnerAuthView">
Where:
Roles attribute is the role we wish to filter.
Context attribute is a unique name of the context of the nested <AuthorizeView> element.
We include the following HTML element <AuthorizeView> to protect a Manage Users menu link from non-Admin users.
<AuthorizeView Roles="Admin" Context="InnerAuthView">
    <div class="nav-item px-3">
        <NavLink class="nav-link" href="manageusers">
            <span class="oi oi-plus" aria-hidden="true"></span> Manage Users
        </NavLink>
    </div>
</AuthorizeView>
The markup for the navigation menu is shown below with the nested <AuthorizeView> element.
<AuthorizeView>
    <Authorized>
        <div class="@NavMenuCssClass nav-scrollable" @onclick="ToggleNavMenu">
            <nav class="flex-column">
                <div class="nav-item px-3">
                    <NavLink class="nav-link" href="" Match="NavLinkMatch.All">
                        <span class="oi oi-home" aria-hidden="true"></span> Home
                    </NavLink>
                </div>
                <div class="nav-item px-3">
                    <NavLink class="nav-link" href="createbook">
                        <span class="oi oi-plus" aria-hidden="true"></span> Create a Book
                    </NavLink>
                </div>
                <div class="nav-item px-3">
                    <NavLink class="nav-link" href="listbooks">
                        <span class="oi oi-plus" aria-hidden="true"></span> List Books
                    </NavLink>
                </div>
                <div class="nav-item px-3">
                    <NavLink class="nav-link" href="lastviewedbooks">
                        <span class="oi oi-plus" aria-hidden="true"></span> Last Viewed Books
                    </NavLink>
                </div>
                <AuthorizeView Roles="Admin" Context="InnerAuthView">
                    <div class="nav-item px-3">
                        <NavLink class="nav-link" href="manageusers">
                            <span class="oi oi-plus" aria-hidden="true"></span> Manage Users
                        </NavLink>
                    </div>
                </AuthorizeView>
            </nav>
        </div>
    </Authorized>
    <NotAuthorized>
        <div class="@NavMenuCssClass nav-scrollable" @onclick="ToggleNavMenu">
            <nav class="flex-column">
                <div class="nav-item px-3">
                    <NavLink class="nav-link" href="" Match="NavLinkMatch.All">
                        <span class="oi oi-home" aria-hidden="true"></span> Home
                    </NavLink>
                </div>
                <div class="nav-item px-3">
                    <NavLink class="nav-link" href="listbooks">
                        <span class="oi oi-plus" aria-hidden="true"></span> List Books
                    </NavLink>
                </div>
            </nav>
        </div>
    </NotAuthorized>
</AuthorizeView>
Using the above role-based filtering in the markup will not work with the current state of the user account and roles. The role-based authorization using <AuthorizeView> will only work if we add records to the [AspNetUserClaims] table. The reason is that the role-based authorization uses the claims type Role in the user claims table.
In addition, the population of role claims allows groups of users to be filtered based on an existing role claim, which is stored in the [AspNetRoleClaims] table.
Population of Role Claims
The [AspNetRoleClaims] table stores the claims for each existing role that we have stored in the [AspNetRoles] table in the SQL Object Explorer.

To add a claim for the Admin role, we can use the following code excerpt:
private string AdminRole = "Admin";

var roleId = db.Roles.Where(r => r.Name == AdminRole).SingleOrDefault().Id;
var idrole = new IdentityRole(role);
idrole.Id = roleId;

var claim = new Claim(ClaimTypes.Role, role);
claims.Add(claim);

await roleManager.RemoveClaimAsync(idrole, claim);
await roleManager.AddClaimAsync(idrole, claim);

await db.SaveChangesAsync();
After the above code has completed execution, the role claims table will have an additional record as shown in the query output:
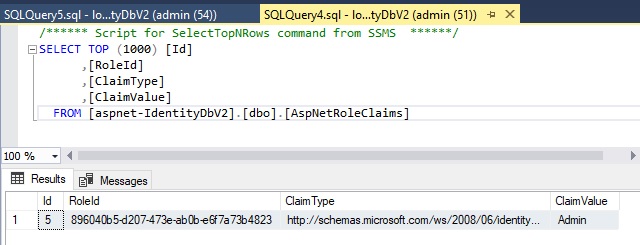
You will notice that the ClaimType is:
http://schemas.microsoft.com/ws/2008/06/identity/claims/role
and the ClaimValue is:
Admin.
In the next section, I will show how to populate the user claims table, [AspNetUserClaims].
Population of User Account Claims
In this section, I will show how to populate the [AspNetUserClaims] table with role- based claims.
The [AspNetUserClaims] table stores the claims for each existing user that we have stored in the [AspNetUsers] table in the SQL Object Explorer.
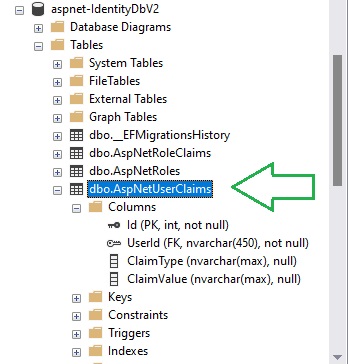
Unlike the [AspNetUserRoles] table, we did not have to store the foreign key of the identity key of an existing role claim record, we store a valid ClaimType and ClaimValue.
To add claims for the Admin user, we use the AddClaimsAsync() method of the userManager service, adding each Claim object of type ClaimTypes.Role, that we generate from each of the users roles.
We can use the following code excerpt:
// Add the roles of the Admin user to the role claims for the Admin user.
var adminUserUpdate2 = await userManager.FindByEmailAsync(AdminEmail);
var claims = new List<Claim>();
if (adminUserUpdate2 != null)
{
    var roles = await userManager.GetRolesAsync(adminUserUpdate2);
    foreach (var role in roles)
    {
        var claim = new Claim(ClaimTypes.Role, role);
        claims.Add(claim);
    }
    await userManager.RemoveClaimsAsync(adminUserUpdate2, claims);
    await userManager.AddClaimsAsync(adminUserUpdate2, claims);
    await db.SaveChangesAsync();
}
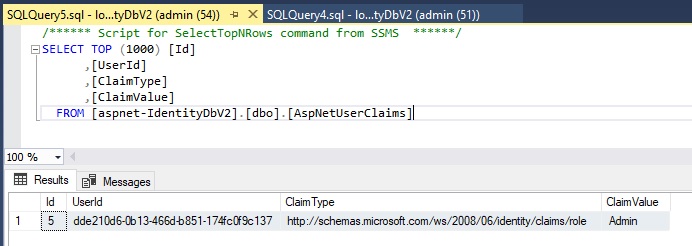
After the above code has completed execution, the user claims table will have an additional record as shown in the query output:
We will now re-test the login and authorization of the revised user account that now contains the user claims data that contains claims of type Role.
On the initial login screen, you will see the menu items that show only for unauthenticated users.
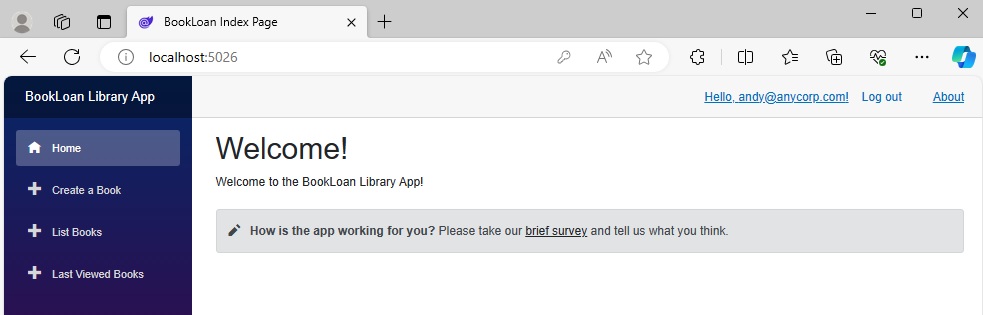
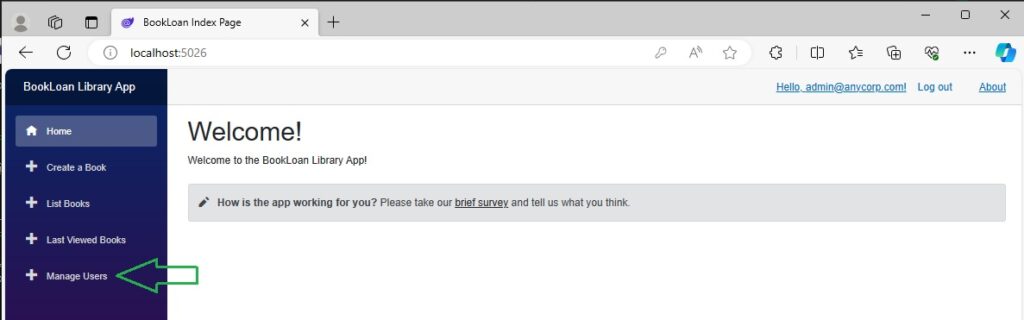
After re-running the application, logging in with our Admin account, the navigation menu with the additional menu, Manage Users item that only administrators can see is shown.
Logging out and back in as a normal user account without the admin role, you will see that the Manage Users menu item is no longer available.

This shows us that the role-based authorization works as expected with the addition of the user claim role type.
Revision of the Seeding Account Code
In the section where I showed how to add roles to the user account, we can consolidate the role claims and user claims updates as shown:
//Add default User to Role Admin
if (chkUser.Succeeded)
{
    var adminRole = await roleManager.FindByNameAsync("Admin");
    var adminUser = await userManager.FindByEmailAsync(AdminEmail);
    if (adminRole != null && adminUser != null)
    {
        // Add user role
        db.UserRoles.Add(new IdentityUserRole<string>()
        {
            RoleId = adminRole.Id.ToString(),
            UserId = adminUser.Id.ToString()
        });
        await db.SaveChangesAsync();

        // Add role claim
        var claims = new List<Claim>();
        var idrole = new IdentityRole("Admin");
        idrole.Id = adminRole.Id;
        var claim = new Claim(ClaimTypes.Role, "Admin");
        claims.Add(claim);
        await roleManager.RemoveClaimAsync(idrole, claim);
        await roleManager.AddClaimAsync(idrole, claim);

        // Add user claim
        await userManager.RemoveClaimsAsync(adminUser, claims);
        await userManager.AddClaimsAsync(adminUser, claims);
        await db.SaveChangesAsync();
    }
}
In the next post I will show how we can amend our Identity UI Blazor Server application to include a general module and screen to manage user roles.
That is all for today’s post.
I hope you have found this post useful and informative.
Andrew Halil is a blogger, author and software developer with expertise of many areas in the information technology industry including full-stack web and native cloud based development, test driven development and Devops.

