
Welcome to today’s post.
In today’s post I will be explaining what a Blazor Hosted WebAssembly application is, how it compares to other Blazor application hosted options, and how we can implement a basic hosted WebAssembly application using Visual Studio.
In a previous post I explained what a Blazor Server application was and how to implement them. I later explained what a Blazor WebAssembly application was and how to implement them.
I will explain what a Hosted Blazor WebAssembly application is in the next section.
What is a Hosted Blazor WebAssembly Application?
A Hosted Blazor WebAssembly application takes the best features of a Blazor WebAssembly application and a Blazor Server application and combines them to give developers additional flexibility in accessing both client and server-side resources, which has the benefit of keeping the code more concise and promote more reusability across the components within the application.
A hosted Blazor WebAssembly application is a web application that includes the components of a Blazor WebAssembly application (the client), a Blazor Server application (the server), and a common, shared library that is accessible from both the client and server sides of the application.
Recall that with a Blazor WebAssembly client application, to be able to access any server-side functionality (such as a service library) or data (such as SQL data through an ORM provider such as Entity Framework Core) would require us to call an HTTP web API service from within the client application. If we wanted to access many server-side methods, functions or even data from the client WebAssembly application that resides on the browser, our application implementation size in terms of code would be quite large.
The Hosted WebAssembly application architecture supports a more efficient way for Razor components within a WebAssembly to access server-side functionality without having to make inefficient and code intensive calls through HTTP API calls.
Below is an architectural diagram that shows how the components within a Hosted Blazor WebAssembly interact.
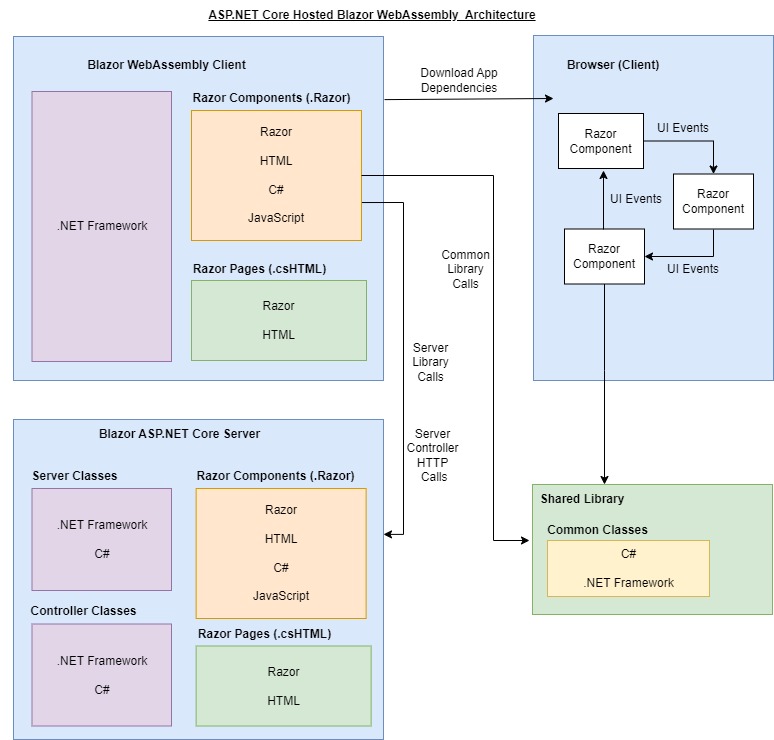
As we can see, there are three high-level key tiers of the architecture:
Client
Server
Shared
The Client tier consists of the Blazor WebAssembly Client.
The Server tier consists of the ASP.NET Core Blazor Server.
The Shared tier consists of shared library classes accessible both Client and Server components.
Before I show how we access server-side libraries from a WebAssembly, I will show how we create a Hosted Blazor WebAssembly application from Visual Studio in the next section.
Creating a Hosted Blazor WebAssembly Application
In this section I will show to create a Blazor WebAssembly application using Visual Studio.
The main difference between creating a Blazor WebAssembly application and a Hosted Blazor WebAssembly application is the Hosted option that we select during the creation Wizard. The Hosted option adds a Server project to the solution, which provides the capability to host both Blazor WebAssembly client Razor components and Blazor Server Razor components.
Start by creating a new project.
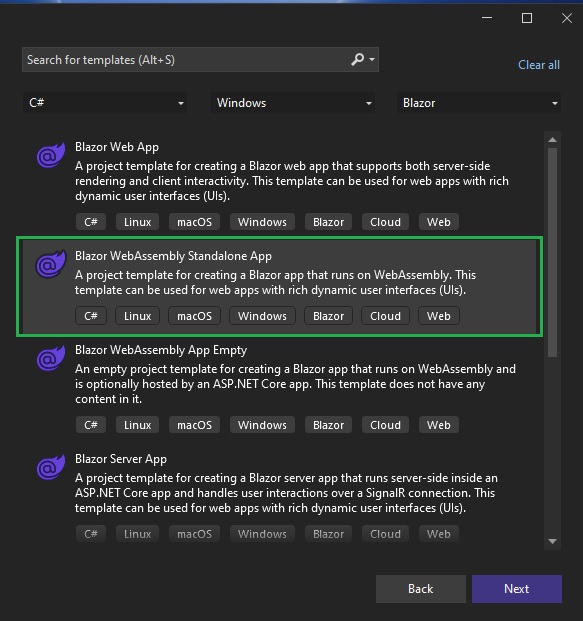
You will notice the different types of Blazor Web projects. Ensure you do not select the Blazor WebAssembly Standalone App as it is a client-only application.
Select the project template Blazor WebAssembly App Empty. As shown in the template description, it gives us the option to host the WebAssembly from an ASP.NET Core app.
After specifying the project name and folder, you will see the Additional information screen:
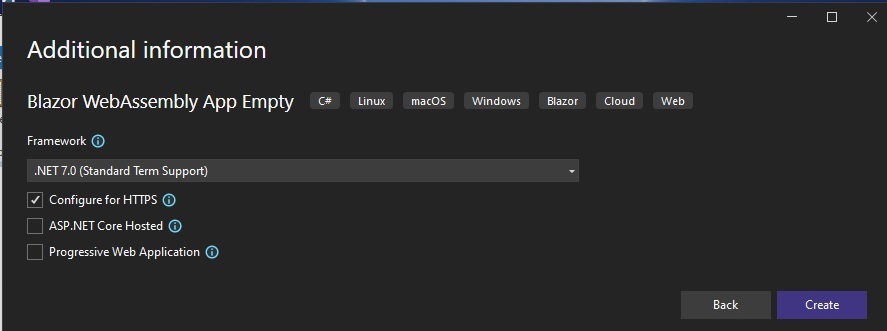
You will notice the option ASP.NET Core Hosted. When this option is unchecked, the WebAssembly client application is downloaded and rendered from within the client browser. When the option is checked, the WebAssembly Razor components are hosted from the ASP.NET Core Blazor Server tier.
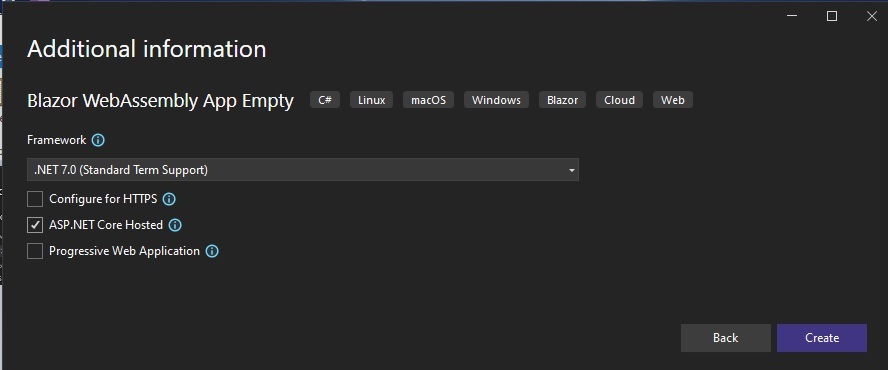
Check the option ASP.NET Core Hosted and click Create.
After the solution is created, with the projects for the Client, Server, and Shared tiers are created with the following source files under each project:
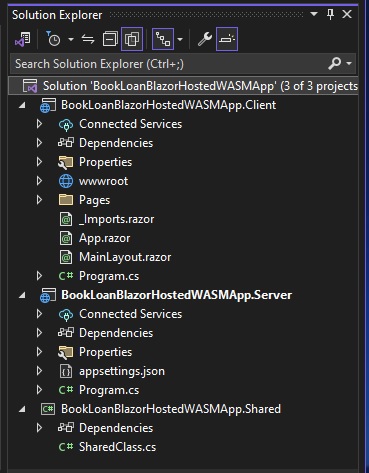
The constituent components of the hosted WebAssembly application include the following in the Client project tier:
App.razor
<Router AppAssembly="@typeof(App).Assembly">
    <Found Context="routeData">
        <RouteView RouteData="@routeData" DefaultLayout="@typeof(MainLayout)" />
        <FocusOnNavigate RouteData="@routeData" Selector="h1" />
    </Found>
    <NotFound>
        <PageTitle>Not found</PageTitle>
        <LayoutView Layout="@typeof(MainLayout)">
            <p role="alert">Sorry, there's nothing at this address.</p>
        </LayoutView>
    </NotFound>
</Router>
The App.razor component contains the main layout component, MainLayout.razor, which contains the HTML body of the rendered application page.
MainLayout.razor
@inherits LayoutComponentBase
<main>
    @Body
</main>
The generated Program.cs startup code for the client is shown:
Program.cs
using BookLoanBlazorHostedWASMApp.Client;
using Microsoft.AspNetCore.Components.Web;
using Microsoft.AspNetCore.Components.WebAssembly.Hosting;

var builder = WebAssemblyHostBuilder.CreateDefault(args);

builder.RootComponents.Add<App>("#app");
builder.RootComponents.Add<HeadOutlet>("head::after");

builder.Services.AddHttpClient(
"BookLoanBlazorHostedWASMApp.ServerAPI",
    client =>
        client.BaseAddress = new Uri(builder.HostEnvironment.BaseAddress));
builder.Services.AddScoped(sp =>
    sp.GetRequiredService<IHttpClientFactory>().CreateClient(
        "BookLoanBlazorHostedWASMApp.ServerAPI"));
await builder.Build().RunAsync();
The startup code initialises the ASP.NET Core web host, then enables the HttpClient service to allow calls to Web API services. it also sets the root component to the App.razor component.
On the Server project tier, the Client and Shared projects are set as dependencies from the project configuration:
BookLoanBlazorHostedWASMApp.Server.csproj
<ItemGroup>
    <ProjectReference Include="..\Client\BookLoanBlazorHostedWASMApp.Client.csproj" />
    <ProjectReference Include="..\Shared\BookLoanBlazorHostedWASMApp.Shared.csproj" />
</ItemGroup>
The startup code for the Server tier project is shown below:
Program.cs
using Microsoft.AspNetCore.ResponseCompression;

var builder = WebApplication.CreateBuilder(args);

builder.Services.AddControllersWithViews();
builder.Services.AddRazorPages();

var app = builder.Build();

if (app.Environment.IsDevelopment())
{
    app.UseWebAssemblyDebugging();
}
app.UseBlazorFrameworkFiles();
app.UseStaticFiles();

app.UseRouting();

app.MapRazorPages();
app.MapControllers();
app.MapFallbackToFile("index.html");

app.Run();
The above startup code sets up the HTTP request pipeline, then enables controllers with views and Razor pages. Razor pages and Controller pages are mapped to the application’s attribute routing endpoints.
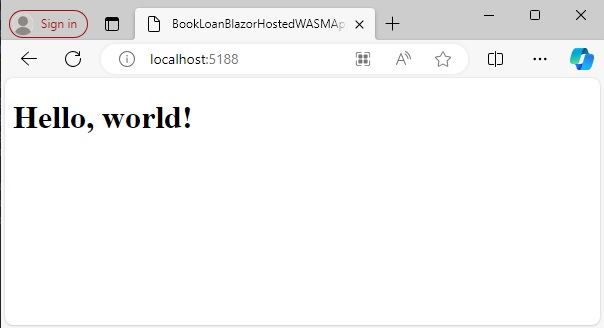
The empty Hosted WebAssembly project when built and run does nothing more than display a welcome screen with no menu, links or functionality.
In the next two sections I will show how we can include at least one client-side Razor component and a server-side library that can be accessed from the client. For the additional server-side and client-side resources including navigational menus, I will take them from previous Blazor Server application that I created from the Visual Studio project template in one of my previous posts. I will then transplant them into the Hosted Blazor WebAssembly project.
Including Client-Side Resources into a Hosted Blazor WebAssembly Application
The default templates for the non-empty Blazor applications in Visual Studio come with the well-known server-side weather forecast data, service and client-side fetch Razor component. Since Razor code can be re-used in either a client-side or server-side context, I will copy those components and paste them into the relevant sections of the Hosted Blazor WebAssembly project. I will first show how the client side components can be integrated. You can use whatever equivalent components to achieve the same result.
The first resource to configure are the bootstrap themed stylesheets and iconic themes. This is done by copying the /wwwroot/css/bootstrap and wwwroot\css\open-iconic subfolders and \wwwroot\css\app.css stylesheet file from an existing WebAssembly project. Then copy them into the \Client\wwwroot\css sub-folder.
Copy the following sub-folders and CSS file:
\BookLoanBlazorWASMApp\wwwroot\css\bootstrap
\BookLoanBlazorWASMApp\wwwroot\css\open-iconic
\BookLoanBlazorWASMApp\wwwroot\css\app.css
into the folder:
\BookLoanBlazorHostedWASMApp\Client\wwwroot\css
Then make the following changes to the Index.html file in the \Client\wwwroot\ sub-folder. Add the following lines:
<link href=”css/bootstrap/bootstrap.min.css” rel=”stylesheet” />
<link href=”BookLoanBlazorHostedWASMApp.Client.styles.css” rel=”stylesheet” />
between the <head>…</head> tags in the file:
\BookLoanBlazorHostedWASMApp\Client\wwwroot\index.html
Next, we will include the shared layout Razor components from the scaffolded Blazor Server (or standalone WebAssembly) application.
Copy the contents of folder \Shared from the standalone Blazor WebAssembly application:
\BookLoanBlazorWASMApp\Shared
to
\BookLoanBlazorHostedWASMApp\Client\Shared
Remove the Razor component file MainLayout.razor from:
\BookLoanBlazorHostedWASMApp\Client
To avoid compilation errors, you will then need to direct references of the
MainLayout.razor component within the App.razor component, which is used in the
following lines:
<RouteView RouteData=”@routeData” DefaultLayout=”@typeof(MainLayout)” />
and
<LayoutView Layout=”@typeof(MainLayout)”>
In the App.razor component, make the following change:
Add the declaration @using BookLoanBlazorHostedWASMApp.Client.Shared
to the top of file App.razor. The script will look like the following (with most lines omitted):
@using BookLoanBlazorHostedWASMApp.Client.Shared
<Router AppAssembly=”@typeof(App).Assembly”>
…
</Router>
Next, we will copy over the Fetch weather data component, FetchData.razor from the Blazor Server (or standalone WebAssembly client).
Copy the file:
\BookLoanBlazorHostedWASMApp\Pages\FetchData.razor
to
\BookLoanBlazorHostedWASMApp\Client\Pages
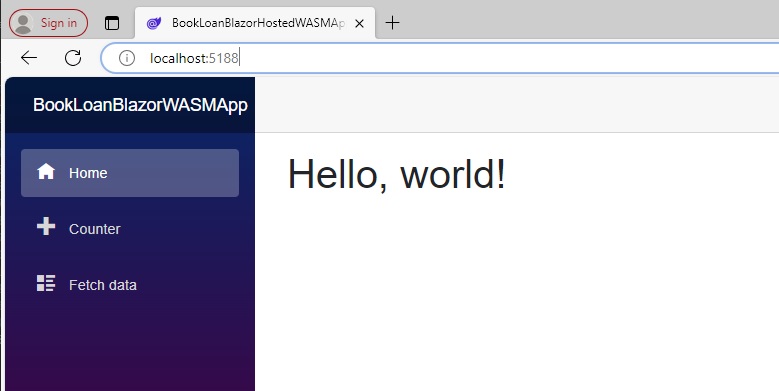
When the application is re-built and run, the landing page will look as follows with the bootstrap themed styling and navigation menu:
At this point, the application links to the Fetch data feature will attempt to run the component, but the data service will not work as we have not integrated nor built the server-side resources. I will show how this is done in the next section.
Including Server-Side Resources into a Hosted Blazor WebAssembly Application
In a Blazor Server application, the Razor components are already on the server-side, so access to server-resources such as SQL data can be achieved by creating separate classes that implement access to data using Entity Framework Core, then calling the classes directly from the Razor components. With a Hosted Blazor WebAssembly, we can access server-side resources is an almost identical way, except the classes that implement access to the server resources reside on separate Shared library and a Blazor Server.
We can either include the server resources for the weather data in the Shared or Server project and reference them from the Client project. I show how this is done from the Shared project.
The weather forecast data service can be included by copying the files WeatherForecast.cs and WeatherForecastServices.cs from a Blazor Server application.
Copy the files:
\BookLoanBlazorServerApp\Data\WeatherForecast.cs
\BookLoanBlazorServerApp\Data\WeatherForecastServices.cs
to
\BookLoanBlazorHostedWASMApp\Shared
We then change the namespaces in the above C# source files to match those in the hosted WebAssembly app.
We can also remove the redundant SharedClass.cs from the Shared project folder:
\BookLoanBlazorHostedWASMApp\Shared
The final task is to associate the weather service to the FetchData razor component with dependency injection. We do this by making the following small additions to the Program.cs startup in the Hosted WebAssembly as shown:
In \BookLoanBlazorHostedWASMApp\Client\Program.cs:
using BookLoanBlazorHostedWASMApp.Data;
and
builder.Services.AddSingleton<WeatherForecastService>();
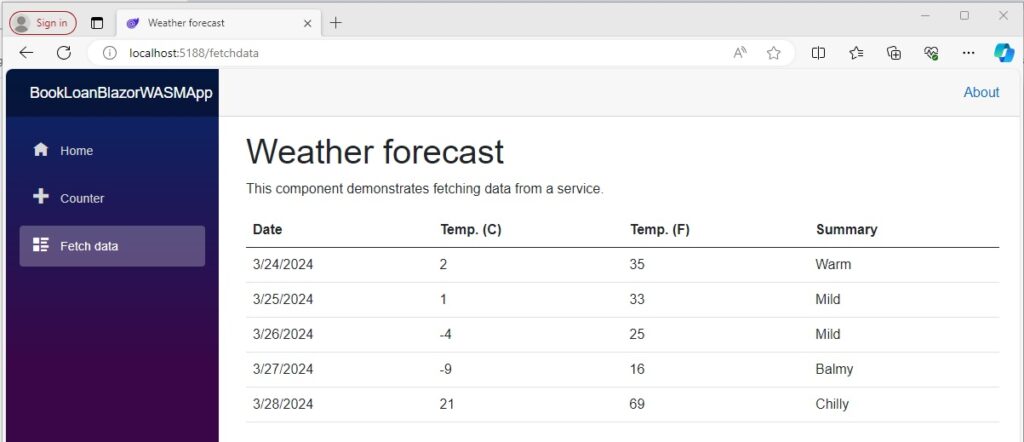
Once you have made the above inclusions and modifications, rebuild, then run the application.
In the navigation menu, click on the fetch data item. You will then see the data populate the content body as shown:
The above tasks and overview have shown us how to create an empty Hosted Blazor WebAssembly application, then modify it to include a basic user interface and server-side resources from the Shared (or Server) project tiers.
In a future post I will show how to include controllers and server-side validations into the Server tier and use them within a Hosted WebAssembly.
That is all for today’s post.
I hope that you have found this post useful and informative.
Andrew Halil is a blogger, author and software developer with expertise of many areas in the information technology industry including full-stack web and native cloud based development, test driven development and Devops.

