
Hi and welcome to my post!
Today I will talk about how you can take your existing ASP.NET Core MVC Web application and enable it to support Web APIs.
In previous editions of Visual Studio, including Visual Studio 2010 the web framework that super-ceded the legacy ASP.NET web forms framework was the ASP.NET MVC web framework.
Subsequently, the next edition of Visual Studio 2012 provided the ASP.NET Web API 1.0 framework, which provided convention-based routing of API requests through a routing table defined within the Global.asax file. The routing table used route templates to determine the controller and action that were executed for each API HTTP request.
Then the next edition of Visual Studio 2013 provided the ASP.NET Web API 2.0 framework, which provided some new features including attribute-based routing, while maintaining the controllers that are part of the MVC architectural framework. This allowed developers an easier transition from the legacy MVC framework to the Web API framework.
Since the release of ASP.NET Core and its inclusion in Visual Studio 2017 and subsequent editions beyond that, both the MVC framework and the Web API 2 framework have been incorporated into the web project templates that are part of the ASP.NET Core framework. Both are available to use when creating ASP.NET web projects.
What is an ASP.NET MVC Application?
Let’s review what an ASP.NET MVC web application is.
An MVC web application supports the Model, View and Controller architectural pattern.
| Layer | Description |
| Model | The classes that define the data model structure of the UI or process interface. |
| View | A UI interface that will present an instance of the model data. |
| Controller | A class that will provide action methods that route HTTP REST actions. These can be either GET, POST, PUT or DELETE. |
Every routing action submitted to the web application is of the format:
{ controller } / { action }
or
{ controller } / { action } / { identifier }
Where:
controller = Name of the controller class.
action = name of controller method.
identifier = parameter value passed into the action method.
Note: Since ASP.NET Core, ASP.NET MVC and ASP.NET Web API have been merged.
Conversion of a Typical MVC Application
I will go through the steps that we will take to convert an existing MVC application and its controllers to a Web API application with API controllers.
Below is an example of an MVC controller that we wish to convert to an API based controller (the code body has been removed to maintain brevity):
namespace BookLoan.Controllers
{
    public class BookController : Controller
    {
        ...

        // GET: Book/Details/5
        public async Task<ActionResult> Details(int id)
        {
		…
        }


        // GET: Book/Create
        public ActionResult Create()
        {
            return View();
        }

        // POST: Book/Create
        [HttpPost]
        [ValidateAntiForgeryToken]
        public async Task<ActionResult> Create(IFormCollection collection)
        {
            ...
        }

        // GET: Book/Edit/5
        public async Task<ActionResult> Edit(int id)
        {
            ...
        }

        // POST: Book/Edit/5
        [HttpPost]
        [ValidateAntiForgeryToken]
        public async Task<ActionResult> Edit(int id, IFormCollection collection)
        {
            ...
        }

        // GET: Book/Delete/5
        public ActionResult Delete(int id)
        {
            return View();
        }

        // POST: Book/Delete/5
        [HttpPost]
        [ValidateAntiForgeryToken]
        public ActionResult Delete(int id, IFormCollection collection)
        {
           ...
        }
Below are the steps we take to make the upgrade:
Step 1 – Declare Controller API Attributes
Firstly, the controller will require attributes in order to recognise API routing.
In pre .NET Core days, we add the Route and ApiController attributes as shown:
[Route(“api/[controller]”)]
[ApiController]
public class BookController : Controller
Since.NET Core, there is no need to add the above as [ApiController] has been made obsolete.
In .NET Core, the change to Web API controller routing is:
[Route(“api/[controller]”)]
public class BookController : Controller
Note: There is no need to add any new namespaces in your source!
Now, for each action method, we will decorate it with an API attribute to indicate it as one of the following request types:
GET
PUT
POST
DELETE
Step 2 – Define action HTTP GET attributes
For requests that return view data we will use [HttpGet] as shown:
// GET: Book
[HttpGet]
[Route("Index")]
public ActionResult Index()
{
  return View();
}

// GET: Book/Details/5
[HttpGet]
[Route("Details/{id}")]
public async Task<ActionResult> Details(int id)
{
	…
}


// GET: Book/Create
[HttpGet]
[Route("Create")]
public ActionResult Create()
{
   return View();
}

// GET: Book/Edit/5
[Route("Edit/{id}")]
public async Task<ActionResult> Edit(int id)
{	…
}
If we used the attribute [HttpGet(“{id}”)] in the Details(int id) action method,
then the id in the route api/Books/1 will be mapped to the id in the method parameter.
Note: After you convert the controller to Web API routing, there is no need to change calls like this in all controllers
return RedirectToAction("Index", "Home");
as ASP.NET Core will recalculate the routing for each non-Web API and Web API controller.
Within the API controller itself, you will need to add a [Route..] attribute to each action method that will be used within the application.
With a HttpGet Edit() defined as shown:
    [Route("api/[controller]")]
    public class BookController : Controller
    {
	…
        [Route("Edit/{id}")]
        public async Task<ActionResult> Edit(int id)

        ...
The translated routing will be
http://localhost:54273/api/Book/Edit/1
Step 3 – Define action HTTP POST attributes
For requests that create new data we will use [HttpPost] as shown:
[HttpPost]
[ValidateAntiForgeryToken]
[Route("Create")]
public async Task<ActionResult> Create(IFormCollection collection)
{
…
}

[HttpPost]
[ValidateAntiForgeryToken]
[Route("Edit/{id}")]
public async Task<ActionResult> Edit(int id, IFormCollection collection)
{
	…
}

[HttpPost]
[ValidateAntiForgeryToken]
[Route("Delete/{id}")]
public ActionResult Delete(int id, IFormCollection collection)
{
	…
}
Step 4 – Define action HTTP PUT attributes
For requests that modify existing data we will use [HttpPut] as shown:
[HttpPut]
[ValidateAntiForgeryToken]
[Route("Edit/{id}")]
public async Task<ActionResult> Edit(int id, IFormCollection collection)
{
   ...
}
An [HttpPut] requires an {id} parameter in order to specify which record id it to be amended.
Step 5 – Define action HTTP DELETE attributes
For requests that remove existing data we will use [HttpDelete] as shown:
[HttpPost]
[ValidateAntiForgeryToken]
public ActionResult Delete(int id, IFormCollection collection)
{
  try
  {
       // TODO: Add delete logic here
[HttpPost]
[ValidateAntiForgeryToken]
public ActionResult Delete(int id, IFormCollection collection)
{
   try
   {
      // TODO: Add delete logic here
Note: Action methods that share the same method name across HTTPGET, HTTPPOST, HTTPPUT and HTTPDELETE can be identical, but action methods within the same request type have to be unique.
Step 6 – Replacing MVC Return Results
Calls made to MVC controllers through HTTP GET calls obtain a cshtml view that by convention, corresponds to the method name and renders by binding with the data of the object presented to the view. This is no longer the case with Web API, where there are no longer templated cshtml Razor pages to present after a GET call.
Ok
NotFound
BadResult
So, the return value:
Return View(object);
Will be replaced by:
Return Ok(object);
The resulting objects in web APIs are returned to a decoupled Web UI form that consumes the API method results using JSON.
With methods that have views returned from the GET methods, we will replace the ViewResult() these with one of the controller base object result types:
Step 7 – [FromRoute] and [FromBody]
When the [FromRoute] attribute is placed before a method parameter, the parameter name must match the parameter in the route during a HTTP GET action.
When the [FromBody] attribute is placed before a method parameter, the parameter name or parameter members map to corresponding posted variables in the HTTP POST body. The convention is to map key name, values from the body into the method parameter.
Step 8 – Replacing IFormCollection
If you use the Visual Studio Wizards to create CRUD controllers skeleton code, you will notice that the [HttpPost] POST methods will be declared with IFormCollection as shown below:
public ActionResult Delete(int id, IFormCollection collection)
With MVC based POST requests we can use the convention based models and replace the action method prototype with the equivalent model parameter:
public ActionResult Delete(int id, BookLoan.Models.BookViewModel collection)
Where the BookLoan.Models.BookViewModel model is matching the model for the corresponding UI form being posted:
@model BookLoan.Models.BookViewModel

<p>
    <a asp-page="/Delete"></a>
</p>

<h2>Delete</h2>

<h3>Are you sure you want to delete this?</h3>
<div>
	…
	[display csHTML]
	…

        <form method="post">
          <input type="hidden" asp-for="@Model.ID" />
          <input type="submit" value="Delete" class="btn btn-default" />
          <div class="form-group">
            <a asp-area="" asp-controller="Home" asp-action="Index">Back to Home</a>
          </div>
        </form>
</div>
When the application is run, there should be no difference in functionality:

When the above form, Delete.cshtml form is posted, the editable visible and hidden form variables are posted to the controller Delete() action method as shown:
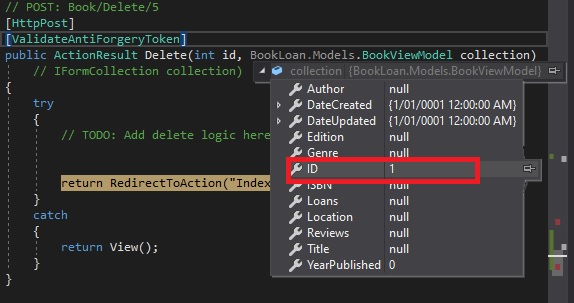
The response is mapping equivalent properties from the request within the target model:
using System;
using System.Collections.Generic;
using System.ComponentModel.DataAnnotations;
using System.Linq;
using System.Threading.Tasks;

namespace BookLoan.Models
{
    public class BookViewModel
    {
        public int ID { get; set; }

        [Required]
        public string Title { get; set; }

        [Required]
        public string Author { get; set; }
	…
    }
}
The same strategy can be used to replace the IFormCollection for a [HttpPut] Edit() action and [HttpPost] Create() actions.
Step 9 – Move Model Definitions into The Client UI
Mapping API results into your UI will require data structures (or models) to be declared in the client UI. The structures should contain data types and properties that have identical names to those from API results.
The client API call return type will use these structures to provide data to the UI forms.
I hope this post has been informative and helped you convert your MVC web applications to Web API.
In the next post I will show how to test your Web API applications.
Andrew Halil is a blogger, author and software developer with expertise of many areas in the information technology industry including full-stack web and native cloud based development, test driven development and Devops.

