
Welcome to today’s post.
In today’s post I will show how to use the Git versioning tool to create feature branches from a repository and merge changes from a repository.
The Git versioning tool is used in two contexts:
- Versioning from the command line.
- Versioning from within an integrated development environment.
In this post I will be focusing on showing how to use Git within a command line context. This is also known as the Git Bash command prompt.
I will be covering the most useful Git commands that we can use to execute the following important developer source code workflow tasks:
- Branch out code from a remote repository.
- Merge local changes into repository code.
- Push changes back to the remote repository when necessary.
In the first section, I will show how to create a new branch from a remote repository.
Creating Feature Branches from the Master Branch
Before we can create feature branches, we need to open a command prompt.
We do this by opening Git Bash.
Assuming we have an existing remote repository that we have already cloned into our environment, we can then proceed to execute some git commands to create, manage branches, and manage the source within the branch.
To clone a branch from a remote repository, we can use the following command:
git clone [URL of path to remote repository]
When we would like to create a new branch from our master branch, we use the following git command:
git branch -b [feature branch name]
Where [feature_branch_name] is the new feature branch that we create from the main/master branch.
When a feature branch is created, it is a separate sub-folder and ready to be populated with an editable copy of the repository.
When changes to source files are made within the feature branch, they are in an updateable state.
To be able to apply the changes from the feature branch into the master branch, we will need to switch over to the master branch. This is what I will show in the next section.
Changing Repository Branches
When we change to the solution folder, we will know what the current repository branch is.
You will see your folder name with your current repository branch in parentheses as shown:

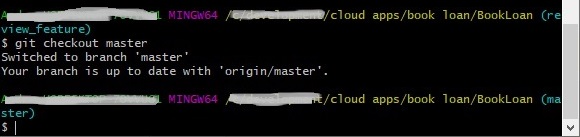
To change to the master branch of our repository within the current project directory enter the command:
git checkout master
You will see your folder name with the master branch in parentheses as shown:
In the next section, I will show how to stage source code changes for committing.
Staging Changes to the Repository
When we switch back to the Visual Studio integrated development environment, you will see the solution folder files change with the master files.
We then apply changes to the source file(s).
When you are ready to include the changes into the repository, we can then stage them for committing to the local repository.
To stage source changes for committing, we use the git add command.
This tags the files for committing to the repository.
Merging Changes to the Repository
In the next step we will merge differences from the feature branch into the master branch.
After making changes to our new feature, we apply the changes to the master branch using the following commands:
git commit
git push master
If we have merge conflicts attempting to push our changes to the master branch, then we apply the following command:
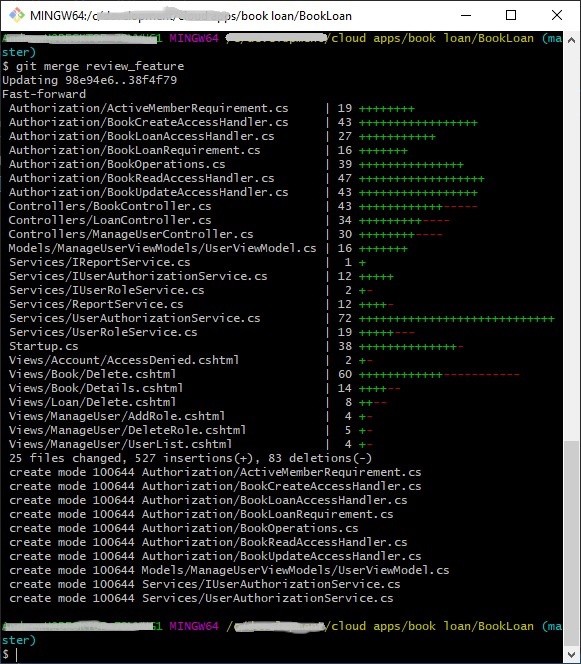
git merge [feature branch name]
After running this merge, if you are in GitBash or in VSCode terminal or the Visual Studio source control output window you will see screenful of source files including changes, additions, and deletions downloaded from git into your current project folder for the current branch:
We then switch back to Visual Studio. You will see the solution folder files change with combined changes with merges from the feature branch.
In the next section, I will show how to check the status of the Git repository.
Checking the Repository Status after the Merge
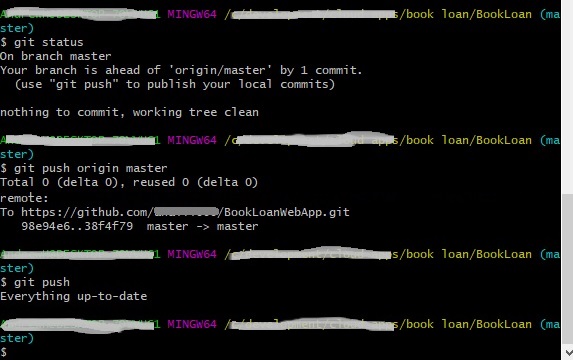
Back inside git bash, run the command:
git status
You will get the following message:
Your branch is ahead of ‘origin/master’ by 1 commit.
Below is the full message and remedial suggestion by Git:
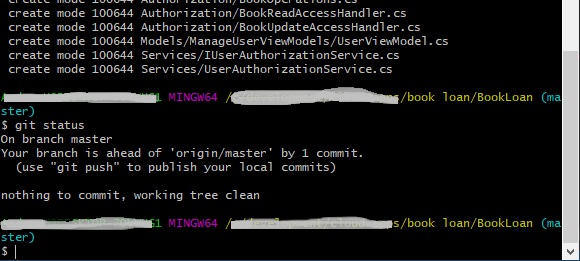
This tells you that you are ahead of the master by 1 commit. Will we need to push our changes over to the master remote repository?
No.
Why?
The following command:
git merge [feature branch name]
does an auto-commit after the merge.
If you had run the following command:
git merge [feature branch name] --no-commit –no-ff
then the merge would not be auto-committed and would require an additional git push like the one below:
git push origin master
You will then see the branch has no differences and is up to date:
Now I go back to Github and check the master folder. The merge from the feature has been applied to the master branch:
We have seen an overview of basic branching, checkout, merging and committing within a local Git repository. The workflow will prove to be useful when working with Git repositories at the Git command and within Visual Studio.
To understand more about branching and merging using git, refer to the official documentation from git (https://git-scm.com/book/en/v2/Git-Branching-Basic-Branching-and-Merging).
That’s all for today’s post.
I hope that you have found this post useful and informative.
Andrew Halil is a blogger, author and software developer with expertise of many areas in the information technology industry including full-stack web and native cloud based development, test driven development and Devops.
