
Welcome to today’s post.
In today’s post I will be discussing how to deploy your .NET Core application to an IIS server.
In a previous post, we have already seen how to deploy a .NET Core web application to Azure.
Even though .NET Core applications can be deployed into an Azure cloud environment, in many situations you may want to deploy the application to an on-premises environment, such as on an IIS web server within a Windows OS. In addition, you may have worked out the costs and benefits of the different deployment scenarios and determined that using an on-premises environment might be cost-effective than committing to a long-term plan under a cloud-based subscription.
Under the hood, an on-premises hosting an ASP.NET Core application within an IIS web server is very similar to the same application hosted as an Azure web application within an Azure App Service. The main difference is that the environment for the same application within Azure is maintained for you, and the one hosted on an on-premises Windows IIS web server is maintained by you (and your organization).
I will go through the steps required to deploy the application in the first section.
Deploying an ASP.NET Core Application from Visual Studio
To deploy a .NET Core Web application from Visual Studio 2017 start by opening the solution.
Then right-click, and select Publish… The following dialog will display:
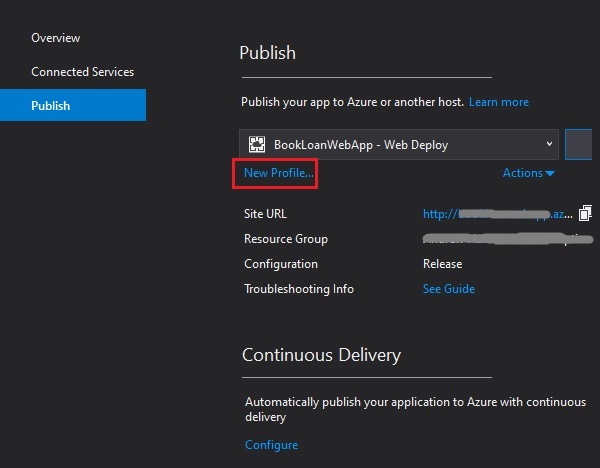
You will notice the Site URL and Resource Group parameters which are applicable for a publication into an existing Azure App Service. To avoid publishing into Azure, we can create a new profile that can override the given cloud base host.
Click on the New Profile… button.
The following dialog will display with some options in the cloud and on-premises destinations:
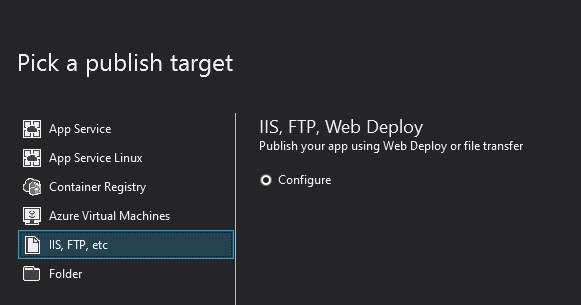
To deploy into an on-premises destination, we select the IIS, FTP, etc. option.

Click on Create Profile.
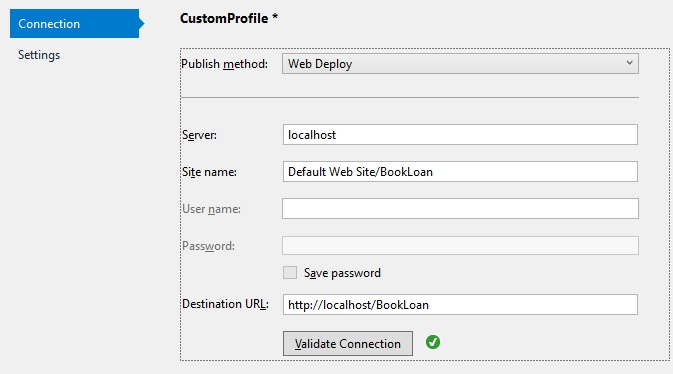
In the next screen, the Connection dialog, enter the server (if on the same machine, localhost), site name and destination URL. Attempt to validate the web site connection.
If you get this error dialog:
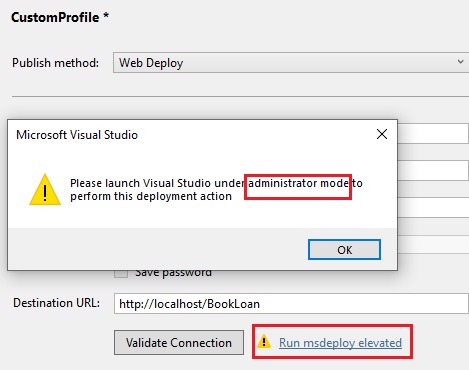
and the following suggestion near the Validate Connection button:
Run msdeploy elevatedWhat this means is that you will need to cancel the Connection and Publish dialogs, close Visual Studio 2017, and re-open Visual Studio 2017 under Administrator access.
Now proceed to re-action publish.
Following successful connection validation, the dialog should look like this:
Save the connection.
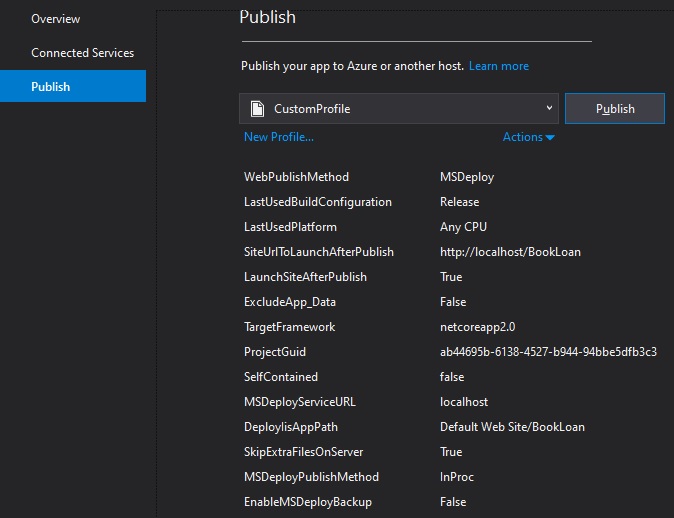
Custom Deployment Profile and the Application Settings
In the next screen, the Settings screen will open:

In this screen, if your application has no database, then the connection string section can be unchecked, else it can be overridden with a database connection string that will work within IIS.
Note: If you use the same SQL Express that was used during development, trusted database connection strings for SQL Express do not work under IIS as they will need to be specified under an account that has access to the database and a database server that is accessible to IIS.
After the settings is saved, the following publish summary details will show:
The profile can be renamed from the generic profile name:
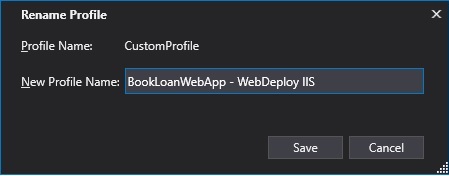
Save change.
Next, click Publish.

The application will commence building.
Once the build deployment has completed, open IIS and inspect the site and web applications to see if the deployment was successful:
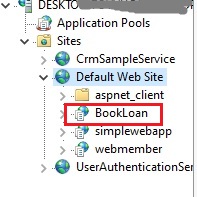
Browse to the web site.
If all goes smoothly, the home page should display without problems:

The above has been an overview in how to deploy an ASP.NET Core web application into an on-premises IIS web server from within the Visual Studio publishing wizard. We have seen how to deploy .NET Core web applications to both Azure and to an on-premises IIS web server. In a future post I will explore other ways in which we can explore .NET Core applications to Azure.
That’s all for today’s post.
I hope you found this post informative and useful.
In a future post I will show how to setup your Visual Studio 2017 environment for IIS debugging.
Andrew Halil is a blogger, author and software developer with expertise of many areas in the information technology industry including full-stack web and native cloud based development, test driven development and Devops.

