Welcome to todays post.
In todays post, I will be showing how to configure Visual Studio to allow debugging of .NET Core web applications hosted under IIS.
In Visual Studio 2017, there is currently build-in support for debugging IIS, but only under IIS Express.
I will show how to create a runtime profile that will allow a .NET Core web application to be debugged within the Visual Studio 2017 IDE.
In the first section I will show how to create a new debug profile that can handle IIS requests to a locally hosted IIS web application.
Creation of an IIS Debug Profile
First, start by opening the project properties for your .NET Core application.
Click on the Debug side tab. The following property page will show the default IIS Express profile:

Click on New…
The Debug profile page shows.
Enter a new profile name.
Name the profile IIS.
The remainder of the Debug page shows.
Enter values for the Launch browser URL, select Launch browser as shown:

In the environment variables section, enter a key and value pair of ASPNETCORE_ENVIRONMENT and Development as shown below:

Save the debug settings.
Updating Launch Settings to Run with new Profile Settings
After saving the debug settings, the launchSettings.json file will be updated as shown below with the new IIS profile settings:

To run the application, locate the run button and drop-down to select the IIS profile as shown:

After running, you may see the following error dialog.
Click Yes to change the disk mapping to the URL.

Wait a few minutes for the IIS to be provisioned.
Once the provisioning has completed and run and your application has launched, the first application breakpoint (if set) will be hit as shown:

You have successfully configured the .NET Core web application for IIS debugging!
The Application Debug Location
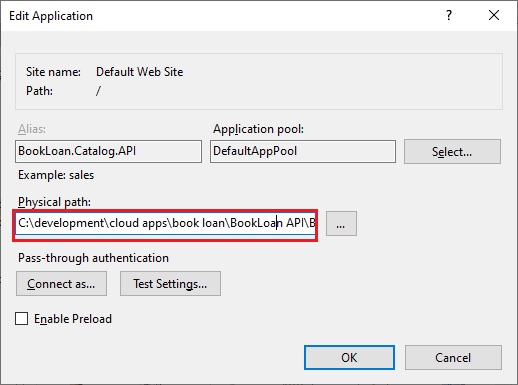
Another thing to note is that once the Web application is set for debugging, the application debug location is mapped to the project disk location as shown:

When you wish to revert the Web application back to IIS hosting, the path can be reverted as shown:

If you get the following error when attempting to run the Web API project from IIS settings:

Then open the launchSettings.json file and add the lines below showing the key / values under the “iisSettings” element:
"iis": {
      "applicationUrl": "http://localhost/BookLoan.Loan.API",
      "sslPort": 0
    },
with the applicationUrl and sslPort defined with your application site URL and port.
Your launch settings should look as follows:
  "iisSettings": {
    "windowsAuthentication": false,
    "anonymousAuthentication": true,
    "iis": {
      "applicationUrl": "http://localhost/BookLoan.Loan.API",
      "sslPort": 0
    },
    "iisExpress": {
      "applicationUrl": "http://localhost:63054/",
      "sslPort": 0
    }
  },
For more detailed treatment of this topic, you can refer to the Microsoft site for IIS support in ASP.NET Core.
As you can see, there are differences in the way the IISExpress and IIS debug profiles define the launching of our .NET Core application. We have seen how we can add an additional debug profile for IIS, then amend our launch profile settings to allow us to select the IIS debug profile to use for launching our application when in development debugging. This degree of flexibility allows us to switch between debugging a recently created ASP.NET Core application under IISExpress, then switch to debugging under IIS after we have completed migration of the application to a local IIS web server.
That’s all for today’s post.
I hope this post has been useful and informative.
Andrew Halil is a blogger, author and software developer with expertise of many areas in the information technology industry including full-stack web and native cloud based development, test driven development and Devops.


