
Welcome to today’s post.
In today’s post I will show how you can add useful end-to-end user interface automated testing to an ASP.NET Core web application using the Selenium Web Driver using an MSTest test runner.
In a previous post I showed how to create an interactive E2E test with the Selenium Chrome Web Driver and NUnit for our ASP.NET Core web application. The test application allowed us to run a series of scripted tests that interact with our web application. The web application that we test is a URL that has either been deployed to a remote hosted web server, such as a cloud service or on-premises environment. In this case, I have deployed the web application to a local IIS hosted web server using the Azure DevOps continuous deployment pipeline. In a previous post I showed how to deploy a typical web application to IIS using an Azure DevOps release pipeline.
As I mentioned, end-to-end interface tests can either be run in interactive mode or in headless mode. This is dependent on the browser we use for the Web Driver. With the Edge browser, headless mode is not available.
The purpose of automated end-to-end testing is to perform integration testing and user-acceptance testing of a user interface without test user intervention and eliminate much of the manual drudgery that is associated with manual testing.
Building an E2E test run with the MSTest test framework is quite similar in procedure, structure, and script to that of a runner based on the NUnit test framework. Again, I will show how this is done using C# as the script language.
Creation of an MSTest Project in Visual Studio
To setup an end-to-end automated test with an ASP.NET Core web application, we will follow the steps as follows:
Open the solution for the web application.
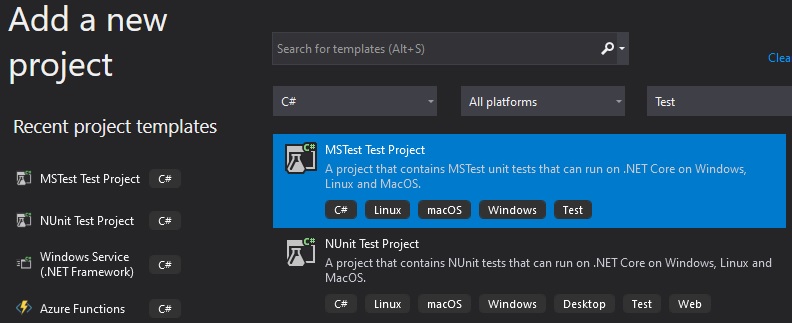
Next, add a new unit test project to our web application solution in Visual Studio. In the list of project templates select the MSTest Test Project.
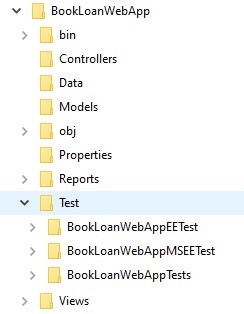
As we did for the unit test E2E project and for our other unit test project which I discussed in a previous post, where I showed how to integrate a unit test into an Azure DevOps continuous integration pipeline, set the project folder for the test to be a subfolder of the parent web application, ensuring that it is created within a subfolder of the main project’s root folder (that contains the .sln and .proj files).
Below is a typical structure we have for our main project and assortment of unit tests and E2E tests:
In the next section, I will show how to install the Selenium Test Driver package in our project.
Installation of the Selenium Test Driver in Visual Studio
Next, before we can implement E2E tests, we will need to install the Selenium.Support NuGet package and at least one of the web drivers your E2E tests will be automated by. In my tests, I have chosen to install the NuGet driver NuGet package Selenium.WebDriver.ChromeDriver.
Search for packages starting with “selenium”. You will find two packages named:
Selenium.Support
Selenium.WebDriver.ChromeDriver
These packages are shown below:

Once the packages are installed, they will be under the Dependencies\Packages folder under your unit test project file.
Initially, the unit test file will be empty with one stubbed test. The structure and implementation of an MSTest project is like an NUnit project.
using Microsoft.VisualStudio.TestTools.UnitTesting;

namespace BookLoanWebAppMSEETest
{
    [TestClass]
    public class Tests
    {
        [TestMethod]
        public void Test1()
        {
        }
    }
}
Configuration of the Selenium E2E Test in a Unit Test Project
First, we add the library references to the unit test source as shown:
using OpenQA.Selenium;
using OpenQA.Selenium.Chrome;
Before we can run the end-to-end tests, we will need to add some plumbing code to connect the unit test to the Selenium automated test driver to the driver corresponding to the browser.
We do this as follows:
Add variables in the private section of the test class to store the context, web driver and application URL:
private TestContext testCtxtInst;
private IWebDriver driver;
private string applicationURL;
These will allow us to store the context of the tests, initialise the web driver and application URL.
To setup and initialize the driver and application URL, we use the [TestInitialize] attribute above our setup method as shown:
[TestInitialize]
public void Setup()
{
    this.applicationURL = "http://localhost:8060";
    this.driver = new ChromeDriver();
}
To release driver resources and tear down our tests, we use the [TestCleanup] attribute above our setup method as shown:
[TestCleanup]
public void TearDown()
{
    this.driver.Quit();
}
With each test method we use the [TestMethod] attribute.
To navigate to the web application to start testing, we use the web driver Navigate() command as shown:
driver.Navigate().GoToUrl(this.applicationURL + "/");
The following command allows us to setup a time out that allows the browser to wait for the driver before running API driver commands within the browser session.
driver.Manage().Timeouts().ImplicitWait = System.TimeSpan.FromMilliseconds(1000);
In the next section I will show how to run a simple e2e test the the Selenium test driver.
Running a Simple E2E Test with the Selenium Test Driver
Before a test run commences, the test driver will be initialised, and the web application will be ready to run.
Below is the test class with two test methods:
using Microsoft.VisualStudio.TestTools.UnitTesting;
using OpenQA.Selenium;
using OpenQA.Selenium.Chrome;

namespace BookLoanWebAppMSEETest
{
    [TestClass]
    public class MainUnitTest
    {
        private TestContext testCtxtInst;
        private IWebDriver driver;
        private string applicationURL;

        [TestInitialize]
        public void Setup()
        {
            this.applicationURL = "http://localhost:8060";
            this.driver = new ChromeDriver();
        }

        [TestCleanup]
        public void TearDown()
        {
            this.driver.Quit();
        }

        public TestContext TestContext
        {
            get
            {
                return this.testCtxtInst;
            }
            set
            {
                this.testCtxtInst = value;
            }
        }

        [TestMethod]
        public void TestOpenAppLandingPage()
        {
            driver.Navigate().GoToUrl(this.applicationURL + "/");

            driver.Manage().Timeouts().ImplicitWait = System.TimeSpan.FromMilliseconds(60000);

            // Test title is correct.
            var title = driver.Title;
            Assert.AreEqual("Landing Page!! - BookLoanWebApp", title);
        }

        [TestMethod]
        public void TestSelectBookList()
        {
            driver.Navigate().GoToUrl(this.applicationURL + "/");

            driver.Manage().Timeouts().ImplicitWait = System.TimeSpan.FromMilliseconds(60000);

            // Click on view books link.
            var viewLink = driver.FindElement(By.Id("viewBookLink"));
            viewLink.Click();

            // Test book list heading is correct.
            var listHeading = driver.FindElement(By.TagName("h1"));
            Assert.AreEqual("Book List", listHeading.Text);

            // Test number of books is greater than zero.
            var booksList = driver.FindElements(By.TagName("tr"));
            Assert.IsTrue(booksList.Count > 0);
        }
    }
}
Refer to my previous post for more details on how the above code works for the Web Driver Selenium API and the use of locators to find web elements during an interactive test.
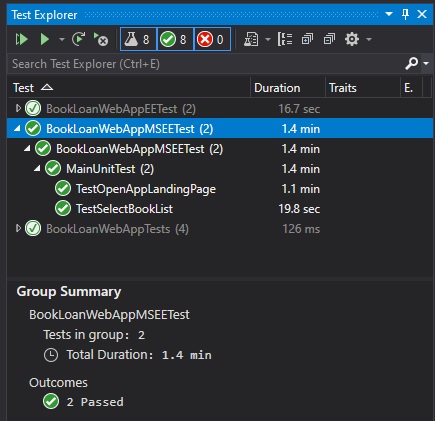
To execute the E2E tests, open Test Explorer in the Visual Studio IDE, then click on the green run button.
Successful test results are indicated by the green tick badges as shown:
After running the test application, the results of the run will be displayed.
This is identical to what we did for the E2E test run with an NUnit test runner.
The above E2E test project can be integrated into a continuous deployment pipeline that will verify that our deployed application functions as expected, before the artifacts are approved to be deployed through a release pipeline into a higher environment, such as test, UAT or production. A variety of end-to-end tests and wide coverage throughout our application will provide significant man-hour savings during the acceptance and integration testing phases during a sprint.
That is all for today’s post.
I hope you have found today’s post useful and informative.
Andrew Halil is a blogger, author and software developer with expertise of many areas in the information technology industry including full-stack web and native cloud based development, test driven development and Devops.
