
Welcome to today’s post.
In today’s post I will show how you can integrate end-to-end tests into an Azure DevOps release pipeline.
You will recall how we were able to create a basic end-to-end test (E2E) application using Visual Studio that used the Selenium Web Driver to run scripted tests against an existing web application using an NUnit test runner or with an MSTest runner. The web application that we had applied the E2E tests was deployed to an IIS server using an Azure DevOps release pipeline.
In addition, we linked our release pipeline to our build pipeline through a continuous build trigger, that would kick off the release pipeline whenever we manually ran the build pipeline or when we committed and pushed source code from our main web application or from any of our tests (unit or E2E) within the project solution.
Before we can proceed with the steps below, I would recommend creating an E2E test then integrate it from the source repository to the build pipeline.
The steps I will explain are:
- Setting up a deployment agent to run E2E tests interactively
- Ensuring only Unit Tests run in the Build Pipeline
- Copying E2E Project Build into Artifacts Storage Folder
- Adding E2E Test Tasks to a Release Pipeline
- Testing Release Pipelines
- Reviewing Test Results of an E2E Test Run
Setting up a Deployment Agent to Run E2E Tests Interactively
When we created an Azure DevOps release pipeline to deploy our web application to an IIS web server, we were required to create a Deployment Group, with a self-hosted deployment Agent configured to run as a Windows Service.
To be able to run E2E tests interactively from a deployment agent, we will need to run tasks from the agent interactively, just as we did with our build pipeline agent. To enable pipeline deployment tasks to run interactively, we will first need to stop the running deployment pipeline’s windows service Azure Pipelines Agent.. as shown:

We will then need to run our Agent’s deployment listener from the c:\azagent folder in administrator context by running run.cmd as shown:

In an unattended environment, the Agent server, when run in interactive mode will need to run with the AutoWinLogon option and specify credentials to allow the release pipeline task to unlock the server and run the tasks unattended.
Ensuring only Unit Tests run in the Build Pipeline
Before we jump into the release pipeline to create and configure the E2E test task, we will need to provide the test task with an existing folder as a source for the project test assemblies that are output from the build pipeline. Without the assemblies and the associated support artifacts, the E2E test will be unable to run without errors in the release pipeline.
The first thing we need to ensure in the build pipeline is to not allow the E2E tests that are in the subfolder of the Test subfolder of the web application to run in the build pipeline. This might seem like a good idea to run E2E tests in the build pipeline, but the E2E tests are essentially acceptance/integration tests that should be run in the release pipeline as a form of validation before the deployment tasks are able to run.
To only run the unit tests, set the field Path to project(s) to a matching wildcard for your unit test project (.csproj) file as shown in the dotnet test task within the build pipeline.

Copying E2E Project Build into Artifacts Storage Folder
To copy our binaries into a sub-folder within the drop artifact of the build pipeline, we will need to add and configure a Copy Task within our build pipeline.

After adding the task into our pipeline task list, move the task just before the Publish Artifact task as shown:

Next, we configure the copy task as follows. Below is a completed configuration and I will explain each significant field in detail:
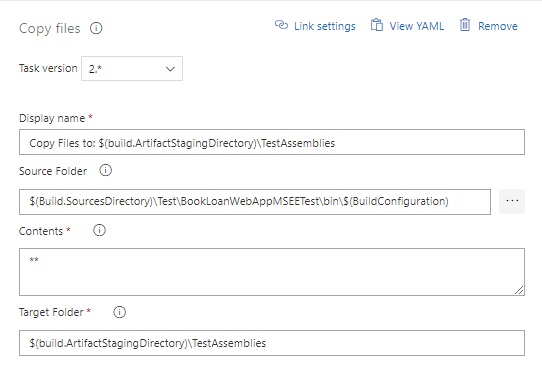
In the Source Folder, we specify the location within our build Agent source folder that contains the binaries and libraries from our E2E test project. For the E2E test project, the source folder is:
$(Build.SourcesDirectory)\Test\BookLoanWebAppMSEETest\bin\$(BuildConfiguration)
In the build Agent source folder, the artifacts are within the \bin\Release\net5.0 subfolder as shown:

The Target folder field holds the location of the artifacts folder that the build files will be copied into. In this case we are using the TestAssemblies subfolder as shown:

The Contents field is a wildcard that filters which source files to copy over into the target artifacts sub-folder. In this case, the wildcard:
**
is a recursive wildcard matching all files and subfolders under the $(BuildConfiguration) sub-folder.
On a self-hosted build agent, the path to the TestAssemblies artifacts would correspond to:
C:\agent\_work\3\a\TestAssemblies\net5.0
Adding E2E Test Tasks to a Release Pipeline
To add an E2E task into a release pipeline requires us to select the stage in the release pipeline designer, then click on the tasks link.

We are then taken to the pipeline tasks designer. From here we click on the plus sign to add a new task into the pipeline.

A list of tasks will then be shown to the right.
There are two tasks we are required to add and initialise:
- Visual Studio test platform installer
- Visual studio test
The platform installer task allows the deployment Agent to download, install and run tests and collate results from any test tasks.

The test task allows both unit and E2E (functional) tests to be run using the visual studio test runner with several frameworks including MSTest and NUnit.

Once added, the release pipeline will look as shown:

To configure the Visual Studio Test task, select it then under Execution options, with the test platform selection, choose Version, then from the Test platform version, choose the Installed by Tools Installer option.

Under the Test selection options, under the Select tests using drop down list, select the option Test assemblies. The outputs in our test project bin folder contain test DLL files which are readable by our test runner.
In the Test files field, we specify the file matching patterns that are used to match test files that contain the E2E tests that will be executed.
Using the recursive wildcard ** means match every file in the current folder. The build pipeline drops the contents of the test project’s \bin sub-folder into an artifact sub-folder that holds the configuration files, binaries and library artifacts required to run the E2E test runner. The sub-folder that contains the artifacts is in the \Release\net5.0 subfolder of the path within the build sources folder of the build agent:
C:\agent\_work\3\s\Test\BookLoanWebAppMSEETest\bin\Release\net5.0
To match the E2E test project library we can use the wildcard below which matches the name of the test project DLL under the child sub-folder:
**\**\BookLoanWebAppMSEETest.dll
The other wildcards:
!**\*TestAdapter.dll
!**\obj\**
Use the not match, which means don’t match these files. So, in the above, we don’t want to match test adapter assemblies or object output files within the bin sub-folder.
If there are too many matching assemblies, the test task will eventually find your test DLL, but it will be slower and will give possible errors during the task run. This could take a few runs of the release pipeline to get the minimal number of matches right.
In the search folder, we specify the path to the test assembly sub-folder within the build pipeline’s artifact that will be searched for test assembly files. This path is relative to the build pipeline drop artifact:
$(System.DefaultWorkingDirectory)\_BookLoanProject001-ASP.NET Core (.NET Framework)-CI\drop\TestAssemblies
On a self-hosted agent, the path would be something like:
C:\agent\_work\3\a\TestAssemblies\net5.0
Under the Test results folder field, specify the folder where test results are stored, by default it is set to:
$(Agent.TempDirectory)\TestResults
The test task with completed parameters is shown below:

Testing Release Pipelines
Once we have saved our release pipeline tasks, we can attempt to execute the E2E tests and deployment tasks on our deployment agent target environment. We manually trigger the deployment tasks as shown:

Once triggered, while the deployment stage is in progress, indicated with a blue icon in the Development stage as shown:

Clicking on the stage in the In progress link will show the progress:

Clicking on the link Deployment in progress (or Deployment succeeded if the task has completed) near the rocket icon will show the following status page.

Clicking on the tick box will take you to the release agent logs:

To review the test logs, click on the vsTest – test assemblies task.
To conform the E2E run was executed on the release Agent, look for text ChromeDriver was started successfully in the log. Below shows both E2E tests have passed!
2022-11-21T11:30:28.0447601Z ChromeDriver was started successfully.
2022-11-21T11:30:54.1576251Z Starting ChromeDriver 107.0.5304.62 (1eec40d3a5764881c92085aaee66d25075c159aa-refs/branch-heads/5304@{#942}) on port 51228
2022-11-21T11:30:54.1588466Z Only local connections are allowed.
2022-11-21T11:30:54.1593986Z Please see https://chromedriver.chromium.org/security-considerations for suggestions on keeping ChromeDriver safe.
2022-11-21T11:30:54.1790094Z ChromeDriver was started successfully.
2022-11-21T11:30:54.1958462Z   Passed TestOpenAppLandingPage [27 s]
2022-11-21T11:31:03.0168564Z   Passed TestSelectBookList [7 s]
Reviewing Test Results of an E2E Test Run
Following the completion of the deployment stage within the release pipeline, if test tasks were completed as part of the deployment job, the deployment Stage will show a green line and box coloured with a green hue. At the base of the Development stage box, you will notice a laboratory beaker showing the percentage of passed tests.

On clicking the beaker icon, you will be taken to the test results screen.
Here you will see the following important statistics in the header:
- Total tests run
- Number of tests passed
- Number of tests failed
- Pass percentage
- Test run duration (in seconds)
In the filtered grid, the following are displayed:
- Test method
- Duration

Selecting any of the test methods will show the Results Details to the right of the screen.
Here you will see the name of the test, duration, owner, date started, and date completed.
Where the result is an error, further details including error messages and a stack trace are shown to help with troubleshooting.

From the above overview, we can see how a basic E2E test run can be integrated into Azure DevOps continuous build and continuous deployment pipelines.
It seems like quite a lot of effort to configure the pipelines from start to finish, however, to gain confidence in the construction of pipelines requires the following:
- Construct each pipeline and test each in isolation
- Enabling debugging of tasks within pipeline jobs
- Understanding how to read the task logs including errors and debug output
- Being aware of the variety of folder structures we are using within each job, stage, artifact and how these are used within task properties
In a future post I will show how to do some useful troubleshooting of end-to-end tests that are run within a release pipeline.
That is all for today’s post.
I hope you have found this post useful and informative.
Andrew Halil is a blogger, author and software developer with expertise of many areas in the information technology industry including full-stack web and native cloud based development, test driven development and Devops.

