
Welcome to today’s post.
In today’s post I will be discussing how we can exchange data between components within in Angular application.
In a previous post I showed how to refactor components by decoupling them and allowing them to share data between them. However, I did not elaborate on the key feature that was used to achieve the data sharing, and that is the EventEmitter class and Output property decorator.
One of the most common patterns we will encounter when developing Angular components is the data sharing pattern that exists between child and parent component within a component HTML template.
A parent component that hosts a child component, the pattern for the general template structure as shown:
<parent-component>
    <child-component></child-component>
</parent-component>
With the above parent-child relationship and structure, there is no data exchange between the outer an inner-components. The most useful scenarios are when data is transferred from the parent to the child component. There are many cases where this is type of data exchange is used. In the next section, I will show how the data input to the child component is detected within the child component.
Component Input and Change Notifications
When we have a parent component passing inputs to a child component, the pattern for the template structure is as follows:
<parent-component>
    <child-component
        [childItem]=”parentItem”>
    </child-component>
</parent-component>
Where parentItem is a property from the parent component, and childItem is a setter for the property childItem in the child component.
To explain how parent to child input data transfer works, we use Input decorators. Input decorators are used within components to allow data to be set within a component. Essentially, they are just property setters. Declaring and initializing a property setter within a child component is done as follows:
@Input() item = 1;
Within our child component, the starting state for our data commences with the input decorator.
Thereafter, within the child component we can process the input and then produce output to the Output decorator via an EventEmiitter, which I will show later. The other possibility is that the inputs may change. When component inputs change, there is an additional lifecycle hook, which is the OnChanges lifecycle event. We can handle such input event changes through the ngOnChanges() event hook as shown:
ngOnChanges(changes: SimpleChanges) {
    for (const propertyName in changes) {
        // get the current value with changes[propertyName].currentValue;
        // get the previous value with changes[propertyName].previousValue;
  }
}
Where the SimpleChanges object that holds a collection of the current and previous objects.
Component Outputs and Change Notifications
When we have property data changes within the child component, and would like to notify the parent component of these changes, and be able to set data to the parent component, the pattern for the template structure is as follows:
<parent-component>
    <child-component
  	[childItem]=”parentItem”
  	(childEvent)=”changedChildData($event)”>
    </child-component>
</parent-component>
Where childEvent is an Output event within the child component that triggers the notification back to the parent component.
The event handler, changedChildData is an event handler within the parent component that receives the data transferred (emitted) from the child component.
In the third template structure, we can make use of the EventEmitter class, which is part of the core Angular library and the Output decorator.
In the child component we are required to import the above as shown:
import { Output, EventEmitter } from '@angular/core';
We then declare an event emitter that will transfer the data, which is an integer in this case, as shown:
@Output() childEvent = new EventEmitter<number>();
The child component in its HTML template through a UI event would then update the data. For example, a user clicked on a button:
<button (click)="incrementCount()">Increment the Count</button>
then, within an internal event handler can emit a value to the component output variable as shown:
incrementCount()
{
    this.internalValue = this.internalValue + 1;
    this.childEvent.emit(this.internalValue);
}
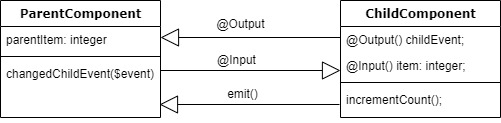
The following diagram encapsulates what I have discussed:
Recall from one of my previous posts, where I showed how we send data to an RxJS Subject, which is an observable. According to the Angular API documentation, an EventEmitter is the Subject RxJS class extended with the emit() method.
So, once the child component emits the data, the parent component then needs to receive this data. We do this by implementing an event handler that will receive the data from the child components emitter. We do this as by declaring an event handler method that is as follows:
changedChildData(dataItem: number) {
    // do something with dataItem..
}
Essentially, dataItem is the same data that was emitted from the child component’s Output decorator value.
Applicable Uses for Component Input Changes
The best case uses for input change notifications is where we have a child component that is visual and is required to refresh itself in response to one of its inputs changing. A prime example would be a chart component that needs to be visually refreshed whenever a dependent input parameter changes and is passed from within the parent component to the child component. An even better use might be where the parent component contains more than one child component, such as charts or grids that require refreshing based on changing property data within the parent.
Applicable Uses for Component Output Changes
The best case uses for output notifications and data exchange is where the child component is also a visual component that has internal properties that change. In turn, the parent receives the notification and / or data output from the child components and then refreshes its own properties and re-displays its changes. This might be a response to a selection made within the child component that affects other child components within the parent component.
An example of this can be seen in my post on creating a checkbox group component.
Further details on the Input and Output decorators are mentioned in the Angular guide on input and output parameters.
The above overview explains how to transfer data from a child component to a parent component in both directions (inputs and outputs).
You can see how the above is implemented in the links to some of my previous posts.
That is all for today’s post.
I hope you found this post useful and informative.
Andrew Halil is a blogger, author and software developer with expertise of many areas in the information technology industry including full-stack web and native cloud based development, test driven development and Devops.
