
Welcome to today’s post.
In today’s post I will discuss what Bicep templates are how to use them to deploy resources to Azure.
I will also show how to use development tools to help us create, author, and validate Bicep templates before using them in Azure deployments.
I will then show how to use development tools to deploy Bicep templates into Azure.
In a previous post I showed how to author and validate ARM templates within the Visual Studio development environment to deploy resources to Azure. I also showed how to integrate the ARM template into an Azure DevOps release pipeline, which is used to deploy resources to Azure as part of a continuous deployment process.
In the first section that follows, I will define Bicep templates.
What are Bicep Templates and how do they differ from ARM Templates?
Bicep templates are a script that represents a declarative form of a deployment.
It represents what is the final state of resources with a deployment in Azure. With a scripted deployment that uses scripts that create each resource in a particular order, we have an imperative representation of the deployment, that shows how the deployment was executed. Both ARM templates and Bicep templates are both declarative representations of the final deployed resources into the target environment.
Another type of declarative deployment script is the ARM template, and they do have some differences.
Below are the differences:
- Simplified syntax
Bicep templates have a simplified syntax that declares Azure resources (storage accounts, app service plans etc.) without using JSON syntax.
- Easier to learn
ARM templates use a JSON syntax, which is difficult to write and is prone to errors.
- Variables and parameters are easier to use in Bicep.
In Bicep, variables and parameters can be declared anywhere in the script. In ARM JSON, they must be declared at the beginning of the script.
As we can see, there are a few differences between Bicep and ARM templates. The main similarity is that both achieve the same outcome of deploying resources to Azure.
In the next few sections, I will explain Bicep templates are created, authored, and processed in a development environment.
How are Bicep and ARM Templates used in the Deployment Process?
A Bicep template script converts to an ARM template JSON script during a build. A deployment to Azure is applied with the ARM template in JSON syntax. An ARM template is a compiled form of a Bicep template.
The building of Bicep templates can be achieved by using one of the following tools:
- Azure CLI command
- Azure PowerShell command
- Visual Code IDE
- Visual Studio IDE
I will show how an Azure Bicep template is built and deployed using the Visual Code IDE. In a future post I will show how to deploy Bicep files using Azure CLI commands.
How are Bicep Templates created and authored?
Like ARM templates, Bicep templates can be authored within the development environments, Visual Studio and Visual Studio Code. There are existing extensions and NuGet packages that help with the authoring and validation of Bicep templates.
I will show how this is done using the Visual Code IDE.
Before we can create and author Bicep templates within the Visual Code IDE, we will need to install the Bicep extension from Microsoft.
The extension provides the following features:
- Authoring templates using the Bicep language.
- Conversion of ARM JSON script into Bicep script.
- Validation of Bicep script.
- Visualisation of resources.
- Generation of Bicep templates from ARM templates
- Generation of ARM templates from Bicep templates
- Preparing Bicep templates for deployment
- Deploying Bicep templates into Azure.
I will go through a brief overview of authoring Bicep templates.
Authoring Templates using the Bicep language
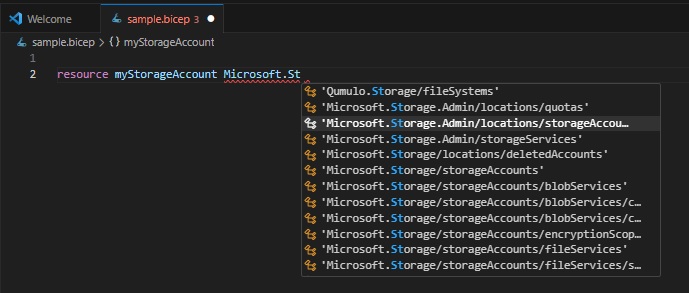
A Bicep template consists of resource definitions, along with parameters and variables. In a blank Bicep file, we can start with a resource definition. When we type in any keyword, there is an auto-completion as shown:

Next, the resource type is also provided as an auto-completion, with all valid resource types displaying in a drop-down list. This is a time-saving feature during scripting:
Next, before we reach the properties block for the resource after typing in the equals ‘=’ character, we get a list of options which includes required-properties.

Selecting option required-properties with the tab key expands the properties required for the resource type:
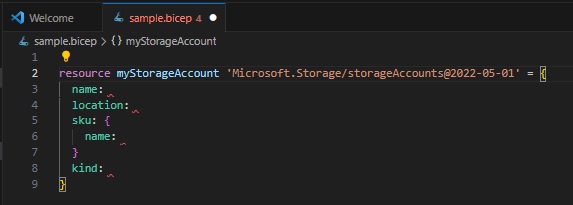
From here we fill in the properties. After specifying the parameters and variables, the resource definition looks as follows:

In the next section, I will show how to convert an ARM script into a Bicep script.
Conversion of ARM JSON script into Bicep script
Another nice feature is the ability to take existing snip of ARM in the clipboard and convert it to equivalent Bicep script. This allows us who are familiar with ARM template JSON syntax to convert it to Bicep script while authoring a template.
Example ARM template JSON script for a storage account is shown below:
{
    "type": "Microsoft.Storage/storageAccounts",
    "apiVersion": "2022-05-01",
    "name": "[variables('vStorage_Account_Name')]",
    "location": "[parameters('pLocation')]",
    "sku": {
        "name": "Standard_LRS"
    },
    "kind": "StorageV2",
    "properties": {
        "supportsHttpsTrafficOnly": true
    }
}
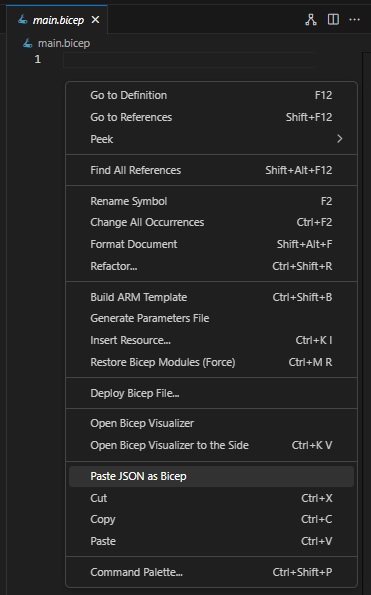
Next, we select the Paste JSON as Bicep menu item from the context menu as shown:
The resulting generated Bicep script definition is shown below:
resource vStorage_Account 'Microsoft.Storage/storageAccounts@2022-05-01' = {
    name: vStorage_Account_Name
    location: pLocation
    sku: {
        name: 'Standard_LRS'
    }
    kind: 'StorageV2'
    properties: {
        supportsHttpsTrafficOnly: true
    }
}
What the converted script includes is a symbolic name, vStorage_Account which Bicep uses to reference the resource within the script. Note that this is different from the name if the resource, vStorage_Account_Name.
The conversion of ARM JSON script to Bicep script is done on a best-effort basis. You may need to do a bit of tidying up of the resulting Bicep script.
I will show how to validate a Bicep script in the next section.
Validation of a Bicep script
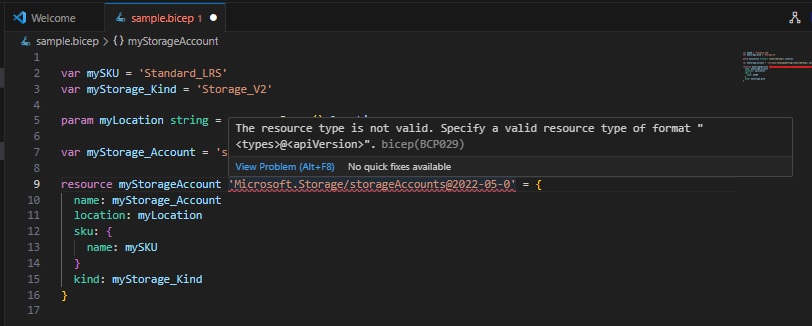
Validation of Bicep template script is done on the fly. One example is the validation of resource types. When the resource type is invalid, the erroneous type is underlined in red as shown:
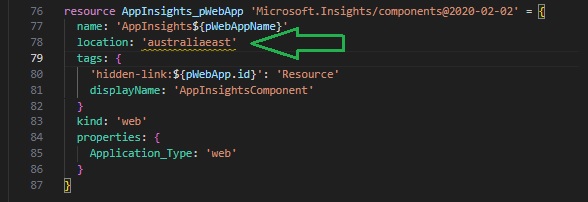
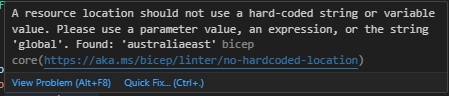
In another example, when a required property, such as a resource location is hard-coded, a warning of the affected value is shown underlined in yellow as shown:
With yellow warnings, there is usually an option to apply a quick fix for the issue. The IDE will offer a dialog to apply a quick fix:
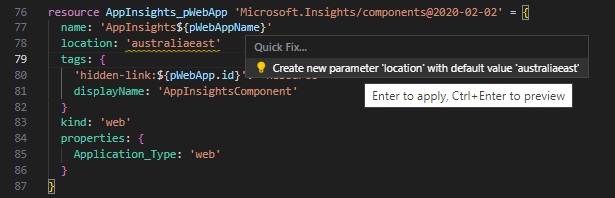
In this case, the declaration of a variable or parameter before the resource definition can remediate the issue.
In the next section, I will show how to visualize the resources in the Bicep template.
Visualization of Resources from the Bicep Template
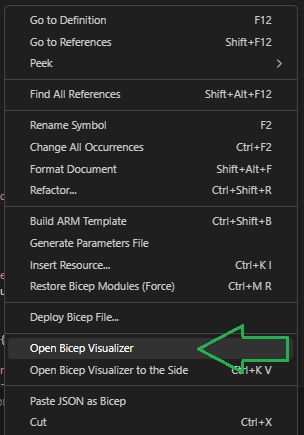
Once we have scripted some of our Bicep template, we can get an overview of the structure of the resources within the template by using the Open Bicep Visualizer option in the context menu:
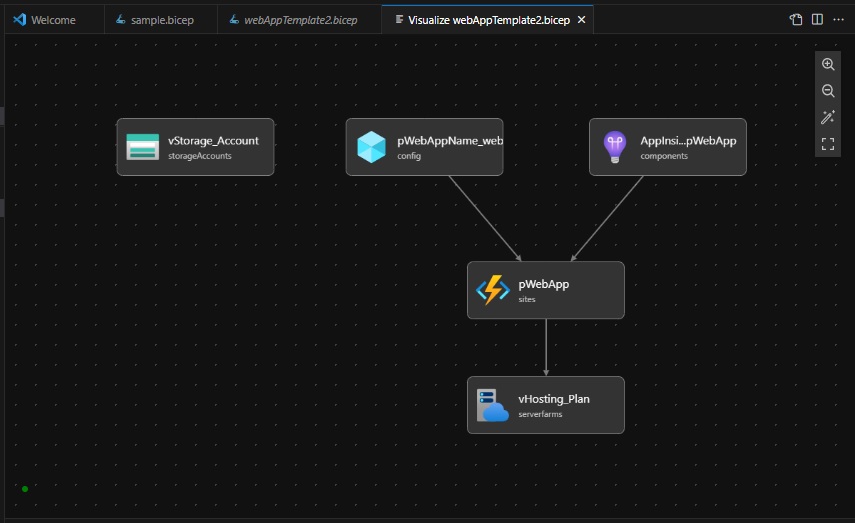
After a short time, the visualizer shows with the resource dependencies displaying with the dependencies lower down in the diagram:
In the next section, I will show how Bicep templates are generated from ARM templates.
Generation of Bicep Templates from ARM Templates
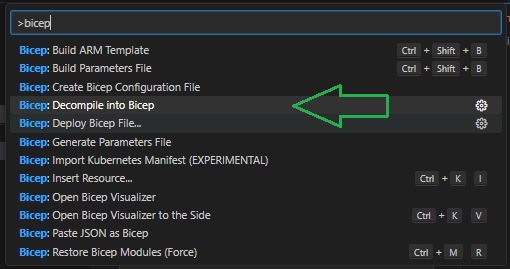
The other useful option that is available is to specify an ARM JSON template file and convert that into a Bicep template file. This option is available in the command palette as the command Decompile into Bicep.
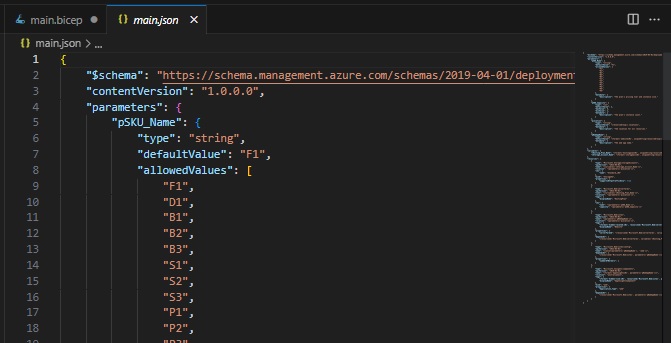
An excerpt of the current ARM scripted file shown below:
The above is then converted into equivalent Bicep scripted file:
We saw an example of how ARM script in the clipboard is converted into Bicep using the context menu option Decompile pasted JSON script and what the resulting resource command and mapped variables and symbols looked like.
Below is sample ARM template script with parameters, variables, app plan, app service, app configuration and app insights:
{
    "$schema": "https://schema.management.azure.com/schemas/2019-04-01/deploymentTemplate.json#",
    "contentVersion": "1.0.0.0",
    "parameters": {
        "pSKU_Name": {
            "type": "string",
            "defaultValue": "F1",
            "allowedValues": [
                "F1",
                "D1",
                "B1",
                "B2",
                "B3",
                "S1",
                "S2",
                "S3",
                "P1",
                "P2",
                "P3",
                "P4"
            ],
            "metadata": {
                "description": "The plan's pricing tier and instance size."
            }
        },
        "pSKU_Capacity": {
            "type": "int",
            "defaultValue": 1,
            "maxValue": 3,
            "minValue": 1,
            "metadata": {
                "description": "The plan's instance count."
            }
        },
        "pLocation": {
            "type": "string",
            "defaultValue": "[resourceGroup().location]",
            "metadata": {
                "description": "The location for all resources."
            }
        },
        "pWebAppName": {
            "type": "string",
            "defaultValue": "[format('website{0}', uniqueString(resourceGroup().id))]",
            "metadata": {
                "description": "The web app name."
            }
        }
    },
    "variables": {
        "vHosting_Plan_Name": "[format('hostingplan{0}', uniqueString(resourceGroup().id))]",
        "vStorage_Account_Name": "[format('storageacc{0}', uniqueString(resourceGroup().id))]"
    },
    "resources": [
        {
            "type": "Microsoft.Web/serverfarms",
            "apiVersion": "2022-03-01",
            "name": "[variables('vHosting_Plan_Name')]",
            "location": "[parameters('pLocation')]",
            "tags": {
                "displayName": "HostingPlan"
            },
            "sku": {
                "name": "[parameters('pSKU_Name')]",
                "capacity": "[parameters('pSKU_Capacity')]"
            }
        },
        {
            "type": "Microsoft.Web/sites",
            "apiVersion": "2022-03-01",
            "name": "[parameters('pWebAppName')]",
            "location": "[parameters('pLocation')]",
            "tags": {
                "[format('hidden-related:{0}', resourceId('Microsoft.Web/serverfarms', variables('vHosting_Plan_Name')))]": "empty",
                "displayName": "Website"
            },
            "properties": {
                "serverFarmId": "[resourceId('Microsoft.Web/serverfarms', variables('vHosting_Plan_Name'))]"
            },
            "dependsOn": [
                "[resourceId('Microsoft.Web/serverfarms', variables('vHosting_Plan_Name'))]"
            ]
        },
        {
            "type": "Microsoft.Web/sites/config",
            "apiVersion": "2022-03-01",
            "name": "[concat(parameters('pWebAppName'), '/web')]",
            "dependsOn": [
                "[resourceId('Microsoft.Web/sites', parameters('pWebAppName'))]"
            ],
            "properties": {
                "numberOfWorkers": 1
            }
        },
        {
            "type": "Microsoft.Insights/components",
            "apiVersion": "2020-02-02",
            "name": "[format('AppInsights{0}', parameters('pWebAppName'))]",
            "location": "australiaeast",
            "tags": {
                "[format('hidden-link:{0}', resourceId('Microsoft.Web/sites', parameters('pWebAppName')))]": "Resource",
                "displayName": "AppInsightsComponent"
            },
            "kind": "web",
            "properties": {
                "Application_Type": "web"
            },
            "dependsOn": [
                "[resourceId('Microsoft.Web/sites', parameters('pWebAppName'))]"
            ]
        }
    ]
}
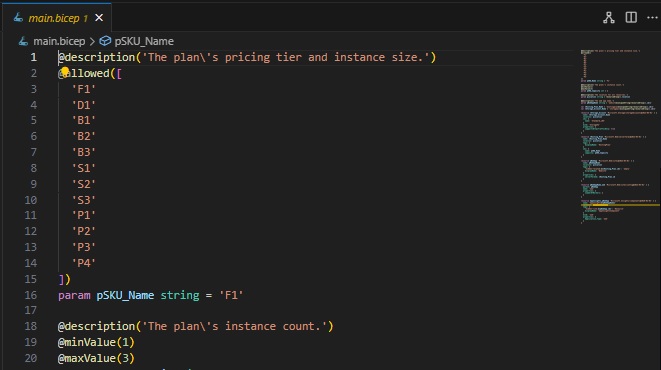
Below is the equivalent generated Bicep script output file:
@description('The plan\'s pricing tier and instance size.')
@allowed([
  'F1'
  'D1'
  'B1'
  'B2'
  'B3'
  'S1'
  'S2'
  'S3'
  'P1'
  'P2'
  'P3'
  'P4'
])
param pSKU_Name string = 'F1'

@description('The plan\'s instance count.')
@minValue(1)
@maxValue(3)
param pSKU_Capacity int = 1

@description('The location for all resources.')
param pLocation string = resourceGroup().location

@description('The web app name.')
param pWebAppName string = 'website${uniqueString(resourceGroup().id)}'

var vHosting_Plan_Name = 'hostingplan${uniqueString(resourceGroup().id)}'
var vStorage_Account_Name = 'storageacc${uniqueString(resourceGroup().id)}'

resource vStorage_Account 'Microsoft.Storage/storageAccounts@2022-05-01' = {
  name: vStorage_Account_Name
  location: pLocation
  sku: {
    name: 'Standard_LRS'
  }
  kind: 'StorageV2'
  properties: {
    supportsHttpsTrafficOnly: true
  }
}

resource vHosting_Plan 'Microsoft.Web/serverfarms@2022-03-01' = {
  name: vHosting_Plan_Name
  location: pLocation
  tags: {
    displayName: 'HostingPlan'
  }
  sku: {
    name: pSKU_Name
    capacity: pSKU_Capacity
  }
}

resource pWebApp 'Microsoft.Web/sites@2022-03-01' = {
  name: pWebAppName
  location: pLocation
  tags: {
    'hidden-related:${vHosting_Plan.id}': 'empty'
    displayName: 'Website'
  }
  properties: {
    serverFarmId: vHosting_Plan.id
  }
}

resource pWebAppName_web 'Microsoft.Web/sites/config@2022-03-01' = {
  parent: pWebApp
  name: 'web'
  properties: {
    numberOfWorkers: 1
  }
}

resource AppInsights_pWebApp 'Microsoft.Insights/components@2020-02-02' = {
  name: 'AppInsights${pWebAppName}'
  location: pLocation
  tags: {
    'hidden-link:${pWebApp.id}': 'Resource'
    displayName: 'AppInsightsComponent'
  }
  kind: 'web'
  properties: {
    Application_Type: 'web'
  }
}
Notice the following conversions:
Parameters in the JSON format:
"parameters": {
    "[parameter name]": {
        …
    }
}
The above are converted into Bicep script in the format:
@description('[description of parameter]')
…
param [parameter name] [parameter type] = [some value]
Variables in the format:
"variables": {
    "[variable 1]": "[format('hostingplan{0}', uniqueString(resourceGroup().id)]",
        …
    "[variable N]": "[format('storageacc{0}', uniqueString(resourceGroup().id))]"
},
Are converted into variables in the format:
var [variable 1] = 'hostingplan${uniqueString(resourceGroup().id)}'
…
var [variable N] = 'storageacc${uniqueString(resourceGroup().id)}'
Strings of the format:
’format('any text{0}', value)’
Are converted into an interpolated string format:
'any text${value}'
The above conversion from an ARM JSON template file into a Bicep template file can also be achieved using the following command:
az bicep decompile --file [Template file name].json
Where [Template file name].json is an ARM template file in the current directory. The resulting generated Bicep file is then [Template file name].bicep
In the next section, I will show how ARM templates are generated from Bicep templates.
Generation of ARM Templates from Bicep Templates
There would be situations where we would need to use the ARM template instead of the Bicep template.
To generate an ARM template file into a Bicep template file we can use the az bicep build command. We do this as follows:
az bicep build --file webAppTemplate.bicep
Where webAppTemplate.bicep is a Bicep template file.
The above command generates an ARM template file webAppTemplate.json.
The beginning of the JSON content within the generated ARM template file shows:
{
    "$schema": "https://schema.management.azure.com/schemas/2019-04-01/deploymentTemplate.json#",
    "contentVersion": "1.0.0.0",
    "metadata": {
        "_generator": {
            "name": "bicep",
            "version": "0.18.4.5664",
            "templateHash": "14860988356018139420"
        }
    },
    ..
The remainder of the generated ARM template is identical that in the previous section.
Preparing Bicep Templates for deployment
Before we can deploy the Bicep template, we require two tasks to be completed:
- A Bicep parameters file.
- Sign-in to an existing Azure subscription.
- An existing resource group in the Azure subscription.
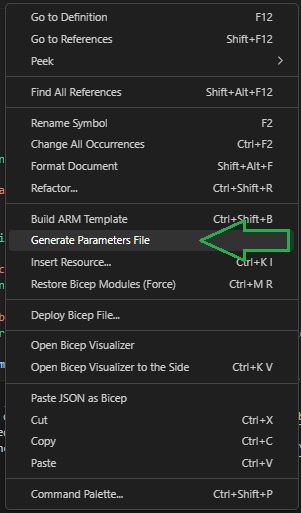
To generate the Bicep parameters file, select the Generate Parameters File option in the context menu while the Bicep file is open:
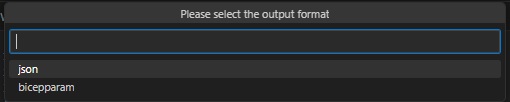
Select bicepparam as the output format:
Select which parameters to include. Select requiredonly.
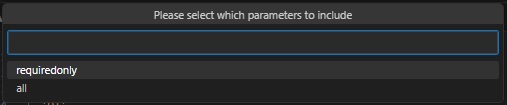
If you select all option, then extra parameters that are already derived within the Bicep template are redundantly included. These will include the pLocation and pWebAppName parameters, which are derived from the resourceGroup() function.
webAppTemplate2.bicepparam
using './webAppTemplate2.bicep'

param pSKU_Name = 'F1'
param pSKU_Capacity = 1
In the next section I will show how to deploy Bicep templates into Azure.
Deploying Bicep Templates into Azure
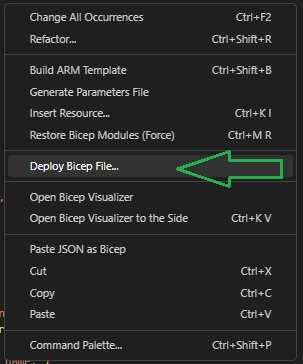
We are now ready to deploy the Bicep template file. Select the Deploy Bicep File… option in the context menu:
If not already signed into Azure, then sign-in as prompted:

A deployment name is autogenerated or you can select an existing one:

Select an existing subscription to deploy resources to:

Select an existing resource group or create a new resource group:

Finally, select the parameters file for the template inputs:

After a minute or so, the deployment will complete. Open the Azure Portal and open the resource group. You will see the resources have been deployed.

The deployment has been successful from the Bicep template.
We have seen how to create, author, validate, generate, and deploy Bicep templates using the Visual Code IDE. Compared to the JSON syntax used within ARM templates, Bicep template script is an easier script to learn and with the Bicep extension within the Visual Code IDE, the entry and validation of resources, resource types are more straightforward without having to remember the complex structure that is within the JSON format within ARM templates. In addition, parameters and variables in Bicep files are re-usable across any resources within the script and can be initialized within the parameter file for deployment.
In a future post I will show how to deploy Bicep templates in other ways, including from the Azure CLI script, Azure Portal and within an Azure DevOps pipeline.
That is all for today’s post.
I hope you have found this post useful and informative.
Andrew Halil is a blogger, author and software developer with expertise of many areas in the information technology industry including full-stack web and native cloud based development, test driven development and Devops.

