In today’s post I show how to deploy Azure Resources with Bicep and the Azure CLI.
In a previous post I showed how to deploy Azure Resources using Bicep within the Visual Code IDE.
In that post, within the Visual Code IDE, I showed how to take an existing Azure ARM template and convert it into a Bicep template script. I then showed how to generate a Bicep parameters file and link that back to the Bicep template script file. I also showed how to build and validate a Bicep script file and then how to deploy the resources in the Bicep script to Azure.
The authoring of Bicep templates is a part of the overall DevOps process, which requires part of a continuous deployment within a scheduled or triggered Azure DevOps pipeline to be scripted. This ensures that the resources in the destination environment are created before the application artifacts are then deployed into the resources within the destination environment.
In today’s post I will show a different way of deploying Bicep script resources to Azure. I will be showing how to use the Azure CLI script to deploy resources into Azure. There are other scripting languages such as Azure PowerShell (locally), Azure CLI Cloud Shell (remote) and Azure Cloud Bash Shell (remote) that can also be used to deploy resources into Azure. The latter two alternatives are run within the Azure Portal.
I will show how to upgrade the Azure CLI and Bicep CLI and then use Azure CLI script to prepare and execute a deployment to Azure.
I will then show how to verify the resources have been deployed into Azure.
In the previous post I showed how to author Bicep templates, so I will assume you already understand the structure and different types of resources, parameters and variables that can be declared within a Bicep template script.
Deploying a Bicep Template to Azure
In this section I will take a Bicep template that defines the resources for a web application that is to be deployed into an Azure App Service. I will also explain the input parameters, including the default parameters that are used within the script. I will also explain how input parameters can be restricted to a finite set of allowable values.
Below is the Bicep script that I will deploy:
@description('The plan\'s pricing tier and instance size.')
@allowed([
  'F1'
  'D1'
  'B1'
  'B2'
  'B3'
  'S1'
  'S2'
  'S3'
  'P1'
  'P2'
  'P3'
  'P4'
])
param pSKU_Name string = 'F1'

@description('The plan\'s instance count.')
@minValue(1)
@maxValue(3)
param pSKU_Capacity int = 1

@description('The location for all resources.')
param pLocation string = resourceGroup().location

@description('The web app name.')
param pWebAppName string = 'website${uniqueString(resourceGroup().id)}'

var vHosting_Plan_Name = 'hostingplan${uniqueString(resourceGroup().id)}'
var vStorage_Account_Name = 'storageacc${uniqueString(resourceGroup().id)}'

resource vStorage_Account 'Microsoft.Storage/storageAccounts@2022-05-01' = {
  name: vStorage_Account_Name
  location: pLocation
  sku: {
    name: 'Standard_LRS'
  }
  kind: 'StorageV2'
  properties: {
    supportsHttpsTrafficOnly: true
  }
}

resource vHosting_Plan 'Microsoft.Web/serverfarms@2022-03-01' = {
  name: vHosting_Plan_Name
  location: pLocation
  tags: {
    displayName: 'HostingPlan'
  }
  sku: {
    name: pSKU_Name
    capacity: pSKU_Capacity
  }
}

resource pWebApp 'Microsoft.Web/sites@2022-03-01' = {
  name: pWebAppName
  location: pLocation
  tags: {
    'hidden-related:${vHosting_Plan.id}': 'empty'
    displayName: 'Website'
  }
  properties: {
    serverFarmId: vHosting_Plan.id
  }
}

resource pWebAppName_web 'Microsoft.Web/sites/config@2022-03-01' = {
  parent: pWebApp
  name: 'web'
  properties: {
    numberOfWorkers: 1
  }
}

resource AppInsights_pWebApp 'Microsoft.Insights/components@2020-02-02' = {
  name: 'AppInsights${pWebAppName}'
  location: pLocation
  tags: {
    'hidden-link:${pWebApp.id}': 'Resource'
    displayName: 'AppInsightsComponent'
  }
  kind: 'web'
  properties: {
    Application_Type: 'web'
  }
}
The Bicep script contains parameters and variables, which give us the flexibility to be able to amend parameters to give us deployments into different release environments (development, test, production).
Each parameter in the script can be annotated and declared as follows:
@description('[description of parameter]')
…
param [parameter name] [parameter type] = [some value]
Variables give us the benefit of re-use so that we avoid having to duplicate values throughout the script.
Each variable in the script is declared as follows:
var [variable name] = [variable value]
We also defined two of the default parameters pSKU_Name and pSKU_Capacity with restrictions. The pSKU_Name stringparameter is restricted to a finite set of strings that can be specified for the service plan. This means that only a valid parameter for pSKU_Name can be specified in the parameters file.
The pSKU_Capacity integer parameter is restricted to a range of integers that are specific for the hosting plan capacity. Again, only values within the range 1 … 3 for pSKU_Capacity can be specified in the parameters file.
In the next section, I will show how to prepare a Bicep template for deployment.
Preparing Bicep Templates for Deployment
Before we can deploy the Bicep template with the Azure CLI, we require two tasks to be completed:
- A Bicep parameters file.
- Sign-in to an existing Azure subscription.
- Create an existing resource group in the Azure subscription.
We showed how the above was achieved using the Visual Code IDE. I will how show how this is done with the CLI.
The purpose behind the Bicep parameters file is to allow both optional and required parameters to be specified to the Bicep script. The optional parameters are specified when the same parameters in the Bicep script are already specified with default values. When no default values are specified in the Bicep script, they will have to be specified in the parameters file as required parameters.
In the next section I will show how to deploy bicep templates using the Azure CLI.
Deploying Bicep Templates using the Azure CLI
Another method of deployment is to use the Azure CLI or Azure PowerShell. I will show how to deploy resources from a Bicep file using the Azure CLI.
Given the Bicep file we had generated earlier from the ARM template, I will that and the Bicep parameter file to deploy the resources in the Bicep script to Azure.
The Bicep parameter is shown below:
using './webAppTemplate.bicep'

param pSKU_Name = 'F1'
param pSKU_Capacity = 1
With a Bicep parameter file, the Bicep script file must be referenced within the parameter file.
Also, according to Microsoft, the minimum versions of Azure CLI and Bicep CLI that support Bicep parameters is 2.47.0 and 0.18.4 respectively.
If you run a Bicep deployment from the Azure CLI with older versions of the CLI, you will get the following error:
Failed to parse [scriptfile].bicepparam with exception:
Failed to parse [scriptfile].bicepparam’, please check whether it is a valid JSON format
Where [scriptfile].bicepparam is the name of your Bicep parameter file.
Before running deployments with the Azure CLI, it is better to check versions using commands:
az --version
and
az bicep version
To upgrade the Azure CLI and Bicep CLI, the following command can be run:
az upgrade
and
az bicep upgrade
To apply a Bicep file, webAppTemplate.bicep and parameter file, webAppTemplate.bicepparam to a deployment try the following CLI commands in a command console.
First login to Azure:
az login
Then create a resource group that will contain the deployed resources:
az group create --location [location-name] --name [resource-group-name]
Where:
[resource-group-name] is the name of your new resource group.
[location-name] is the location for your new resource group.
The deployment is executed with the following command:
az deployment group create \
  --name [app-deployment-name] \
  --resource-group [resource-group-name] \
  --template-file webAppTemplate.bicep \
  --parameters webAppTemplate.bicepparam
The above command requires a new app deployment name, an existing resource group, a Bicep file, and parameter file argument.
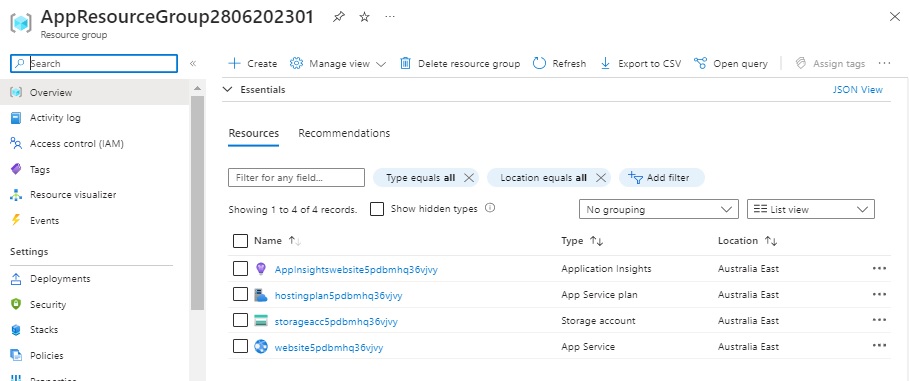
When deployed, the resources in Azure will show under the resource group as shown:

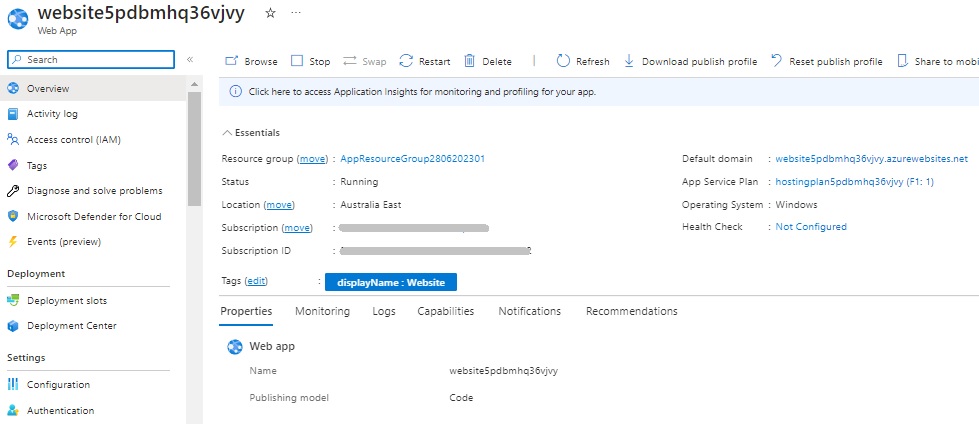
The web site will be deployed as shown:

Notice that the resource names are created with unique names.
When deploying resources for an application to different locations it makes sense to generate unique web application names and hosting plans. Other naming conventions can be used to generate unique resource names across different stages of the deployment: Dev, Test, UAT, and Prod. In this case, making using of the string interpolation of variables, like I showed earlier helps to make the Bicep script flexible to support the deployment of resources into each environment of the release cycle.
To cleanup and remove resources, use the following command.
az group delete --name [resource-group-name]
We have seen how to deploy Bicep templates using Azure CLI script. In addition, I have showed how to deploy the Bicep script with a parameters file. The use of the CLI script allows us to automate the deployment of resources either from a local development environment, from a deployment server, or from a deployment release pipeline.
In a future post I will show how to deploy Bicep templates in other ways, including from the Azure Portal and within an Azure DevOps pipeline.
That is all for today’s post.
I hope you have found this post useful and informative.
Andrew Halil is a blogger, author and software developer with expertise of many areas in the information technology industry including full-stack web and native cloud based development, test driven development and Devops.


