
Welcome to today’s post.
In today’s blog post I will be showing how to modularize deployments using Azure Bicep scripts.
In previous posts I introduced the use of Bicep scripts to deploy Azure resources within the Visual Code IDE. I also showed how to deploy Azure resources with Bicep scripts using Azure CLI. In those cases, I deployed the resources contained within a standalone Bicep script with a parameter file.
What is the purpose behind modularizing Bicep scripts?
The reason for modularizing Bicep scripts is to provide us with standalone modular scripts that we can use to deploy individual Azure resources for projects that have different resource requirements. This promotes re-use of scripts across multiple projects and minimizes potential manual errors that can occur due to duplication and manual changes of scripts. This also makes the deployment scripts easier to test.
Below are the steps we can take to modularize deployments with Bicep scripts:
- Identify major application resources in Bicep script.
- Move application resource scripts into separate modular Bicep script files.
- Declare input parameters in each modular Bicep script file.
- Declare output parameters in each modular Bicep script file.
- Create a main Bicep script file to bootstrap the deployment.
- Move input parameter definitions into main Bicep script file.
- Declare dependent modules in the main Bicep script file.
- Produce outputs from the main Bicep script file.
- Reviewing the structure of the Bicep deployment.
- Ensure resources run under an existing resource group.
- Determine any security authentications in each deployed resource.
- Determine initial deployment parameters including environment context (dev, test, prod).
- Test the deployment using Azure CLI script. Check outputs for each module in Azure portal.
The above steps are a similar strategy we would use to separate the logic contained in a large application source code into multiple source modules, with each module serving a separation of application business (functional) or technical (non-functional) logic.
Identifying major resources in the Bicep template script
In the following application Bicep template, we identify the web app and databases as separate resources that can be segregated. The resources with resource type containing ‘Microsoft.Web..’ and ‘Microsoft.Insights’ are dependencies of the web resources (app hosting plan, app service, app config, app insights). The resources with resource type containing ‘Microsoft.Sql/servers/databases..’ are dependencies of the database resource.
appTemplate.bicep
@description('The resource location')
param pLocation string = resourceGroup().location

@description('storage account name')
param pStorageAccountName string = 'storageacc${uniqueString(resourceGroup().id)}'

@description('web application name')
param pWebAppName string = 'website${uniqueString(resourceGroup().id)}'

@description('logical sql server name')
param pSqlServer_Name string

@description('The SQL database name.')
param pSQLDB_Name string = 'appdb${uniqueString(resourceGroup().id)}'


@description('The plan\'s pricing tier and instance size.')
@allowed([
  'F1'
  'D1'
  'B1'
  'B2'
  'B3'
  'S1'
  'S2'
  'S3'
  'P1'
  'P2'
  'P3'
  'P4'
])
param pSKU_Name string = 'F1'

@description('The plan\'s instance count.')
@minValue(1)
@maxValue(3)
param pSKU_Capacity int = 1

var vHosting_Plan_Name = 'hostingplan${uniqueString(resourceGroup().id)}'

resource vHosting_Plan 'Microsoft.Web/serverfarms@2022-03-01' = {
  name: vHosting_Plan_Name
  location: pLocation
  tags: {
    displayName: 'HostingPlan'
  }
  sku: {
    name: pSKU_Name
    capacity: pSKU_Capacity
  }
}

resource pWebApp 'Microsoft.Web/sites@2022-03-01' = {
  name: pWebAppName
  location: pLocation
  tags: {
    'hidden-related:${vHosting_Plan.id}': 'empty'
    displayName: 'Website'
  }
  properties: {
    serverFarmId: vHosting_Plan.id
  }
}

resource pWebAppName_web 'Microsoft.Web/sites/config@2022-03-01' = {
  parent: pWebApp
  name: 'web'
  properties: {
    numberOfWorkers: 1
  }
}

resource AppInsights_pWebApp 'Microsoft.Insights/components@2020-02-02' = {
  name: 'AppInsights${pWebAppName}'
  location: pLocation
  tags: {
    'hidden-link:${pWebApp.id}': 'Resource'
    displayName: 'AppInsightsComponent'
  }
  kind: 'web'
  properties: {
    Application_Type: 'web'
  }
}

resource pSQLServer_Name_pSQLDB 'Microsoft.Sql/servers/databases@2022-11-01-preview' = {
  name: '${pSqlServer_Name}/${pSQLDB_Name}'
  location: pLocation
  sku: {
    name: 'GP_S_Gen5'
    tier: 'GeneralPurpose'
    family: 'Gen5'
    capacity: 1
  }
  kind: 'v12.0,user,vcore,serverless'
  properties: {
    collation: 'SQL_Latin1_General_CP1_CI_AS'
    maxSizeBytes: 1073741824
    catalogCollation: 'SQL_Latin1_General_CP1_CI_AS'
    zoneRedundant: false
    readScale: 'Disabled'
    autoPauseDelay: 60
    requestedBackupStorageRedundancy: 'Local'
    minCapacity: '0.5'
    maintenanceConfigurationId: '/subscriptions/xxxxxxx/providers/Microsoft.Maintenance/publicMaintenanceConfigurations/SQL_Default'
    isLedgerOn: false
    availabilityZone: 'NoPreference'
  }
}
In the next section, I will show how to move our Bicep resource scripts into separate Bicep scripts in separate files.
Moving application resource scripts into separate modular Bicep script files
From the above consolidated script, we identified from the resource types the web and database resources and move their definitions and associated parameters into separate Bicep template script files.
The web application deployment template script is shown below:
webAppTemplate.bicep
param pWebAppName string

param pLocation string

@description('The plan\'s pricing tier and instance size.')
@allowed([
  'F1'
  'D1'
  'B1'
  'B2'
  'B3'
  'S1'
  'S2'
  'S3'
  'P1'
  'P2'
  'P3'
  'P4'
])
param pSKU_Name string = 'F1'

@description('The plan\'s instance count.')
@minValue(1)
@maxValue(3)
param pSKU_Capacity int = 1

var vHosting_Plan_Name = 'hostingplan${uniqueString(resourceGroup().id)}'

resource vHosting_Plan 'Microsoft.Web/serverfarms@2022-03-01' = {
  name: vHosting_Plan_Name
  location: pLocation
  tags: {
    displayName: 'HostingPlan'
  }
  sku: {
    name: pSKU_Name
    capacity: pSKU_Capacity
  }
}

resource pWebApp 'Microsoft.Web/sites@2022-03-01' = {
  name: pWebAppName
  location: pLocation
  tags: {
    'hidden-related:${vHosting_Plan.id}': 'empty'
    displayName: 'Website'
  }
  properties: {
    serverFarmId: vHosting_Plan.id
  }
}

resource pWebAppName_web 'Microsoft.Web/sites/config@2022-03-01' = {
  parent: pWebApp
  name: 'web'
  properties: {
    numberOfWorkers: 1
  }
}

resource AppInsights_pWebApp 'Microsoft.Insights/components@2020-02-02' = {
  name: 'AppInsights${pWebAppName}'
  location: pLocation
  tags: {
    'hidden-link:${pWebApp.id}': 'Resource'
    displayName: 'AppInsightsComponent'
  }
  kind: 'web'
  properties: {
    Application_Type: 'web'
  }
}

output webAppServiceAppHostName string = pWebApp.properties.defaultHostName
In the next section, I will show how to declare input and output parameters in an app service Bicep script file.
Declaring input and output parameters in the app service Bicep script file
Declaring input parameters
Because the web application name and location will be generated or derived and will be passed in as an input parameter, I have left the parameters declared but unassigned at the top of the script:
param pWebAppName string
param pLocation string
I will later show how the above are derived in the main Bicep template.
Declaring output parameters
I have also declared an output string parameter that will contain the host name of the web site:
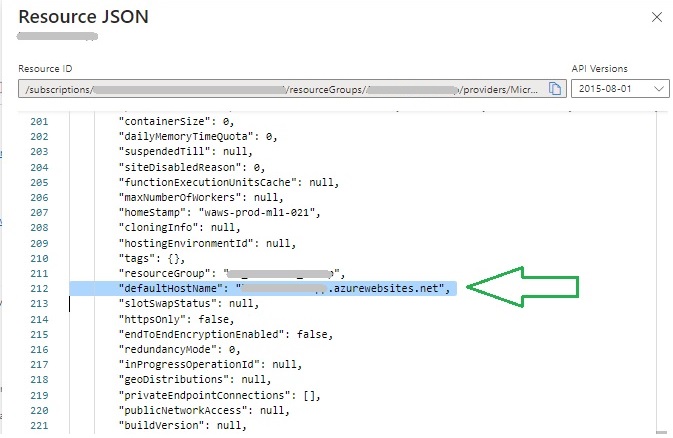
output webAppServiceAppHostName string = pWebApp.properties.defaultHostName
Note that for the app service output, the defaultHostName is a property from the app service resource that can be obtained from the resource overview within the Azure Portal. To view the resource properties, click the JSON View as shown:

Then in the Resource JSON displayed pane you will see the property for the app service default host as shown:
The database deployment template script is shown below:
dbTemplate.bicep
param pLocation string

param pSqlServer_Name string

@description('The SQL database name.')
param pSQLDB_Name string = 'appdb${uniqueString(resourceGroup().id)}'


resource pSQLServer_Name_pSQLDB 'Microsoft.Sql/servers/databases@2022-11-01-preview' = {
  name: '${pSqlServer_Name}/${pSQLDB_Name}'
  location: pLocation
  sku: {
    name: 'GP_S_Gen5'
    tier: 'GeneralPurpose'
    family: 'Gen5'
    capacity: 1
  }
  kind: 'v12.0,user,vcore,serverless'
  properties: {
    collation: 'SQL_Latin1_General_CP1_CI_AS'
    maxSizeBytes: 1073741824
    catalogCollation: 'SQL_Latin1_General_CP1_CI_AS'
    zoneRedundant: false
    readScale: 'Disabled'
    autoPauseDelay: 60
    requestedBackupStorageRedundancy: 'Local'
    minCapacity: '0.5'
    maintenanceConfigurationId: '/subscriptions/xxxxxx/providers/Microsoft.Maintenance/publicMaintenanceConfigurations/SQL_Default'
    isLedgerOn: false
    availabilityZone: 'NoPreference'
  }
}

output dbName string = pSQLServer_Name_pSQLDB.name
The above SQL template is a serverless, compute plan intended for a low-use development environment. You may adjust the SQL resource with your own SKU and compute needs. You can determine these by creating them in the Azure Portal and downloading the ARM template and modifying for your own requirements for each application environment (dev, test, staging, prod).
In the next section, I will show how to declare input and output parameters in a database Bicep script file.
Declaring input and output parameters in the database Bicep script file
Declaring input parameters
Because the logical database server and location will be generated or derived and will be passed in as an input parameter, I have left the parameters declared but unassigned at the top of the script:
param pWebAppName string
param pSqlServer_Name string
I will later show how the above are derived in the main Bicep template.
Declaring output parameters
I have also declared an output string parameter that will contain the host name of the created database:
output dbName string = pSQLServer_Name_pSQLDB.name
Create a main Bicep script file to bootstrap the deployment
The main Bicep script that integrates the above two Bicep modules is as follows:
main.bicep
@description('The resource location')
param pLocation string = resourceGroup().location

@description('storage account name')
param pStorageAccountName string = 'storageacc${uniqueString(resourceGroup().id)}'

@description('web application name')
param pWebAppName string = 'website${uniqueString(resourceGroup().id)}'

@description('logical sql server name')
param pSqlServer_Name string

resource vStorage_Account 'Microsoft.Storage/storageAccounts@2022-05-01' = {
  name: pStorageAccountName
  location: pLocation
  sku: {
    name: 'Standard_LRS'
  }
  kind: 'StorageV2'
  properties: {
    supportsHttpsTrafficOnly: true
  }
}

module appService 'webAppTemplate.bicep' = {
  name: 'appService'
  params: {
    pLocation: pLocation
    pWebAppName: pWebAppName
  }
}

module dbService 'dbTemplate.bicep' = {
  name: 'dbService'
  params: {
    pLocation: pLocation
    pSqlServer_Name: pSqlServer_Name
  }
}

output appServiceAppHostName string = appService.outputs.webAppServiceAppHostName
output dbName string = dbService.outputs.dbName
Move input parameter definitions into main Bicep script file
The parameters for the above two Bicep template modules are consolidated into a main Bicep template, with the names for the location, storage account, and web application name pre-generated as shown:
param pLocation string = resourceGroup().location

param pStorageAccountName string = 'storageacc${uniqueString(resourceGroup().id)}'

param pWebAppName string = 'website${uniqueString(resourceGroup().id)}'
The storage account is deployed within this template, although we could separate that into its own Bicep template file is we wanted.
Also, the above separated Bicep modules appService and dbService integrated with the use of the module keyword, with input and output parameters.
Declare dependent modules in the main Bicep script file
The modules for the above Bicep scripts are referenced with input parameters as shown:
module appService 'webAppTemplate.bicep' = {
  name: 'appService'
  params: {
    pLocation: pLocation
    pWebAppName: pWebAppName
  }
}

module dbService 'dbTemplate.bicep' = {
  name: 'dbService'
  params: {
    pLocation: pLocation
    pSqlServer_Name: pSqlServer_Name
  }
}
Produce outputs from the main Bicep script file
Each module name will then be used to retrieve the outputs of the respective deployment later.
The outputs from each module are declared at the end of the script as shown:
output appServiceAppHostName string = appService.outputs.webAppServiceAppHostName
output dbName string = dbService.outputs.dbName
The remaining parameter that I did not compute was the name for logical SQL server. The reason is that this is not as straight-forward to deploy as it requires additional credentials to be specified during the deployment. This could be done through an existing Azure Key Vault, which I can show in a future post. For the purposes of this exercise, I will just specify an existing one in a parameter file as shown:
main.bicepparam
using './main.bicep'

param pSqlServer_Name = 'sqlserver010520231234'
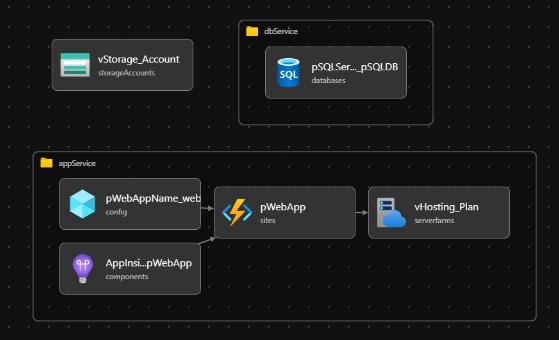
Reviewing the structure of the Bicep deployment
Once we have authored the above three Bicep template files, we can check for any issues by opening the main.bicep script in Visual Code, then inspect the dependencies in visual form:
Ensure resources run under an existing resource group
To make cleanup easier post deployment, we can deploy the resources under a common resource group. This can be created beforehand and have the resource group specified in the az deployment group create command. When setting parameter names within each script, we can use the Bicep function resourcegroup() to obtain the current resource group and any other useful properties, such as the location of the resource group.
Determine any security authentications in each deployed resource
As mentioned earlier, for some resources, such as a logical SQL server resource, we are required to specify administrative credentials for the database server. This can be done through an Azure Key Vault.
Determine initial deployment parameters including environment context (dev, test, prod)
For the above scripts, I will deploy these to a development environment. You can include additional conditional code to detect the environment, then change the service plan for deployed resources from a development plan to scale to a more storage and/or compute resources in a production environment.
Testing the deployment using Azure CLI script. Check outputs for each module in Azure Portal
To test the deployment of the Bicep script we can Azure CLI commands like those below:
az login

az group create --location australiaeast --name AppResourceGroup05007202301

az deployment group create \
  --name AppDeployment05007202301 \
  --resource-group AppResourceGroup05007202301 \
  --template-file main.bicep \
  --parameters main.bicepparam

az group deployment list
  --resource-group AppResourceGroup05007202301
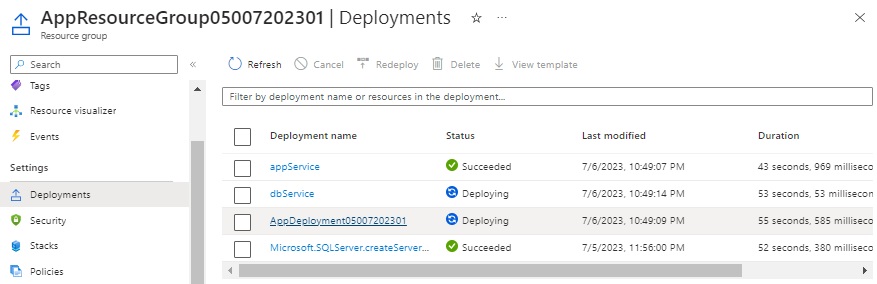
Once the deployment starts, you will see the deployment group status as shown:
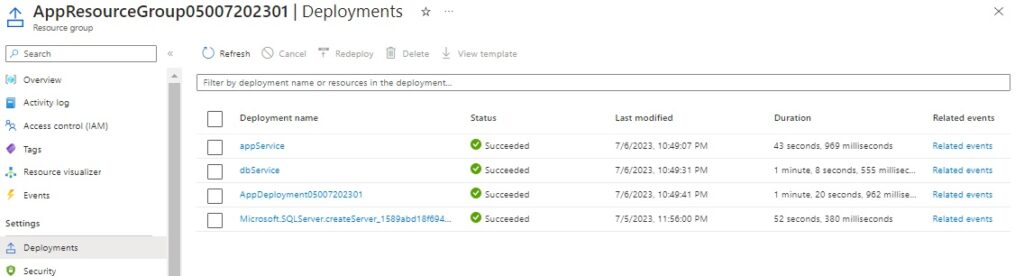
Once completed, the deployment group deployments will show succeeded as shown:
After clicking on the deployment group will show the generated output names from our Bicep deployment script:

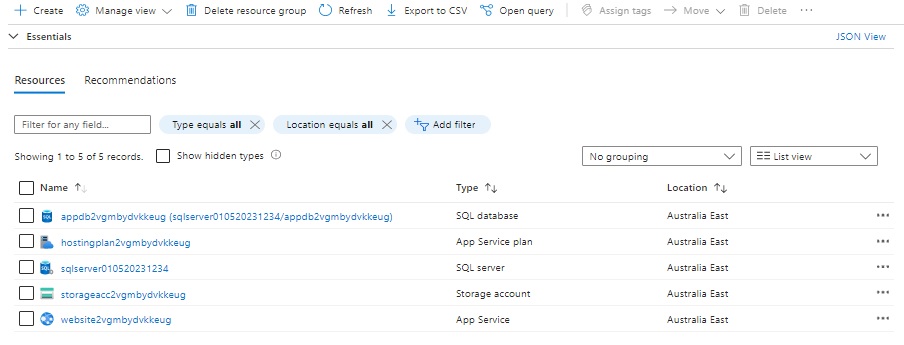
When we open the resource group, if all has gone well, we will see the resources deployed as expected:
We can also view the ARM template for the deployment group as shown:
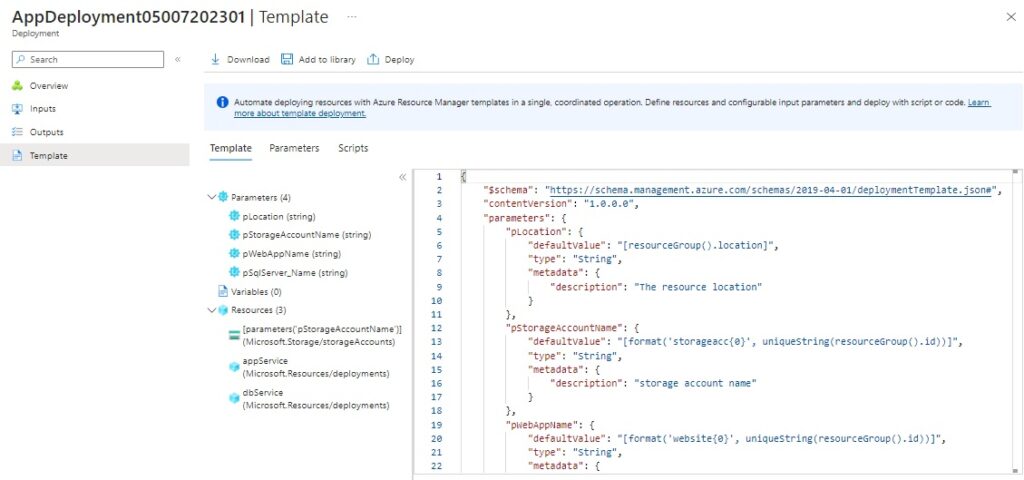
We can also import the generated Arm template as a library into the resource group for later use.
After completion of the above, we can delete the resources as shown:
az group delete --name [resource-group-name]
We have seen from the above, how to create modular Bicep templates, how to process input and output parameters from templates, and then deploy them to Azure. This has shown us how to re-use Bicep templates for future project deployments.
That is all for today’s post.
I hope you have found this post useful and informative.
Andrew Halil is a blogger, author and software developer with expertise of many areas in the information technology industry including full-stack web and native cloud based development, test driven development and Devops.

