

Welcome to today’s post.
In today’s post, I will be showing you how to use the OpenAI DALL-E generative AI model with the Azure OpenAI SDK to generate image content within a client application.
In the previous post I showed how to use the DALL-E model to generate images within the Azure AI Studio.
There are different services we can use to submit prompts and receive generated images. These include the following services:
OpenAI ChatGPT Search
Microsoft CoPilot Search
Development with the OpenAI Libraries
Developers can also use libraries to integrate generative AI image generation models into client applications. With the Microsoft based stack, the libraries that can be used include:
OpenAI SDK
Azure OpenAI SDK
With the above libraries, we can integrate DALL-E generative AI image generation capability into .NET web client or console applications written using C# with the Azure Open AI SDK or the OpenAI REST API. The resulting applications can be used to develop your own custom search tool to allow image generation through chat completion prompts.
The OpenAI API is also a paid service that can be used by developers to implement applications or integrate with applications that use the pre-built generative AI models such as GPT or DALL-E. With the OpenAI API, the libraries are optimized for usage with the Python language.
The most common usage for the image generation capability is to integrate the OpenAI image generation within a content authoring application that allows you to not only generate images to use for personal or business purposes, but also to modify areas of images that you would not be able to have returned through image generation.
Later in this post, I will show how to use the Azure OpenAI SDK within a C# .NET Core console application to generate images using a deployed DALL-E-3 model.
In the next section, I will show how to setup a .NET client application to use the Azure OpenAI SDK.
Setup of Azure OpenAI in a .NET Client Application
In this section, I will show how to setup a .NET Client application to use the Azure OpenAI libraries.
Before I show what libraries are to be installed, I will explain the configuration parameters required to setup a connection to the Azure OpenAI resource and the deployed OpenAI DALL-E model.
Depending on the client application type that is being developed, you can either use an app settings (appsettings.json) configuration file or an Azure Key Vault to store the configurations to the Azure resources for a web client application. For a console application, you can use environment variables to store the configurations.
In this post, I will be using a console application, where I will store the configuration settings within environment variables.
In a command prompt, use the setx command to initialize the values like so (fill in parameters as desired):
setx OPENAI_ENDPOINT " YOUR_KEY_VALUE_HERE"
setx OPENAI_KEY " YOUR_ENDPOINT_HERE"
setx OPENAI_DEPLOYMENT_NAME " YOUR_DEPLOYMENT_NAME_HERE"
The above sequence of commands should be run before opening the Visual Studio IDE.
After running the above commands, open Visual Studio then proceed as follows for the library installations:
To install the OpenAI SDK libraries within your .NET application, from the NuGet package library management within Visual Studio, search for the library with name:
Azure.AI.OpenAI
After installation, you will see the following NuGet package:

In your applications, startup code, you will need to configure the following:
- An endpoint to the Azure OpenAI resource.
- An access key (or API key) for the Azure OpenAI resource.
- The deployment name of the OpenAI DALL-E model.
The endpoint is in the format:
https://[resource-name].openai.azure.com/
The access key can be found in the overview of the Azure OpenAI resource in the Azure Portal.
The deployment name can be found by first selecting the Deployments menu item in Azure AI Studio under the Shared Resources menu as shown:
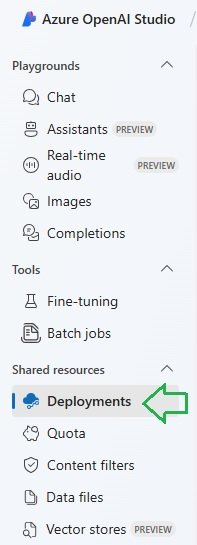
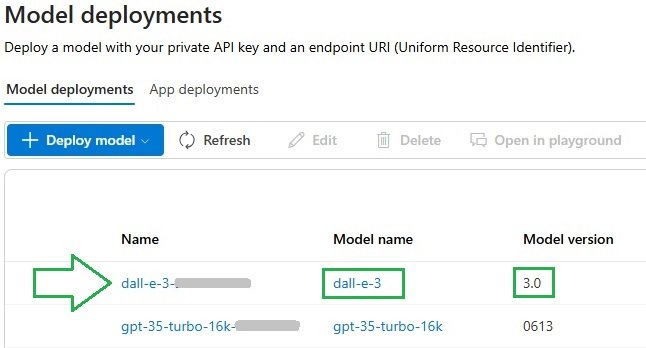
When you click on the Deployments menu item, you will be taken to the Model deployments screen.
To find the deployed DALL-E model deployment name, look for a row with the model name column to equal dall-e-3, and the version to match 3.0. Then the deployment name is the value on the name column as shown:
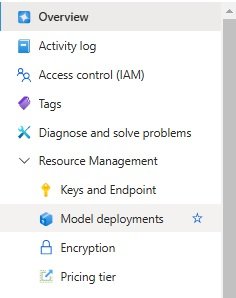
The other way that used to be available for getting to the OpenAI model deployments was through the Model deployments menu item in the Azure OpenAI resource in the Azure Portal. However, this pathway, which used to display the models in a screen has since (recently as of 10/2024) been replaced with a link to the Azure AI Studio.
To access the configuration values, you can use the following code snip through the system.environment .NET namespace:
static string? endpoint = Environment.GetEnvironmentVariable("OPENAI_ENDPOINT");
static string? key = Environment.GetEnvironmentVariable("OPENAI_KEY");
static string? deploymentName = Environment.GetEnvironmentVariable("OPENAI_DEPLOYMENT_NAME");
Before the write any code to instantiate any classes within the Azure OpenAI SDK, declare the following namespaces at the top of the source file:
using Azure;
using Azure.AI.OpenAI;
using OpenAI.Images;
To use the SDK methods, we will need to create an instance of the ImageClient class within the Azure.AI.OpenAI.Images namespace.
Before we can create an instance of the ImageClient class, we create a connection and instance to the Azure OpenAI client through the AzureOpenAIClient class as shown:
AzureOpenAIClient client = new AzureOpenAIClient(
    new Uri(endpoint!),
    new ApiKeyCredential(key!)
);
Creation of an instance to the ImageClient class is through the GetImageClient() constructor within the AzureOpenAIClient class. This is done as follows with the deployment name of the DALL-E model (mentioned in earlier in this section) as a parameter:
ImageClient imageClient = client.GetImageClient(deploymentName);
I will show how the above is used within the PromptUser() method, which I will explain in the next section, where I will also go through the OpenAI SDK Image library types, classes, and method used to process image generation through a user prompt.
Setting up Image Generation Options in the .NET Client Application
In this section, I will show how to setup options in preparation for the execution of calls to the DALL-E OpenAI model with the Azure OpenAI SDK.
Before I show the code to prepare the parameters used in the image generation client, I will explain the SDK method used for the code generation.
The ImageClient class has a method, GenerateImage() which is used to generate images of type OpenAI.Images.GeneratedImage from a prompt and some options. It has the form:
OpenAI.Images.GeneratedImage ImageClient.GenerateImage(
    string prompt,
    ImageGenerationOptions options
);
The ImageGenerationOptions parameter is a type that requires instantiation and initialization and has three properties:
Quality
Size
Style
Which determine the quality, size, and style of the generated image content. The respective types of the above properties are GeneratedImageQuality, GeneratedImageSize, and GeneratedImageStyle.
Each of the above types is an enumerated type that has a set of values.
The enumerations for GeneratedImageQuality are:
Standard
High
The enumerations for GeneratedImageStyle are:
Natural
Vivid
The enumerations for GeneratedImageSize are:
W1024 x H1024
W256 x H256
W512 x H512
W1024 x H1792
W1792 x H1024
The image generation options are then instantiated and initialized as shown with default options:
ImageGenerationOptions imageGenerationOptions = new ImageGenerationOptions()
{
    Quality = GeneratedImageQuality.Standard,
    Size = GeneratedImageSize.W1024xH1024,
    Style = GeneratedImageStyle.Natural
};
The code for PromptUser(), which I will show soon, does the following:
- Setup up a connection and instance to the Azure OpenAI resource.
- Obtains an instance to the image client class.
- Reads input for the prompt from the user.
- Reads input for the prompt from the user.
- Reads input for the image quality from the user.
- Reads input for the image size from the user.
- Reads input for the image style from the user.
- Executes a call to RunDallePromptCompletion() to generate the image.
Below is the code for PromptUser():
/// <summary>
/// PromptUser()
/// </summary>
static void PromptUser()
{
    // Get OpenAI client
    AzureOpenAIClient client = new AzureOpenAIClient(
        new Uri(endpoint!),
        new ApiKeyCredential(key!)
    );

    // Get image client
    ImageClient imageClient = client.GetImageClient(deploymentName);

    string? userMessage = String.Empty;

    ConsoleKeyInfo consoleKeyInfo;
    bool isFinished = false;

    while (!isFinished)
    {
        userMessage = String.Empty;

        Console.WriteLine("Enter a prompt to submit to the DALL-E model:");

        userMessage = Console.ReadLine();

        if (userMessage == String.Empty || userMessage?.Length == 0)
        {
            Console.WriteLine("A valid prompt was not specified.");
            return;
        }

        Console.WriteLine();

        Console.WriteLine("Select option [1-2] for the generated image quality:");
        Console.WriteLine("1. Standard");
        Console.WriteLine("2. High");

        string? imgQualityOption = Console.ReadLine();
        int imgQualityValue = 0;

        if (imgQualityOption == String.Empty || imgQualityOption?.Length == 0)
        {
            Console.WriteLine("A valid image quality option was not specified.");
            return;
        }

        if (!int.TryParse(imgQualityOption, out imgQualityValue) ||
            ((imgQualityValue < 1) || (imgQualityValue > 2)))
        {
            Console.WriteLine("The entered image quality option is out of range.");
            return;
        }

        Console.WriteLine();

        Console.WriteLine("Select option [1-5] for the generated image size:");
        Console.WriteLine("1. W1024 x H1024");
        Console.WriteLine("2. W256 x H256");
        Console.WriteLine("3. W512 x H512");
        Console.WriteLine("4. W1024 x H1792");
        Console.WriteLine("5. W1792 x H1024");

        string? imgSizeOption = Console.ReadLine();
        int imgSizeValue = 0;

        if (imgSizeOption == String.Empty || imgSizeOption?.Length == 0)
        {
            Console.WriteLine("A valid image size option was not specified.");
            return;
        }

        if (!int.TryParse(imgSizeOption, out imgSizeValue) ||
            ((imgSizeValue < 1) || (imgSizeValue > 5)))
        {
            Console.WriteLine("The entered image size option is out of range.");
            return;
        }

        Console.WriteLine();

        Console.WriteLine("Select option [1-2] for the generated image style:");
        Console.WriteLine("1. Natural");
        Console.WriteLine("2. Vivid");

        string? imgStyleOption = Console.ReadLine();
        int imgStyleValue = 0;

        if (imgStyleOption == String.Empty || imgStyleOption?.Length == 0)
        {
            Console.WriteLine("A valid image style selection was not specified.");
            return;
        }

        if (!int.TryParse(imgSizeOption, out imgStyleValue) ||
            ((imgStyleValue < 1) || (imgStyleValue > 2)))
        {
            Console.WriteLine("The entered image style option is out of range.");
            return;
        }

        Console.WriteLine();

        // Obtain the generate the image from the user prompt routine.
        string imageURI = RunDallePromptCompletion(
            imageClient,
            userMessage!,
            imgQualityValue,
            imgSizeValue!,
            imgStyleValue!
        );

        Console.WriteLine("---------------");

        Console.WriteLine($"Generated image URL: {imageURI}");

        Console.WriteLine();

        Console.WriteLine("Copy and paste the generated URL into a browser to view it.");
        Console.WriteLine("The above image URL is valid for 24 hours.");

        Console.WriteLine();

        Console.WriteLine("Press Y to return to the menu. Escape to finish.");
        consoleKeyInfo = Console.ReadKey(true);
        if (consoleKeyInfo.Key == ConsoleKey.Escape)
        {
            Console.WriteLine("Escape Key Pressed.");
            isFinished = true;
        }
    }
}
In this section, we have seen how to setup options for preparation in the execution of calls to the image generation DALL-E model. In the next section, I will show how the image generation SDK method is used to send our prompt to the DALL-E model and return a generated image.
Posting Prompts to the DALL-E Image Generation Model in a .NET Client Application
In this section, I will show how to execute calls to the DALL-E OpenAI model using prompts submitted within a client application with the Azure OpenAI SDK.
In the previous section, I wrote a routine that elicited the prompt and image generation options from the user, then sent the resulting inputs to a function that returned the generated image’s URI. The call is as shown:
// Obtain the generate the image from the user prompt routine.
string imageURI = RunDallePromptCompletion(
    imageClient,
    userMessage!,
    imgQualityValue,
    imgSizeValue!,
    imgStyleValue!
);
Below is the implementation of the RunDallePromptCompletion() method that sets the image generation options within the type ImageGenerationOptions, then calls the image generation through a call to GenerateImage().
/// <summary>
/// RunDallePromptCompletion
/// </summary>
/// <param name="imageClient"></param>
/// <param name="prompt"></param>
/// <param name="imgQualityOption"></param>
/// <param name="imgSizeOption"></param>
/// <param name="imgStyleOption"></param>
/// <returns>URL to the generated image</returns>
static string RunDallePromptCompletion(
    ImageClient imageClient,
    string prompt,
    int imgQualityOption,
    int imgSizeOption,
    int imgStyleOption)
{
    GeneratedImageStyle imgStyle;
    GeneratedImageQuality imgQuality;
    GeneratedImageSize imgSize;

    // Image style option.

    if (imgStyleOption == 0)
        imgStyle = GeneratedImageStyle.Natural;

    switch (imgStyleOption)
    {
        case 1:
            imgStyle = GeneratedImageStyle.Natural;
            break;
        case 2:
            imgStyle = GeneratedImageStyle.Vivid;
            break;
        default:
            imgStyle = GeneratedImageStyle.Natural;
            break;
    }

    // Image quality option.

    if (imgQualityOption == 0)
        imgQuality = GeneratedImageQuality.Standard;

    switch (imgQualityOption)
    {
        case 1:
            imgQuality = GeneratedImageQuality.Standard;
            break;
        case 2:
            imgQuality = GeneratedImageQuality.High;
            break;
        default:
            imgQuality = GeneratedImageQuality.Standard;
            break;
        }

        // Image size option.

        if (imgSizeOption == 0)
            imgSize = GeneratedImageSize.W1024xH1024;

        switch (imgSizeOption)
        {
            case 1:
                imgSize = GeneratedImageSize.W1024xH1024;
                break;
            case 2:
                imgSize = GeneratedImageSize.W256xH256;
                break;
            case 3:
                imgSize = GeneratedImageSize.W512xH512;
                break;
            case 4:
                imgSize = GeneratedImageSize.W1024xH1792;
                break;
            case 5:
                imgSize = GeneratedImageSize.W1792xH1024;
                break;
            default:
                imgSize = GeneratedImageSize.W1024xH1024;
                break;
        }

        // Image completion options
        ImageGenerationOptions imageGenerationOptions = new ImageGenerationOptions()
        {
            Quality = imgQuality,
            Size = imgSize,
            Style = imgStyle
        };

        // Image generation object
        var imageGeneration = imageClient.GenerateImage(
            prompt,
            imageGenerationOptions
        );

        // Obtain image URL.
        return imageGeneration.Value.ImageUri.ToString();
}
The generated image is obtained from the Value property within OpenAI.Images.GeneratedImage and is of type System.Uri. The above method returns the image URI to the PromptUser() method, which is then displayed through the console.
I will go through a sample run in the next section.
DALL-E Image Generation with a Sample Application Run
In this section, I will show how an image is generated through a run of the above code.
The main starting block application of the application is a simple menu that is shown below, which makes the initial call to the PromptUser() method:
static void Main(string[] args)
{
    bool isFinished = false;

    while (!isFinished)
    {
        ConsoleKeyInfo consoleKeyInfo;

        Console.WriteLine("Azure OpenAI DALL-E Demo Menu");
        Console.WriteLine("-----------------------------");
        Console.WriteLine("Press D to submit a prompt to DALL-e.");
        Console.WriteLine("Press Escape to finish.");
        Console.WriteLine();

        consoleKeyInfo = Console.ReadKey(true);
        if (consoleKeyInfo.Key == ConsoleKey.Escape)
        {
            Console.WriteLine("Escape Key Pressed.");
            isFinished = true;
        }
        if (consoleKeyInfo.Key == ConsoleKey.D)
        {
            PromptUser();
        }
        Console.WriteLine();
    }
}
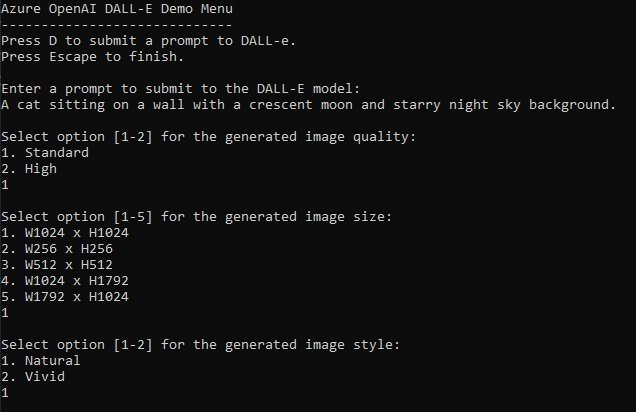
After we build and run the application, the console will display the initial menu:
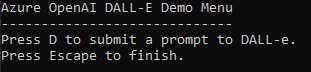
When we select the option to submit a prompt, we get to the following menu, where I enter the following prompt:
A cat sitting on a wall with a crescent moon and starry night sky background.
And the options for a Standard, 1024×1024, and Natural image:
After a minute of processing, we get a response back from the OpenAI service, which is an image URI of the form:
https://dalleprodaue.blob.core.windows.net/private/images/[guid]/generated_00.png?
se=[signed expiry date]&sig=[signature]&ske=[expiry date]&skoid=[sk id]&sks=b&skt=[sk end]&sktid=[sk id]&skv=[sk v]&sp=r&spr=https&sr=b&sv=2020-10-02
The above image URI is a direct link to your generated image in PNG format and has an expiry of 24 hours from the time of generation.

After we copy and paste the URI from the output into a browser, we will see our hard work pay dividends:
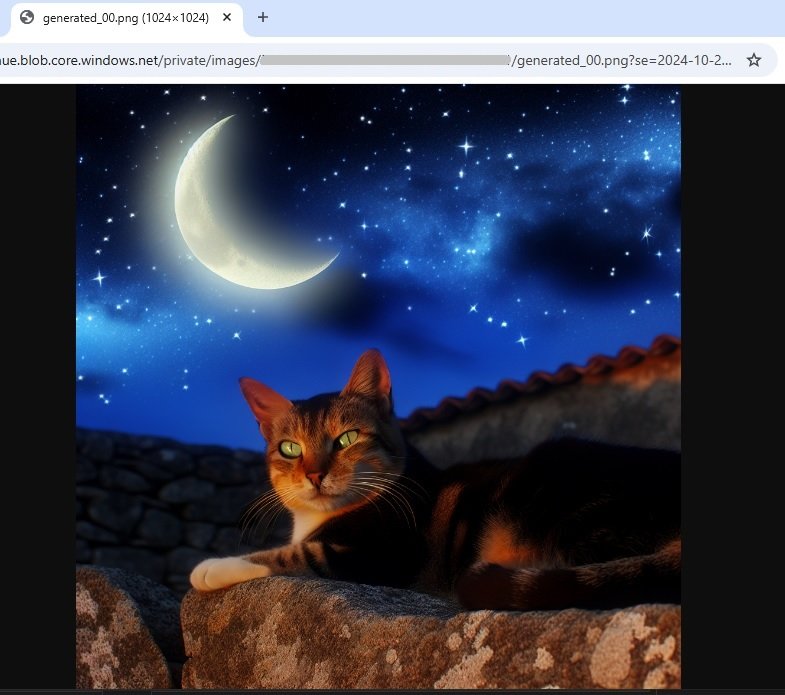
The DALL-E generational AI model did its job and generated a fine work of art of amazing quality.
We have seen how to use the Azure OpenAI SDK to generate images within a client application.
The above code could also be used similarly within a web client application written in an ASP.NET Core wen application or a JavaScript web client frontend application to achieve a similar outcome, with the generated image rendered instead in a browser.
That is all for today’s post.
I hope that you have found this post useful and informative.

Andrew Halil is a blogger, author and software developer with expertise of many areas in the information technology industry including full-stack web and native cloud based development, test driven development and Devops.