
Welcome to today’s post.
In today’s post I will be showing how to use Postman to create more complex test runs that can use conditional branching, logging, and use of Chai BDD expressions to assert the status of API responses.
In the previous post I introduced the Postman Workspace, Collections, Collection Runners, and Test Scripting.
I also showed how to create basic test scripts within each API request and how to group the tests into Collections that can be tested in by the Collection Runner. I will go further by showing how to implement a test suite that provides the following features:
- Logging of interim results within tests to the console.
- Setting and retrieving variables.
- Templating the request body based on variables.
- Conditional logic.
- Branching to a different test based on conditional logic.
I will create a basic sequence of tests that will login as a test user, call a secure request to retrieve a library book list, run two tests for invalid account credentials, then finish by running a test to unlocking the test account. If the first test resulted in a locked test account, then we jump to the test to unlock the test account.
Determining the Test Script Sequence
The above test requirement can be implemented as a workflow using Postman test scripting with the collection runner. To summarize the requirement as a test script sequence we have:
- Run test for Login API request with test user credentials.
- If login successful, store auth token.
- If login unsuccessful with credential failure, exit test with failure. Skip remaining tests.
- If login unsuccessful with account lockout, go to step 9.
- Run test for Book Retrieval API request.
- If request unsuccessful, exit test with failure.
- Run test for Single Book Retrieval API request.
- If request unsuccessful, exit test with failure.
- Run test for Login API request with admin user credentials.
- If login successful, store admin auth token.
- If login unsuccessful with credential failure, exit test with failure. Skip remaining tests.
- Run test for Account Unlock with test user as parameter and admin auth token.
I will show how the above is implemented in Postman.
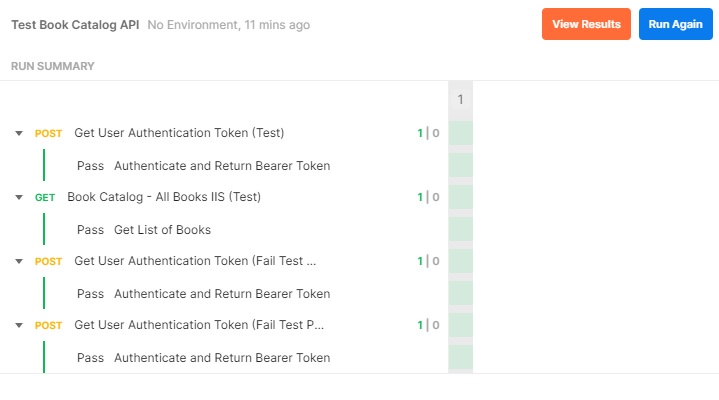
By default, the Collection Runner will execute each request and test within a collection in the order they are created. So, regardless of whether each test passes or fails, the next test in the sequence will be run like the example run (like the example shown below) where all tests pass successfully:
In the next section, I will show how you can adapt the test scripts and their execution order in the Collection Runner to run the tests according to their natural user flow and dependencies.
Adapting Test Script Flow from Test Results
But what if some of the tests do not pass and the results and the responses are used in subsequent tests, or if failed tests mean that we must skip some tests that depend on these responses for parameters?
The test run below shows how earlier test failures lead to undefined or empty parameters being passed onto subsequent requests and leading to undesirable test failures:
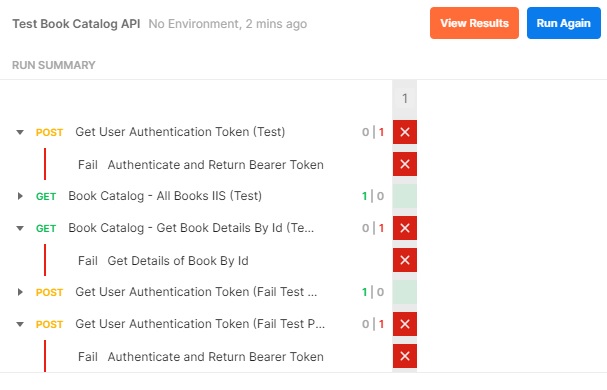
By viewing the results, we can obtain more details on the test failures:

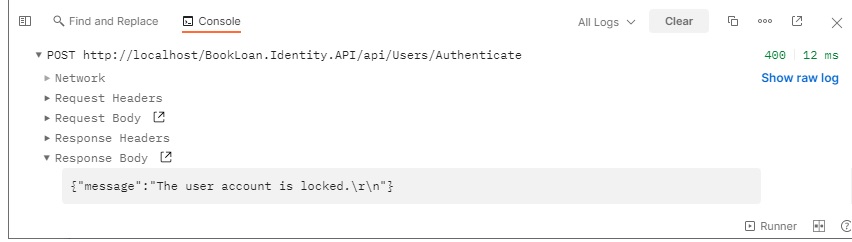
By selecting the affected request and test, we can investigate the cause and add additional logic to circumvent these issues. In the above case, I discovered the test account was locked out after I run repeated tests to test for invalid credentials.
In the next section, I will show some examples of how to alter the control flow within test scripts based on outputs.
Examples of How to Change the Flow of Test Scripts
To avoid this issue, I modified the test for the authentication request API to trap the error, then persist parameters, the locked state and user login in global variables is_account_locked and account_user_id, then branch the test to an API request to unlock the account.
The implementation Test Scripts for user authentication token retrieval is below:
Request: Get User Authentication Token (Test)
Request Header:
{
    "userName": "{{user_id}}",
    "password": "{{user_pwd}}"
}
Pre-request Script:
pm.globals.set("user_id", "andy@aaaa.com.au");
pm.globals.set("user_pwd", "Abcd1234");
pm.globals.set("is_account_locked", "false");
pm.globals.set("account_user_id", "");
Tests:
pm.test("Authenticate and Return Bearer Token", function () {
    const responseJson = pm.response.json();

    if (pm.response.code === 200)
    {
        pm.globals.set("user_auth_token", responseJson.token);
    }

    console.log("Response code = " + pm.response.code);

    if (pm.response.code === 400)
    {
        console.log("Response For Test :Get User Authentication Token (Test)");
        console.log(responseJson);

        pm.expect(responseJson.message).to.be.not.empty;

        const messageJson = responseJson.message;

        if (pm.expect(messageJson).to.include("account is locked"))
        {
            const userId = pm.globals.get("user_id");
            pm.globals.set("is_account_locked", "true");
            pm.globals.set("account_user_id", userId);
            console.log("Account is locked!!!");
        }
    }
});
To be able to branch off to the unlocking request, Unlock User Account, we will have to implement a Pre-request Script within the Book Catalog – All Books request, which checks the is_account_locked variable and decides whether to run the current test or branch off to the unlock account request.
Request: Book Catalog – All Books IIS (Test)
Request Header:
Authorization: "Bearer {{user_auth_token}}"
Pre-request Script:
const isAccountLocked = pm.globals.get("is_account_locked");

if (isAccountLocked === "true")
{
    console.log("Account locked: Jumping to Unlock account request..")
    postman.setNextRequest("Get Admin User Authentication Token (Test)");
}
Test:
pm.test("Get List of Books", function () {
    pm.response.to.have.status(200);
});
The account unlocking request receives the account_user_id variable as the value to the userName key in the request body. The tests are shown below:
Request: Unlock User Account (Test)
Request Header:
Authorization: "Bearer {{user_auth_token}}"
Request Body:
{
    "userName": "{{account_user_id}}"
}
Test:
pm.test("Unlock User Account", function () {
    pm.response.to.have.status(200);
    console.log("Response code = " + pm.response.code);

    const responseJson = pm.response.json();
    const userId = pm.globals.get("account_user_id");

    if (pm.response.code === 200)
    {
        console.log("Unlock User Account (Test): Account " + userId + " successfully unlocked.");
    }
    if (pm.response.code === 400)
    {
    	console.log("Unlock User Account (Test): Cannot unlock account " + userId);
    }
    console.log(responseJson);
});
In the above request to unlock an account, the authentication token passed into the request header should be from an administrator account that can unlock account. We then create an additional API request (like the Get User Authentication Token (Test) request) and test that sets the user_auth_token variable that is passed into the Authorization key of the request header as a bearer token.
If an authentication token is generated, then the Book retrieval requests are executed along with their tests.
In the request to retrieve a book by its identifier, we implement a test script to check if the JSON response contains the same identifier, book_id that was passed in as a parameter.
Request: Book Catalog – Get Book Details By Id (Test)
Pre-request Script:
pm.globals.set("book_id", "1");
Test:
pm.test("Get Details of Book By Id", function () {
    const responseJson = pm.response.json();

    console.log("Get Details of Book By Id: Id=" + responseJson.id)
    pm.expect(responseJson.id).to.be.not.null;

    const idJson = responseJson.id.toString();
    const bookId = pm.globals.get("book_id");

    pm.expect(idJson).to.eq(bookId);
});
An except from the JSON response is shown below:
{
    "status": null,
    "dateLoaned": "0001-01-01T00:00:00",
    "dateDue": "0001-01-01T00:00:00",
    "dateReturn": "0001-01-01T00:00:00",
	…
    "id": 1,
    "title": "The Lord of the Rings",
    "author": "J. R. R. Tolkien",
    "yearPublished": 1954,
    "genre": "fantasy",
	…
}
From the JSON response we use the BDD expression to check if the Id is defined:
pm.expect(responseJson.id).to.be.not.null;
and check for equality of the id parameter and the JSON key value:
pm.expect(idJson).to.eq(bookId);
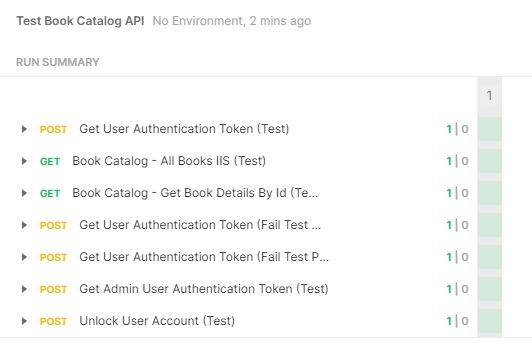
A successful run with the additional tests will resemble the Run Summary as shown:
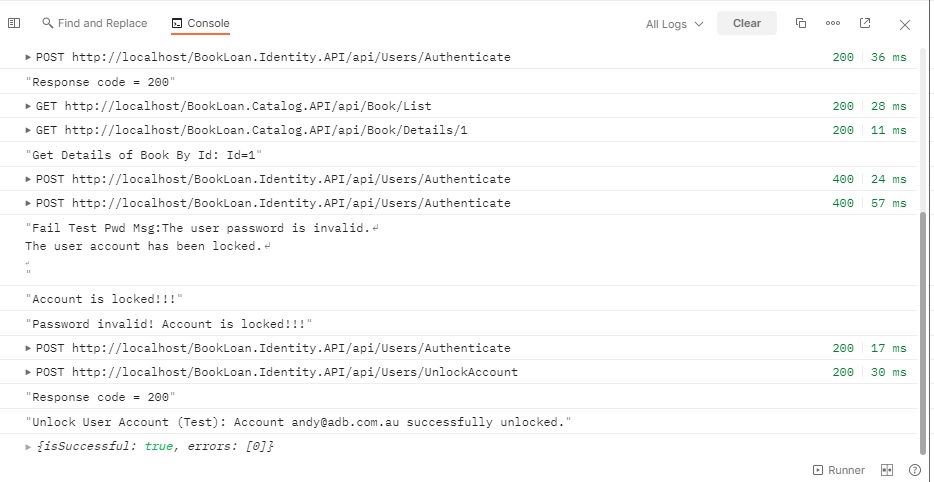
To diagnose and analyze test logging output, click on the Console button on the bottom left of the footer:

The console output will then display, which can be helpful for debugging issues in your test scripts:
As you can see, with some knowledge of JavaScript and basic knowledge of Chai BDD you can create some complex test runs using Postman.
For additional details on creating and accessing variables, you can refer to the Postman site.
For additional details on how to use the Chai BDD language for test assertions, refer to the Chai scripting site.
For more details on how to build request workflows and conditional branching, refer to the Postman site.
That is all for today’s post.
I hope you found this post useful and informative.
Andrew Halil is a blogger, author and software developer with expertise of many areas in the information technology industry including full-stack web and native cloud based development, test driven development and Devops.

