Welcome to today’s post.
In today’s post I will be explaining what the Angular HTTP interceptor is and how we can make use of it within our application, including installation and setting it up for usage.
The HTTP Interceptor is used to intercept http requests or http responses. The interceptor is an event handler which can then modify the request or response headers, then dispatch the resulting header into the request or response chain.
The HTTP Interceptor Component
To be able to use the interceptor in an Angular application, we will require use of the HTTPInterceptor component within the Angular Http Client Library.
The return result from the interceptor handler is of type Observable<HttpEvent<any>>. Recall from my previous the blog where I explain how to configure Web API HTTP request and how to handle errors from a Web API HTTP response. We saw how to use the observable pattern to process error responses, there are three methods that are used to control the flow of a stream of data from an observable:
next()
error()
complete()
There is a similar design pattern that is used to handle errors in .NET Core middleware HTTP request delegate handlers that I mentioned in one of my previous posts where I explain how global exception handling is implemented in .NET Core applications.
In another previous post, I showed in a common application scenario, how to apply HTTP interceptors to create an Angular login.
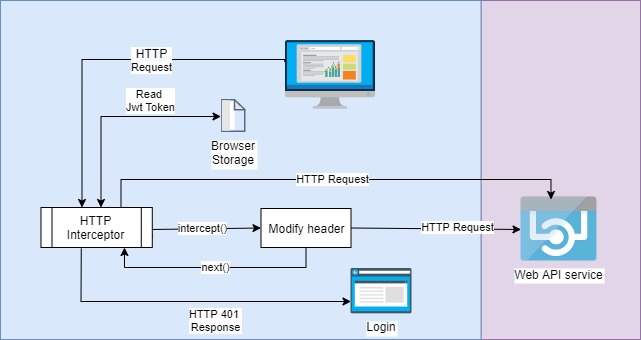
The HTTP interceptor in an Angular application is used to dispatch a stored authentication token to a secured Web API HTTP request. The technique employed by the interceptor is to retrieve the authentication token from storage, then assign the token to the Authorization key’s value within the HTTP request header. The interceptor’s next() method is then used to pass the modified request onto the next request in the chain.
When a user makes any HTTP request (GET, POST, PUT, DELETE), the interceptor handler is called with either the first request in the chain or a modified request from the previous intercepted request in the chain.
What this does for our client application is to allow security authentication tokens to be submitted to a secure backend Web API on each request without the user of the application having to login and obtain a new authentication token. When the token is invalid or expired, the secure backend API controller or method will invalidate the token and return an HTTP response code of 401 (unauthorized) to the Angular client. What the application does with an unauthorized response is to redirect the user to a login form so that a new token can be regenerated from re-entered credentials. With most modern web and mobile applications, the use if expiring authentication tokens is more secure and this is where the use of the HTTP interceptor becomes handy.
The diagram below shows how the interceptor is used to modify the header and submit the request to the API service:
In the next section, I will show how to setup the HTTP interceptor within an Angular component.
Setting up the HTTP Interceptor within an Angular Application
To setup the HTTP Interceptor in Angular, as we did to execute HTTP requests, we will need to install and import the HttpClientModule class from the @angular/common/http library.
The necessary classes used are imported as shown:
import { HttpRequest, HttpHandler, HttpEvent, HttpInterceptor } from '@angular/common/http';
An interceptor is then derived from the HttpInterceptor class, with the intercept() method overridden to override the HTTP request headers and / or content. The interceptor can then be used as an injectable service. The following code stub for the interceptor can be used:
import { Injectable } from '@angular/core'
import { HttpRequest, HttpHandler, HttpEvent, HttpInterceptor } from '@angular/common/http';
import { Router } from '@angular/router';
import { Observable, throwError } from 'rxjs';
import { catchError, finalize, map } from 'rxjs/operators';

import { AuthService } from './auth.service';

@Injectable()
export class AuthInterceptor implements HttpInterceptor {
    constructor(private authenticationService: AuthService,
        private router: Router) { }

    intercept(request: HttpRequest<any>, next: HttpHandler): Observable<HttpEvent<any>> {
    …
    }
}
Before the interceptor can be recognised by your HTTP request, the following changes will need to be made to the app.module.ts file:
Import the HTTP_INTERCEPTORS token:
import { AuthInterceptor } from './security/auth.interceptor';
Import the interceptor:
import { AuthInterceptor } from './security/auth.interceptor';
Declare the interceptor class as a provider:
providers: [
    …
    {
        provide: HTTP_INTERCEPTORS,
        useClass: AuthInterceptor,
        multi: true
    },
    …
 ],
The above service provider declaration allows our derived interceptor class, AuthInterceptor to be a created with multiple instances. This allows the interceptor class to be created with a new instance within the request / response delegate handlers.
An interceptor handler implementation is shown below:
intercept(request: HttpRequest<any>, next: HttpHandler): Observable<HttpEvent<any>> {
    // add authorization header with basic auth credentials if are available
    const currentUser = this.authenticationService.currentUserValue;
    if (currentUser && currentUser.token) {
        request = request.clone({
            setHeaders: {
                Authorization: `Bearer ${currentUser.token}`
            }
        });
    }
    return next.handle(request).pipe(map(event => {
        return event;
    }), catchError(err => {
        if (err.status === 401) {
            // not authorized so redirect to login page with the return url
            this.router.navigate(['/login'], {
                queryParams: { returnUrl: this.router.url }
            });
        }
        const error = err.error.message || err.statusText;
        return throwError(error);
    }),
    finalize(() => {})
)}
The interceptor method is implemented by taking a token from a custom authentication service, then creating a cloned instance of the request with the token injected into the Authorization key of the cloned request header. The cloning if the request and injection of the token into the header is shown below:
request = request.clone({
    setHeaders: {
        Authorization: `Bearer ${currentUser.token}`
    }
});
The cloned request header is then chained to the next request handler as shown:
return next.handle(request).pipe(map(event => {
    return event;
}
The error handler for the interceptor includes a catchError() function that pipes the error into a delegate error handler as shown:
catchError(err => {
    if (err.status === 401) {
        // not authorized so redirect to login page with the return url
        this.router.navigate(['/login'], {
            queryParams: { returnUrl: this.router.url }
        });
    }
    const error = err.error.message || err.statusText;
    return throwError(error);
})
If the HTTP API call results in an error, then the interceptor will redirect us back to the login page and request re-authentication.
You have seen how to configure and utilize the Angular HTTP interceptor to intercept and amend HTTTP requests. A common example of its application is with authentication, which is what I have explained.
Useful links what I have discussed in this post, which include observables, http interceptor, and http handler from the HTTP common library, and dependency injection are in the Angular developer site.
That is all for today’s post.
I hope you have found this post useful and informative.
I hope you have found this post useful and informative.
Andrew Halil is a blogger, author and software developer with expertise of many areas in the information technology industry including full-stack web and native cloud based development, test driven development and Devops.