
Welcome to today’s post.
I will discuss how to implement a basic login for your Angular application.
In a previous post I showed how to call a Web API securely from your Angular application. I will be using the ideas from the post to implement the authentication for an Angular application.
I will extend that discussion by showing how to create a basic login that calls our identity login Web API method and uses the token to persist the login details within the application.
An overview of the login process is shown below:
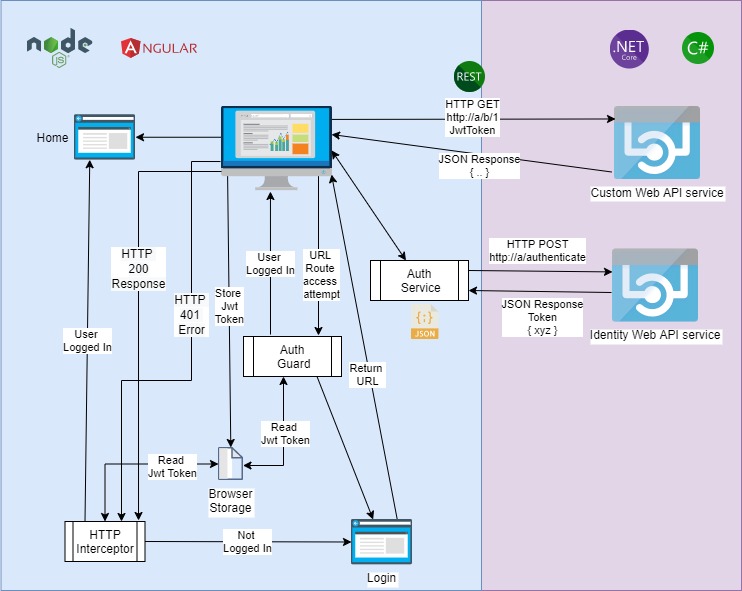
In the next section I will be covering the necessary components of the application login.
Components Required for an Angular Login Implementation
Our Angular application requires a login dialog, a basic implementation is shown below:
Login Component (HTML)
<mat-card>
    <form [formGroup]="form" (ngSubmit)=
"login(form.controls.email.value, form.controls.password.value)">
        <mat-form-field>
            <input matInput type="email" placeholder="Email" formControlName="email">
        </mat-form-field>
        <mat-form-field>
            <input matInput type="password"
placeholder="Password" formControlName="password">
        </mat-form-field>
        <button mat-raised-button color="primary" [disabled]="!form.valid">Login</button>
    </form>
</mat-card>
You can see I am using the Angular Material framework to implement the UI which is quite a popular framework for many web applications.
The Typescript component code for the login form is shown below:
Login Component (TS)
import { Component } from '@angular/core'
import { FormBuilder, FormGroup, Validators, ReactiveFormsModule } from '@angular/forms';
import { AuthService } from '../security/auth.service';
import { MaterialModule } from '../material/material.module';

@Component({
    templateUrl: './login.component.html'
})
export class LoginComponent {
    form
    constructor(private auth: AuthService, private fb: FormBuilder) {
        this.form = fb.group({
            email: ['', Validators.required],
            password: ['', Validators.required]
        })
    }
    login(username: string, password: string): void {
        this.auth.login(username, password);
      }
}
The login form component on submission calls the login() method with the user name and password.
The login method within our component then calls the login() method of our authorization service.
The login method within the authorization service then makes an HTTP POST call to our Web API authentication method:
http://localhost/BookLoan.Identity.API/api/Users/Authenticatewhich takes a user name and password.
If successful, it will then return JSON data containing the username and an access token. This token is then stored within the browser local storage for use by our application when requesting authorization of other API services.
Authorization Service (TS)
import { Injectable } from '@angular/core'
import { HttpClient, HttpHeaders } from '@angular/common/http'
import { Router } from '@angular/router'
import { User } from '../models/User';
import { Observable, BehaviorSubject } from 'rxjs';
import { map, catchError, switchMap } from 'rxjs/operators';

@Injectable()
export class AuthService {
    private currUserSubject: BehaviorSubject<User>;
    public currUser: Observable<User>;

    constructor(private http: HttpClient, private router: Router) {
        var sUser: string = localStorage.getItem('currentUser');
        var sToken: string = localStorage.getItem('token');

        var user: User = {
            username: sUser,
            token: sToken
        };
        this.currUserSubject = new BehaviorSubject<User>(user);
        this.currUser = this.currUserSubject.asObservable();
    }

    public get currentUserValue(): User {
        return this.currUserSubject.value;
    }

    register(credentials){
        this.http.post<any>('http://localhost/BookLoan.Identity.API/api/Users/Authenticate', credentials)
          .subscribe(res =>{
            this.authenticate(res)
          })
    }

    login(userName: string, password: string){
        var config = {
            headers: new HttpHeaders({
                'Content-Type': 'application/json',
            })
        };

        this.http.post<any>('http://localhost/BookLoan.Identity.API/api/Users/Authenticate', { "UserName": userName, "Password": password }, config).
          subscribe(
              res => { this.authenticate(res) },
              error => { error => console.error('There was an error!', error) }
        );
    }

    public get currUserValue(): User {
        return this.currUserSubject.value;
    }

    authenticate(res: User) {
        localStorage.setItem('token', res.token)
        localStorage.setItem('currentUser',
          JSON.stringify(res.username));
        this.currUserSubject.next(res);

        this.router.navigate(['/'])
    }
}
In addition, as we discussed in a previous post, an interceptor service is required to catch any HTTP requests and attach the JWT access token to the request header prior to requesting or posting to the Web API. When we get an unauthorized (401) response from the API, then we will be redirected to the login prompt to re-renter credentials.
Interceptor Service (TS)
import { Injectable } from '@angular/core'
import { HttpRequest, HttpHandler, HttpEvent, HttpInterceptor } from '@angular/common/http';
import { Router } from '@angular/router';
import { Observable, throwError } from 'rxjs';
import { catchError, finalize, map } from 'rxjs/operators';

import { AuthService } from './auth.service';

@Injectable()
export class AuthInterceptor implements HttpInterceptor {

    constructor(private authenticationService: AuthService,
        private router: Router) { }

    intercept(request: HttpRequest<any>, next: HttpHandler): Observable<HttpEvent<any>> {
        const currentUser = this.authenticationService.currentUserValue;
        if (currentUser && currentUser.token) {
            request = request.clone({
                setHeaders: {
                    Authorization: `Bearer ${currentUser.token}`
                }
            });
        }
        return next.handle(request).pipe(map(event => {
            return event;
        }), catchError(err => {
                if (err.status === 401) {
                    // not authorized so redirect to login page with the return url
                    this.router.navigate(['/login'], { queryParams: { returnUrl: this.router.url } });
                }
                const error = err.error.message || err.statusText;
                return throwError(error);
            }),
            finalize(() => {})
        )}
}
The interceptor injects the token from the login into each HTTP request our Angular application makes. Provided the token is valid and not expired, the API call will be successful. If the HTTP API call results in an error, then the interceptor will redirect us back to the login page and request re-authentication.
Before the interceptor can be recognized by your HTTP request, the following changes will need to be made to the app.module.ts file:
Import the HTTP_INTERCEPTORS token:
import { HttpClientModule, HTTP_INTERCEPTORS } from '@angular/common/http';
Import the interceptor:
import { AuthInterceptor } from './security/auth.interceptor';
Declare the interceptor class as a provider:
  providers: [
    …
    AuthService,
    {
        provide: HTTP_INTERCEPTORS,
        useClass: AuthInterceptor,
        multi: true
    },
    …
  ],
The final piece to our login is to provide an authorization guard.
The purpose of the authorization guard is to challenge any user access to sensitive parts of our application and direct the user to the login if there are no access tokens within the session.
Auth Guard (TS)
import { Injectable } from '@angular/core';
import { Router, CanActivate, ActivatedRouteSnapshot, RouterStateSnapshot } from '@angular/router';

import { AuthService } from './auth.service';

@Injectable({ providedIn: 'root' })
export class AuthGuard implements CanActivate {
    constructor(
        private router: Router,
        private authService: AuthService
    ) { }

    canActivate(route: ActivatedRouteSnapshot, state: RouterStateSnapshot) {
        const currUser = this.authService.currentUserValue;
        if (currUser.token) {
            return true;
        }

        this.router.navigate(['/login'], {
          queryParams: { returnUrl: state.url }
        });
        return false;
    }
}
The code below is the routing module that defines the routing paths that are guarded by the authorization guard service (see source above) so that access is restricted to authenticated users:
app.routing.module.ts
const routes: Routes = [
    { path: 'home', component: HomeComponent, canActivate: [AuthGuard] },
    { path: 'login', component: LoginComponent },
    { path: '', redirectTo: '/home', pathMatch: 'full' },
    { path: 'book-detail/:id', component: BookDetailComponent, canActivate: [AuthGuard] },
];

@NgModule({
  imports: [RouterModule.forRoot(routes)],
  exports: [RouterModule]
})
export class AppRoutingModule { }
With the above overview you have the necessary components to be able to implement a basic login for your Angular application.
That’s all for today’s post.
I hope you found this post useful and informative.
Andrew Halil is a blogger, author and software developer with expertise of many areas in the information technology industry including full-stack web and native cloud based development, test driven development and Devops.

