Welcome to today’s post.
I will discuss how to use NgRx Store to track state within an Angular application.
There are other ways we can track state within an Angular application, such as using the Angular router to pass data between components or even using Dependency injection to access a shared data component within the application. In this post I am introducing an alternative external method of manage application state storage. This is NgRx store.
Before I show how to configure and implement NgRx store in the application, I will go through some useful definitions.
What is an NgRx Store?
NgRx Store is a third-party library that provides a framework for reactive applications. These include state management and development debugging tools. Installation is done using the command below:
npm install @ngrx/storeFor more details see the NgRx store reference.
What is an NgRx Entity?
NgRx Entity provides an API for manipulating and querying entity collections.
Installation is done using the command below:
npm install @ngrx/entityFor more details see the NgRx entity guide.
What are NgRx Effects?
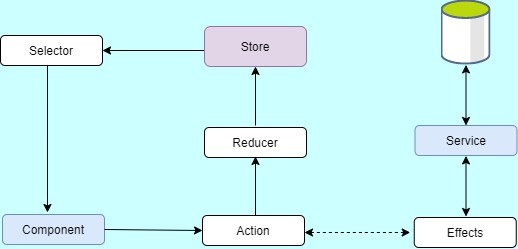
Effects are an RxJS powered side effect model for Store, using streams to provide new sources of actions to reduce state based on external interactions.
Within a traditional Angular service-based application that uses RxJs to interact with API data, the component that subscribes to the API service will in many cases need to fulfil multiple responsibilities:
- Storing the state of the entity being subscribed to.
- Calling the API to fetch new data.
- Changing the state of the entity within the component.
In NgRx an Effect is used to decouple the interaction of the component from the API service. This allows your component to be less stateful and only perform tasks related to external interactions.
Installation is done using the command below:
npm install @ngrx/effectsFor more details see the NgRx effects guide .
What is NgRx Data?
NgRx Data automates the creation of actions, reducers, effects, dispatchers and selectors and default HTTP GET, PUT, POST and DELETE methods for each entity type.
Installation is done using the command below:
npm install @ngrx/dataFor more details see the NgRx data guide.
What are the NgRx Store Dev Tools?
The Dev Tools for NgRx provide support for debugging and tracing applications during the development of NgRx applications.
Installation is done using the command below:
npm install @ngrx/store-devtoolsHow does NgRx allow us to integrate with the backed Web API and provide state within our application?

In the next section, I will show how to create an NgRx Effect.
Creating an NgRx Effect
First, we create an effect to consume data from our service:
import { Injectable } from '@angular/core';
import { Actions, Effect, ofType, createEffect } from '@ngrx/effects';
import { Observable, of as observableOf } from 'rxjs';
import { catchError, map, startWith, switchMap } from 'rxjs/operators';
import { BookApiService } from '../../services/bookApi.service';
import * as bookActions from './actions';

@Injectable()
export class BookStoreEffects {
  constructor(private dataService: BookApiService, private actions$: Actions) {}

  loadBookRequestEffect$ = createEffect(() => this.actions$.pipe(
    ofType(bookActions.loadBookRequestAction),
      switchMap(action => {
        const subject = "Book";
        return this.dataService.getBook(action.id).pipe(
          map((book: any) => {
              return bookActions.loadBookSuccessAction({ book })
          }),
          catchError((error: any) => {
            return observableOf(bookActions.loadBookFailureAction({ error }))
          })
        )
      })
  ))
Our service is shown below:
import { Injectable } from '@angular/core'
import { HttpClient, HttpHeaders, HttpParams } from '@angular/common/http'
import { Book } from 'src/app/models/Book';
import { Subject} from 'rxjs'

@Injectable({
    providedIn: 'root'
})
export class BookApiService {

    private selectedBook = new Subject<any>();
    bookSelected = this.selectedBook.asObservable();

    constructor(private http: HttpClient) {}

    getBooks(){
        return this.http.get('http://localhost/BookLoan.Catalog.API/api/Book/List'); //, config);
    }

    getBook(id: number)
    {
        return this.http.get('http://localhost/BookLoan.Catalog.API/api/Book/Details/' + id);
    }

    selectBook(book) {
        this.selectedBook.next(book)
    }

   …
}
The actions, which are the basic building blocks and unique events for our features within the application are defined as shown:
import { Action, createAction, props } from '@ngrx/store';
import { Book } from '../../models/Book';

export enum ActionTypes {
  LOAD_BOOK_REQUEST = '[Book] Load Book Request',
  LOAD_BOOK_FAILURE = '[Book] Load Book Failure',
  LOAD_BOOK_SUCCESS = '[Book] Load Book Success',

  LOAD_REQUEST = '[Book] Load Request',
  LOAD_FAILURE = '[Book] Load Failure',
  LOAD_SUCCESS = '[Book] Load Success',
  …
}

export const loadBookRequestAction = createAction(
  ActionTypes.LOAD_BOOK_REQUEST,
  props<{ id: number }>()
);

export const loadBookSuccessAction = createAction(
  ActionTypes.LOAD_BOOK_SUCCESS,
  props<{ book: Book }>()
);

export const loadBookFailureAction = createAction(
  ActionTypes.LOAD_BOOK_FAILURE,
  props<{ error: string }>()
);
Our reducers which handle the transition from one state to another within our application for a given loading state is implemented as shown:
import { initialState } from './state';
import { createReducer, on } from '@ngrx/store';
import * as BookActionTypes from './actions';

export const bookReducer = createReducer(
  initialState,
  on(BookActionTypes.loadBookRequestAction, (state, {id}) => ({
    ...state,
    isLoading: true
  })),

  on(BookActionTypes.loadBookSuccessAction, (state, { book }) => ({
      ...state,
      isLoading: false,
      selectedBook: book
  })),

  on(BookActionTypes.loadBookFailureAction, (state, { error }) => ({
    ...state,
    isLoading: false,
    error: error
  })),

  on(BookActionTypes.loadRequestAction, state => ({
    ...state,
    isLoading: true
  })),

  on(BookActionTypes.loadSuccessAction, (state, { items }) => ({
      ...state,
      isLoading: false,
      books: items
  })),

  on(BookActionTypes.loadFailureAction, (state, { error }) => ({
    ...state,
    isLoading: false,
    error: error
  })),

  …
Importing Features and Reducers into an NgRx Store
To import the feature and reducers within the store, we use a sub-module:
import { CommonModule } from '@angular/common';
import { NgModule } from '@angular/core';
import { EffectsModule } from '@ngrx/effects';
import { StoreModule } from '@ngrx/store';
import { BookStoreEffects } from './effects';
import { bookReducer } from './reducer';

@NgModule({
  imports: [
    CommonModule,
    StoreModule.forFeature('bookStore', bookReducer),
    EffectsModule.forFeature([BookStoreEffects])
  ],
  providers: [BookStoreEffects]
})
export class BookStoreModule {}
Before our component can consume the store data, we require a selector implementation:
import {
  createSelector
} from '@ngrx/store';

import { Book } from '../../models/Book';

import { AppState } from '../state';
import { BookState } from './state';

const BookFeature = (state: AppState) => {
  return state.bookStore
};

export const getBooks = createSelector(
  BookFeature,
  (state: BookState) => state.books
);

export const getBook = createSelector(
  BookFeature,
  (state: BookState, id: number) => state.books.filter(x=> x.id === id)
);

export const getSelectedBook = createSelector(
  BookFeature,
  (state: BookState) => state.selectedBook
);

export const getBookError = createSelector(
  BookFeature,
  (state: BookState) => state.error
);

export const getBookIsLoading = createSelector(
  BookFeature,
  (state: BookState) => state.isLoading
);
Creating the NgRx State
The state which wraps the Book entity into an interface defines the loading state and any errors and is implemented as shown:
import { createEntityAdapter, EntityAdapter, EntityState }
from '@ngrx/entity';

import { Book } from '../../models/Book';

export interface BookState {
  selectedBook: Book,
  books: Book[],
  isLoading?: boolean;
  error?: any;
}

export const initialState: BookState =
{
    selectedBook: null,
    books: [],
    isLoading: false,
    error: null
};
Finally, our component can consume the data using our selector:
import { Component, OnInit } from '@angular/core'
import { Router } from '@angular/router';
import { Store, StoreRootModule } from '@ngrx/store';
import { Observable, pipe, of } from 'rxjs';
import { map } from 'rxjs/operators';
import { Book } from '../models/Book';
import { BookState } from 'src/app/root-store/book-store/state';

import {
    BookStoreState,
    BookStoreActions,
    BookStoreSelectors,
    BookStoreModule
} from '../root-store/book-store/index';

import { AppState } from 'src/app/root-store/state';

@Component({
    selector: 'books',
    templateUrl: './books.component.html'
})
export class BooksComponent implements OnInit {
    books$: Observable<Book[]>;
    error$: Observable<any>;
    isLoading$: Observable<boolean>;

    books: Book[];

    constructor(
        private store$: Store<AppState>,
        private router: Router)
    {}

    ngOnInit() {
        this.store$.dispatch(BookStoreActions.loadRequestAction());

        this.store$.select(BookStoreSelectors.getBooks).subscribe(
            books =>
                {
                    this.books$ = of(this.books);
                }
            );

        this.error$ = this.store$.select(BookStoreSelectors.getBookError);
        this.isLoading$ = this.store$.select(BookStoreSelectors.getBookIsLoading);
    }

    onRefresh()
    {
        this.store$.dispatch(BookStoreActions.loadRequestAction());
    }

    selectBookById(id) {
        this.router.navigate(['book-detail', id]);
    }

    eventNewRecord(event)
    {
        this.router.navigate(['book-new']);
        console.log("new book data entry form being opened.");
    }
}
In your root storage app module import the feature module(s) as shown:
import { CommonModule } from '@angular/common';
import { NgModule } from '@angular/core';
import { EffectsModule } from '@ngrx/effects';
import { StoreModule } from '@ngrx/store';
import { StoreDevtoolsModule } from '@ngrx/store-devtools';
import { BookStoreModule } from './book-store/book-store.module';

@NgModule({
  imports: [
    CommonModule,
    BookStoreModule,
    StoreModule.forRoot({}),
    EffectsModule.forRoot([]),
    StoreDevtoolsModule.instrument({
      maxAge: 25, // Retains last 25 states
    }),
  ],
  declarations: []
})
export class RootStoreModule {}
Import your root store module into your app module as shown:
..
import { RootStoreModule } from './root-store';
..
@NgModule({
  declarations: [
..
  ],
  imports: [
	..
    RootStoreModule
  ],
  providers: [
	..
  ],
  bootstrap: [AppComponent]
})
export class AppModule { }
Testing the NgRx Application State
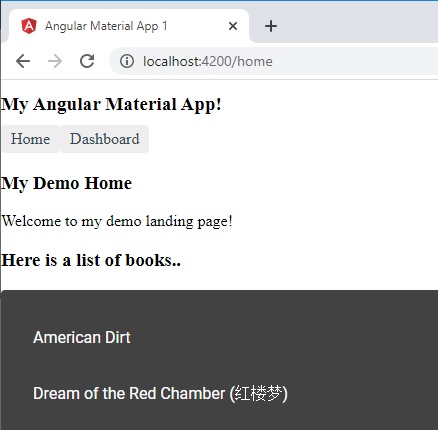
When run, you should see the data consumed and displayed by the component:

If you get the following error when building an NgRx application:
ERROR in node_modules/@ngrx/data/src/dataservices/default-data.service.d.ts:23:9 - error TS1086: An accessor cannot be declared in an ambient context.Then try reinstalling the NgRx entity package.
If you get errors like the following when installing the entity package:
npm WARN @ngrx/data@9.2.0 requires a peer of @angular/common@^9.0.0 but none is installed. You must install peer dependencies yourself.

npm WARN @ngrx/data@9.2.0 requires a peer of @angular/core@^9.0.0 but none is installed. You must install peer dependencies yourself.

npm WARN @ngrx/data@9.2.0 requires a peer of rxjs@^6.5.3 but none is installed. You must install peer dependencies yourself.
Then try downgrading the NgRx package to a slightly lower version that is compatible with your angular version and rebuild:
"@ngrx/data": "^8.0.0",
    "@ngrx/effects": "^8.0.0",
    "@ngrx/entity": "^8.0.0",
    "@ngrx/store": "^8.0.0",
As we can see, integrating NgRx store into an Angular application has quite a large overhead, and the benefits allow the coding of data persistence of external data stores with application data to be cleaner.
The well-tried methods of using external APIs to retrieve data have fewer overheads but fewer benefits of caching external data within application memory. With NxRx store requiring additional in-memory caching of external data gives greater application memory overheads.
The trade-offs for a cleaner data persistence framework are greater application memory requirements. Your application, system requirements and maintenance requirements of your application will determine on your data persistence framework.
That’s all for today’s post.
I hope you found this post useful and informative.
In a future post I will show how to use the Redux tool to debug and trace NgRx state within your applications and how to develop CRUD applications.
Andrew Halil is a blogger, author and software developer with expertise of many areas in the information technology industry including full-stack web and native cloud based development, test driven development and Devops.


