Welcome to today’s post.
In today’s post I will show how to use Event Emitters and observables to communicate and dispatch messages between parent and child Angular components.
In a previous post I discussed how to use Event Emitters to exchange event notifications between Angular components.
In another post I discussed how to use BehaviorSubject and asynchronous observables to refresh component interfaces with changes in data from a component.
Data Exchange and Notification Flows between Child and Parent Components
In the example I will be discussing below, I will put together the above skills to provide the following:
- Allow a parent component to send data to child components.
- Allow child components to receive and act on data received from a parent component.
- Allow changes within child components to notify parent components.
- Adjust child components according to changes to its properties.
- Adjust a parent component display to reflect data received from a child component.
Our basic scenario is as shown in the diagram:
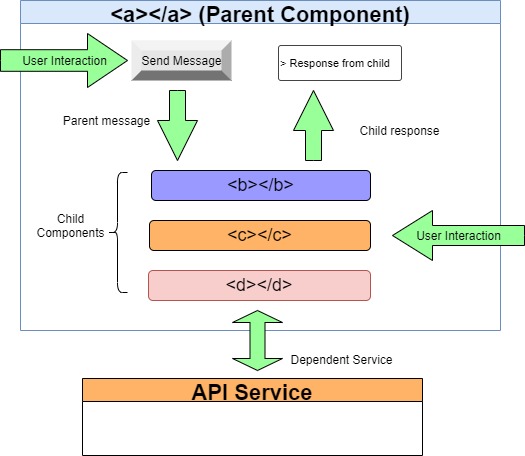
We have a parent component that contains three child components, which in turn call the same service to retrieve data or calculations.
The parent component interacts with the child component with button(s) actions that submits a message to either of the child components.
Each child component contains a button that is clickable within the parent container component.
Notifications flow from the child to the parent text edit control.
Data flow responses flow from the service back to each child component service.
Defining a Child Component
The Child component consists of a HTML template as shown with a card enclosing a button with a click event :
<mat-card [ngClass]="comp_rating < 40 ? 'mat-red-card':
    comp_rating < 60 ? 'mat-azure-card': 'mat-green-card'">
  <div>
    <p>Child Component: {{id}}</p>
      <button type="button" class="btn btn-primary"
          id="btnPush" (click)="eventSubmit($event.value)">
        Press Me!
      </button>
      <p>Message Received: {{ReceivedMessage$ | async}}</p>
  </div>
</mat-card>
<br />
The child component source is below:
import { Component, EventEmitter, Input, OnInit, Output }
  from '@angular/core';
import { BehaviorSubject } from 'rxjs';
import { DemoRandomService } from
  '../demo-random-service/demo-random-service';

@Component({
  selector: 'demo-emitter-child',
  templateUrl: './demo-emitter-child.component.html',
  styleUrls: ['./demo-emitter-child.component.scss']
})
export class DemoEmitterChildComponent implements OnInit {
  private _id: number = 0;
  private _receivedMessage: string = '';
  private ReceivedMessage$: BehaviorSubject<string> =
    new BehaviorSubject<string>('');
  private comp_rating: number = 0;

  @Output() childEvent = new EventEmitter<number>();
  @Input()
  set id(value: number)
  {
    this._id = value;
  }
  get id()
  {
    return this._id;
  }

  @Input()
  set receivedMessage(value: string)
  {
    this._receivedMessage = value;
    this.ReceivedMessage$.next(value);
  }
  get receivedMessage()
  {
    return this._receivedMessage;
  }

  constructor(private api: DemoRandomService) {}

  ngOnInit(): void {}

  eventSubmit(event)
  {
    this.api.getRandomValue().subscribe(res =>
    {
      this.comp_rating = res;
      console.log('child ' + this.id + ' submitted to parent!');
      this.childEvent.emit(res);
    });
  }
}
Child Components Receive and Act on Data Received from a Parent Component
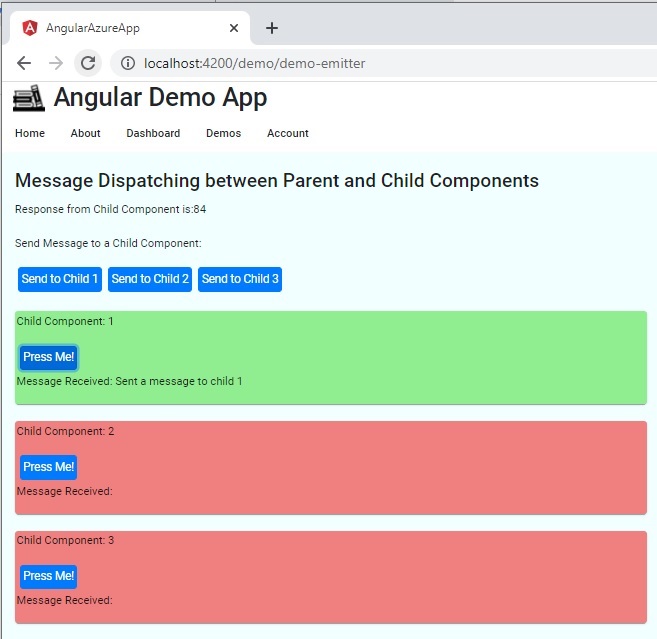
To show the state of the child component, the material card that contains each child component is coloured according to the rating the child component’s comp_rating property is set to. So, for a rating value below 40 we set it to red, between 40 and 60, set it to azure, and above 60 to green.
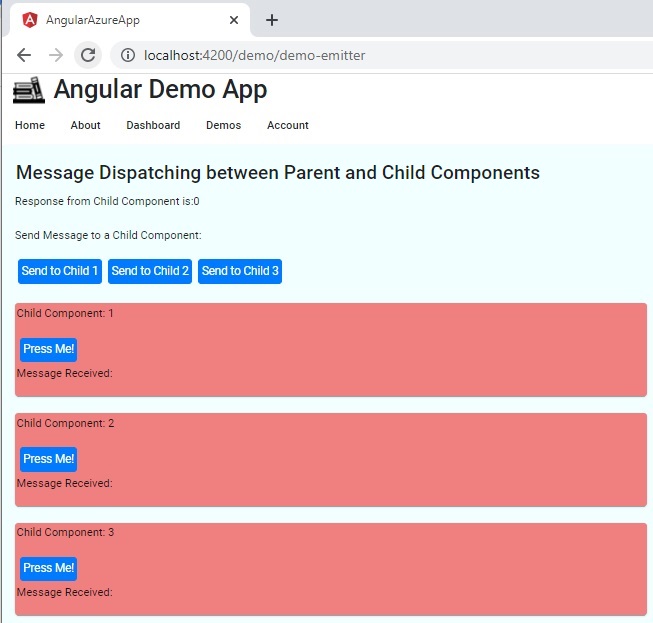
Initially, the rendered state of the parent and child components in the form are as shown:
The child component receives messages through the receivedMessage input accessor and has an id property. The received message observable ReceivedMessage$ is then used to update the text within the child component.
Changes within Child Components Notify Parent Components
When the child component button is clicked, the eventSubmit() event handler fires and a random integer from the service DemoRandomService is emitted by the child component back to the parent through the event emitter childEvent.
Adjust Child Components According to Changes to its Properties
In addition, the comp_rating property is updated and is used to change the colour of the child component card. The colour styles of the material card are below:
.mat-red-card {
    padding: 2px;
    background-color: lightcoral;
}

.mat-green-card {
    padding: 2px;
    background-color: lightgreen;
}

.mat-azure-card {
    padding: 2px;
    background-color: azure;
}
Below is an example of one of the child components being pressed and both the text control shows the response, a random value from the child and the card of the child component coloured green:
In the next section I will show how the parent component displays data received from the child component.
Adjusting a Parent Component Display to Reflect Data Received from a Child Component
The Parent Component HTML template is shown below showing the DIV used to display the child response value and the child HTML component declarations:
<mat-card>
    <mat-card-title>
        Message Dispatching between Parent and Child Components
    </mat-card-title>

    <mat-card-content>
        <div>Response from Child Component is:
            {{receivedChildResponse$ | async}}
        </div>

        <br />

        <div>
            <p>Send Message to a Child Component:</p>

            <button type="button" class="btn btn-primary"
                id="btnSend" (click)="eventSend(1)">
                Send to Child 1
            </button>
            <button type="button" class="btn btn-primary"
                id="btnSend" (click)="eventSend(2)">
                Send to Child 2
            </button>
            <button type="button" class="btn btn-primary" id="btnSend"
                (click)="eventSend(3)">
                Send to Child 3
            </button>
        </div>
        <br />
        <demo-emitter-child [id]=1
            (childEvent)='changedChildData($event)'
            #cmp1>
        </demo-emitter-child>
        <demo-emitter-child [id]=2
            (childEvent)='changedChildData($event)'
            #cmp2>
        </demo-emitter-child>
        <demo-emitter-child [id]=3
            (childEvent)='changedChildData($event)'
            #cmp3>
        </demo-emitter-child>
    </mat-card-content>
</mat-card>
Through a behaviour observable receivedChildResponse$, a message is sent to the parent component through an event handler, changedChildData() and displayed through a DIV.
The Parent Component Sends Data to Child Components
The parent component HTML template has three HTML instances of the child component, demo-emitter-child, each set with a unique ID property and a template variable, #cmp[i] which allows each of the child component’s receivedMessage property to be set to a text within the parent eventSend() method.
The parent component source consists of ViewChild() objects, which allow the child component instances to be templated and updateable from within the parent component.
import { Component, ElementRef, OnInit, QueryList, ViewChild,
  ViewChildren } from '@angular/core';
import { BehaviorSubject } from 'rxjs';
import { DemoEmitterChildComponent } from
  '../demo-emitter-child/demo-emitter-child.component';

@Component({
  selector: 'app-demo-emitter',
  templateUrl: './demo-emitter.component.html',
  styleUrls: ['./demo-emitter.component.scss']
})
export class DemoEmitterComponent implements OnInit {
  receivedChildResponse$: BehaviorSubject<number> =
    new BehaviorSubject<number>(0);
  @ViewChild('cmp1', { static: false })
    private cmp1: DemoEmitterChildComponent;
  @ViewChild('cmp2', { static: false })
    private cmp2: DemoEmitterChildComponent;
  @ViewChild('cmp3', { static: false })
    private cmp3: DemoEmitterChildComponent;

  childMessage: string = '';

  constructor() { }

  ngOnInit(): void {}

  changedChildData(dataItem: number) {
    // do something with output from child..
    this.receivedChildResponse$.next(dataItem);
  }

  eventSend(event)
  {
    if (event === 1) {
 	  this.cmp1.receivedMessage = "Sent a message to child " + event;
    }
    if (event === 2) {
 	  this.cmp2.receivedMessage = "Sent a message to child " + event;
    }
    if (event === 3) {
 	  this.cmp3.receivedMessage = "Sent a message to child " + event;
    }
    console.log('parent submitted message to child' + event);
  }
}
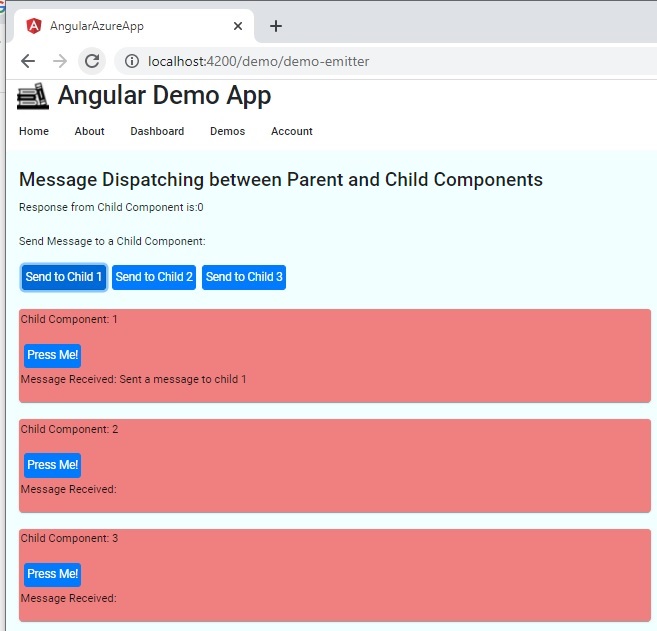
Below is the message displayed in the first child component after the first button in the parent component is pressed:
Finally, the service component that is used within each child component instance has a single function that generates and returns a random number between 1 and 100:
import { Injectable } from '@angular/core';
import { Observable, of } from 'rxjs';

@Injectable()
export class DemoRandomService {
  constructor() { }

  getRandomValue(): Observable<number> {
    let val: number = Math.random() * 100;
    val = parseInt(val.toFixed(0));
    return of(val);
  }
}
We can see how this all fits together in the messaging between the parent and child component instances.
Examples of how this interaction between a parent component and child components can be usefully utilized within an application that uses many charting reports. The parent component in this case would be a form that contains parameters such as drop-down selections or checkboxes, and the child components would be charts within the parent component. When one of the parent component parameters are changed, the parameter values in the form of structured typescript objects are passed into the child components, where they can update graph properties such as x and y axis scaling. This gives the user incredible look and feel, and response within the application.
That is all for today’s post.
I hope you have found this post useful and informative.
Andrew Halil is a blogger, author and software developer with expertise of many areas in the information technology industry including full-stack web and native cloud based development, test driven development and Devops.