
Welcome to today’s blog.
In today’s blog I will show how to import and configure a local Git repository into an Azure DevOps Service project repository.
In previous blogs I have shown how to create a basic Git repository locally, import the source to a remote GitHub repository, make changes to source files and push them to the GitHub repository.
The main difference between that and what I will show is that the repository will be stored within a Git project repository within Azure DevOps Services.
There are other variations in the integration of source code repositories and Azure DevOps. One most obvious integration is that between a GitHub repository and an Azure DevOps Services repository.
I will outline the steps below.
Source Code Management Between Git and Azure DevOps
Before we can associate any Git source with Azure DevOps, first create a simple .NET Core web application.
Create a local folder: C\development\devops (you can name it whatever you want)
From the local folder, create a sub-folder to hold the application source:
mkdir BookLoanWebApp
cd BookLoanWebApp
Inside a GitBash command prompt, initialize a new Git repository:
git init
Initialization of the repository will be confirmed from the output:
Reinitialized existing Git repository in C:/development/devops/BookLoanWebApp/.git/
Configure the global settings for the name and email address to be used when committing for this Git repository within Azure DevOps:
git config --global user.name "[whatever name you want to use] "
git config --global user.email [whatever your email address]
The next step is to create a.NET Core app. I will use the dot net command to generate a new scaffolded ASP.NET core MVC web application. More details on the syntax for this is in the Microsoft .NET site.
dotnet new mvc
Note: If we don’t specify the –name parameter in the above command, then the application name will default to the parent directory name, which in my case is BookLoanWebApp.
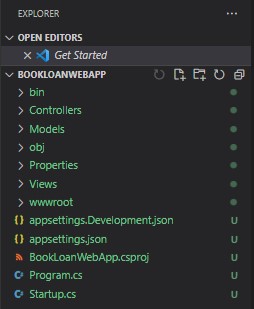
Once created, open Visual Studio Code and the folder of the application. The application structure should look something like this:
Next, build and run the application.
dotnet build
dotnet run
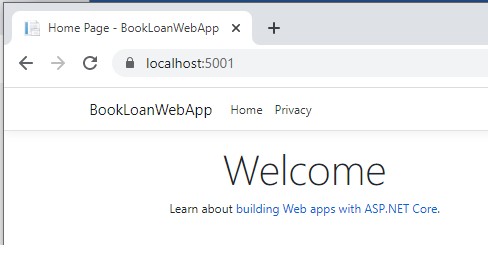
After the application has run, it will resemble the output in the browser as shown:
The next step is to import the Git source code into an Azure DevOps Git project repository.
Associating a local project source with Azure DevOps Repository
Before we can import source code from a Git repository into Azure DevOps, we require the following tasks to be completed:
- Login to an existing Azure DevOps Service account.
- Setup an Azure DevOps Organization.
- Setup a project within an Azure DevOps Organization.
Open the page for the DevOps project under the organization:
https://dev.azure.com/[MyOrganization]/_git/[MyProject]
In Azure DevOps Services, you reference the project URL with the format:
dev.azure.com/{organization}/{project}
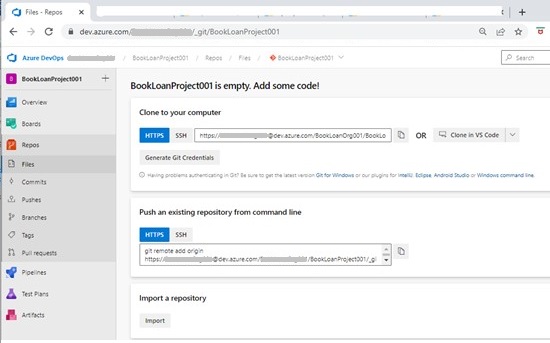
If we select Repos | Files from the left menu, we notice the project files page is empty.
There are various methods we can import local Git repository or associate existing Git source files from an Azure DevOps project into a local development environment:
Some of these methods are as follows:
1. Clone an Azure DevOps repo to your VS code IDE:
The cloned HTTPS repository URL is of the form:
https://[organization-name]@dev.azure.com/[organization-name]/[project-name]/ _git/[project-name]
The URL can be used to clone an existing repository from Azure DevOps into either GitHub, Visual Code or Visual Studio. The remote repository source can then be downloaded into the project folder on the local machine.
A list of source code IDE applications is shown when the drop down for the Clone in VS Code button is dropped down:
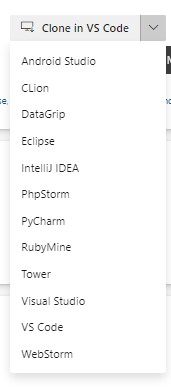
Use this option when the source is within Azure DevOps and you want to download the source into a local source folder.
2. Push a repository from the Git Bash command line
From a project source folder on the local machine, we can push the project source code into the Azure Repo.
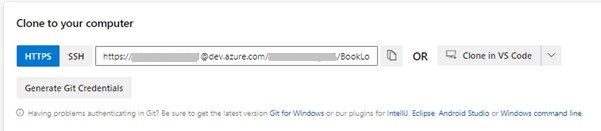
This requires us to first copy the Azure DevOps Git HTTPS URL:
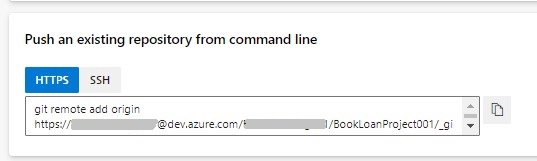
In the project folder, we then run the following Git command:
git remote add origin
https://[organization-name]@dev.azure.com/[organization-name]/[project-name]/
_git/[project-name]

git push -u origin --all
The above familiar git push command is used to push source code from a local Git repository into a remote Git repository (GitHub or Azure DevOps).
3. Import project source into an Azure DevOps repository
The third option is to import source from a remote repository. This is done by clicking on the Import button.

When the import dialog opens, it presents us two fields:
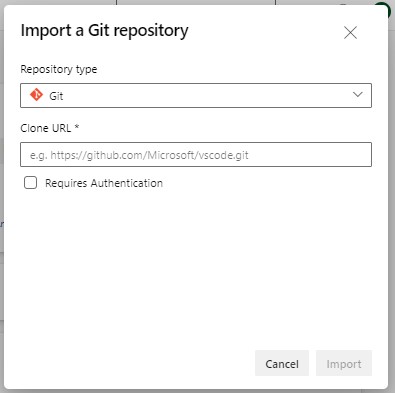
Importing source can be done from a Git or TFVC repository:
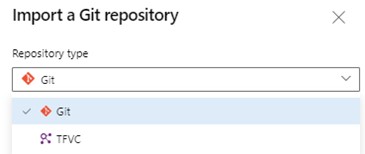
The clone URL is obtained similarly from within a repository within GitHub, TFS, then pasted into Azure DevOps.
An alternative way of importing a Git repo into an Azure DevOps project is using the Azure DevOps CLI.
Other ways to clone a Git repository are classified in the Azure DevOps reference from Visual Studio.
The next step is to push the local Git repository into the Azure DevOps project.
Pushing a Local Git Repository into an Azure DevOps Project
Since we already have the source files locally generated in our development environment and no source in our Azure DevOps project, we will make use of option 2 above from the Azure DevOps options in Repos | Files.
Run the following command (replacing with your own organization and project names):
git remote add origin https://[organization-name]@dev.azure.com/
[organization-name]/ [project-name]/_git/[project-name]
git push -u origin –all)
If you happen to get one of these Git errors:
No refs in common and none specified; doing nothing.
Perhaps you should specify a branch.
Everything up-to-date
OR
error: src refspec –all does not match any
OR
error: failed to push some refs to 'https://dev.azure.com/[organization-name]/[project-name]/_git/[project-name]'
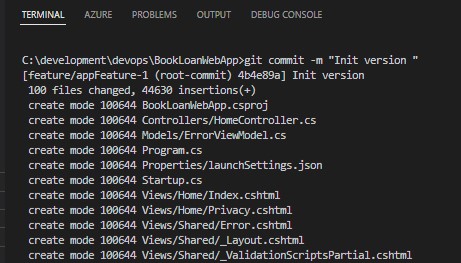
Then run the command git add first to stage all files in the project:
git add .
git commit -m "Init version"
The output will show what files have changed and the files that have been inserted into the repo:
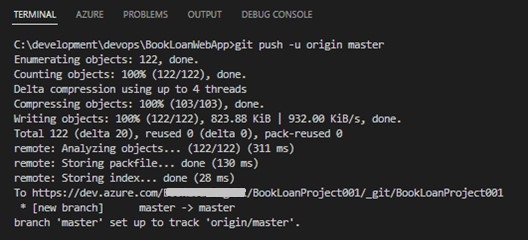
To push the committed source into an initial master (main) branch, run the command:
git branch -b master
git push -u origin master
The console output is shown:
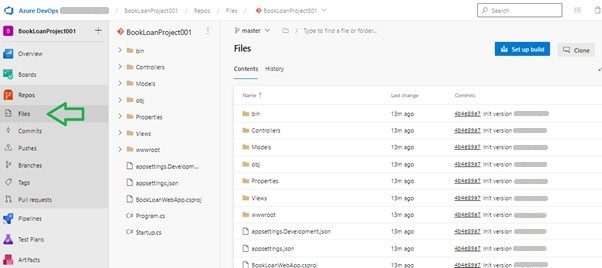
Return to Azure DevOps page.
Select Repos -> Files.
The imported repository will be visible:
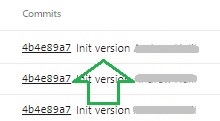
Our commit message “Init version” will be displayed in the Commits column under Files as shown:
From the above steps we have learned the following useful tasks:
From the above steps we have learned the following useful tasks:
- How to initialize a local Git repository.
- How to establish a local source code base from a generated .Net Core web application.
- How to clone a Git repository URL from an existing Azure DevOps project.
- How to import a local Git source repository into an empty Azure DevOps project repository.
From here we have established the master code base within an Azure DevOps project source repository. From here, we can provide versioning of source code to developers that contribute to the project.
Under the free offer from Azure DevOps Services Basic Plan, the first 5 users in your projects are license free, with unlimited private repos, and 2GB artifact size limit per organization, and 1 free hosted CI/CD pipeline. If you stick to within these limits, then experimentation with Azure DevOps Services can be free until you decide to scale use in bigger projects with greater resources.
In future posts I will explore more interesting features of Azure DevOps Services and explore how we can make the most of these.
That is all for today’s post.
I hope you found this post useful and enjoyable.
Andrew Halil is a blogger, author and software developer with expertise of many areas in the information technology industry including full-stack web and native cloud based development, test driven development and Devops.

