Welcome to today’s post.
In today’s post I will be showing how to create feature branches and push changes from a local Git repository into the main branch a remote Azure DevOps repository.
Feature branching, the most popular Git version control strategy, is part of the Gitflow branching model. It is used to isolate features and bug fixes into branches isolated from the main branch. The main branch contains the latest quality working version of the code base. Merges of changes to the main branch from feature branches are protected by using approved pull requests. Pull requests are code reviews conducted by approvers of the codebase. The feature branching strategy lends itself to distributed development, where multiple developers can work on different features without affecting the main branch. Feature branches tend to contain larger changes that take longer to develop and require approval before merging into the main branch. In addition, they can conflict with changes with common code files in other feature branches, so the skill of resolving merge conflicts by collaborating with other developers is required.
The alternative to the Gitflow branching model is trunk-based development. With trunk-based development, smaller code changes are checked into the main branch. To ensure the quality of code in the main branch is maintained, frequently running builds, automated unit tests, and code quality scanning are run on the version control server to approve or reject changes which might break the validity and/or quality of the code base or business logic of the application source within the main branch. Larger code check-ins tend to break builds more often, so frequent, smaller check-ins are better suited to this branching model.
In the previous post I showed how to commit and push changes within a local Git repository to a remote project repository in Azure DevOps Services. In the same post I showed how to setup Azure DevOps CLI in a local development environment. I have also showed in another post how to initialize a local Git repository and import the source from a project into an Azure DevOps project repository.
The first task I will show is to add a branch to our repository.
Adding a new Feature Branch
To create new feature branch from our local development IDE, we can run the following command:
git checkout -b feature/appFeature-1
where:
feature/appFeature-1
is the name of a feature branch we are creating in the current branch (usually main or master).
When the above git checkout command is executed, the branch will be switched to the new branch as shown:
>git checkout -b feature/appFeature-1
Switched to a new branch 'feature/appFeature-1'
To list all feature branches under the main branch run the following git command:
git branch
When the above command is run, the list of branches will display:
>git branch
* feature/appFeature-1
master
Committing and Pushing Changes to the Remote Git Repository
Suppose I want to make a change to a .NET Core web application, commit, then push the changes to our repository. In Visual Studio Code (VS), open our source code, amend a comment within the source file above the namespace line:
Replace
// Web app startup
With
// Program startup
The source will look as shown with the modified comment:
using System;
using System.Collections.Generic;
using System.Linq;
using System.Threading.Tasks;
using Microsoft.AspNetCore.Hosting;
using Microsoft.Extensions.Configuration;
using Microsoft.Extensions.Hosting;
using Microsoft.Extensions.Logging;

// Program startup
namespace BookLoanWebApp
{
    public class Program
    {
        public static void Main(string[] args)
        {
            CreateHostBuilder(args).Build().Run();
        }

        public static IHostBuilder CreateHostBuilder(string[] args) =>
            Host.CreateDefaultBuilder(args)
                .ConfigureWebHostDefaults(webBuilder =>
                {
                    webBuilder.UseStartup<Startup>();
                });
    }
}
Save the change to the source file.
Once saved, you can see all changes in the source to the left of the Visual Studio Code explorer:
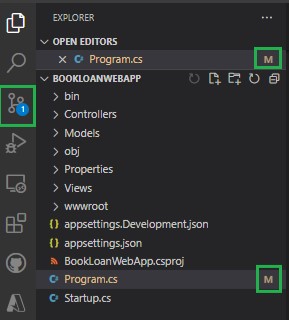
The changed file(s) will have an M (modified) state, and the total number of changes shows in the source control icon button to the left.
(If you are not in the feature branch, then switch to the feature branch by running the checkout command:
>git checkout feature/appFeature-1
Switched to branch 'feature/appFeature-1'
)
To stage the change and commit it to the feature branch with a comment run the following commands:
git add .
git commit -m "Comment added to Program startup"
The git add command will stage our changes in the current repository for committing.
The git commit command will commit our staged changes into the local repository branch with a comment.
When the above sequence of commands is run, the output will resemble those below:
>git commit -m "Comment added to Program startup"
[feature/appFeature-1 8da0bee] Comment added to Program startup
 1 file changed, 1 insertion(+), 1 deletion(-)
If you get the following warning from git:
>git commit -m "Comment added to Program startup"
On branch feature/appFeature-1
nothing to commit, working tree clean
then check that you have saved changes to your source file(s).
To push our committed changes to the remote repository, we run the following command:
git push -u origin feature/appFeature-1
The output from the above command is shown below:
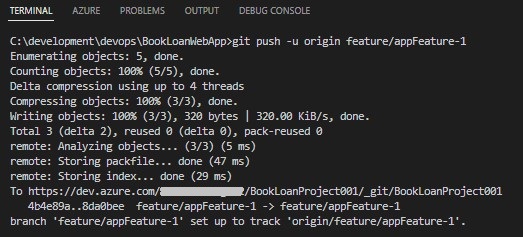
If you want to just push the branch change before any code changes, the output from the git push command will display the following indicating a new branch is created remotely:

We will next see how to view committed changes in the DevOps repository.
Viewing Committed Changes in the Azure DevOps Repository
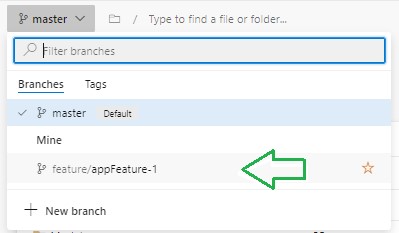
To view the committed changes in our remote repository, open the Azure DevOps organization. Then select the project. Now open Repository | Files.
Refresh the Files screen. Select the feature branch in the drop down above the Files heading. You will see the new feature branch below the master branch:
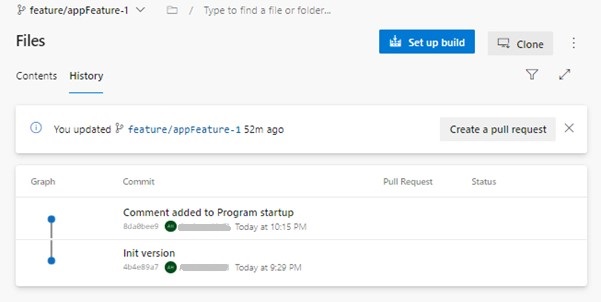
Below the Files heading we can see the “You updated ……” message:

Under Files, select History to view the commit graph with the comments for each revision:
Under Files, select Contents and look out for the Last change field and the Commits field. They will show when the commit was made and the comment. The comment matches what we ran in our git commit command:

Click on the commit link. This will take you to the code change screen. It looks like this:
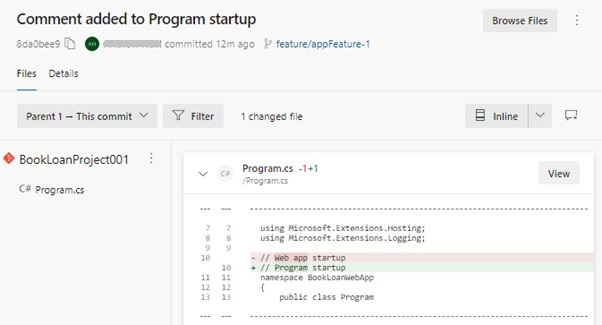
Where:
– indicates the previous version of the source line.
+ indicates the new version of the source line.
In this post we have observed the following tasks:
- Create a new feature branch in a local Git repository.
- Change, commit and push changes to a remote Azure DevOps Git repository.
- Open the Files view in an Azure DevOps project repository.
- View changes to files within the Azure DevOps repository branch.
In the next post I will show how to apply a pull request to a commit and merge the changes into a master branch in the Azure DevOps repository.
That is all for today’s post.
I hope you have found this post useful and informative.
Andrew Halil is a blogger, author and software developer with expertise of many areas in the information technology industry including full-stack web and native cloud based development, test driven development and Devops.