Welcome to today’s post.
In today’s post I will show how to implement ARM templates within Visual Studio.
The ability to create ARM templates has been part of the Visual Studio development environment since Visual Studio 2019 introduced the Azure Resource Group project template. In a previous post I showed how to construct ARM templates by making use of sample Azure Resource Manager templates.
The sample ARM Templates can be obtained from the Microsoft site.
With that approach, we would take elements from each type of resource such as: Storage Account, Hosting Plan, Application Configuration, Web Application, SQL Database and combine them into a JSON structure, with the parameters and variable sections (and schema header) to construct a draft version of an ARM template.
With the manual approach, we would on occasions have syntactic issues with the JSON structure, or we would have variable and/or parameter errors, which would show up during a validation run on our template.
To validate the deployment of the template without deploying any resources, the following command can be used within PowerShell or in the Azure Cloud CLI:
$p_TEMPLATE_FILE = "[location of ARM template file]"
Test-AzResourceGroupDeployment `
  -Name [web app name] `
  -ResourceGroupName [resource group name] `
  -TemplateFile $p_TEMPLATE_FILE
In the first section, I will show how to create ARM Templates from one of the Visual Studio project templates.
Creating ARM Templates from Resource Group Deployment Projects
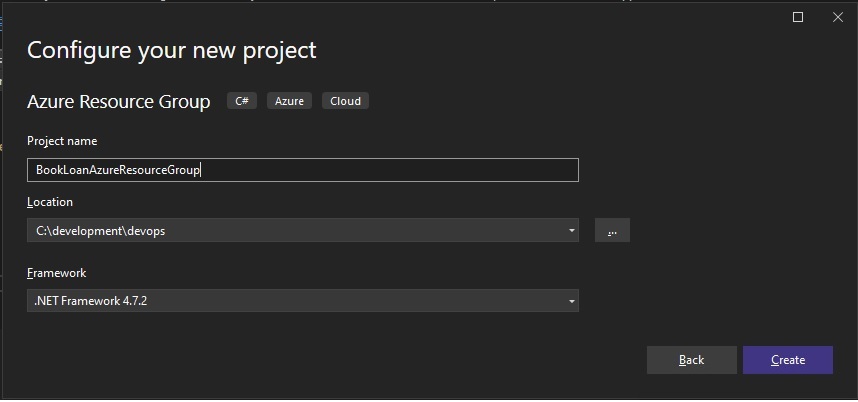
In Visual Studio 2019 or 2022, we can add the ARM template deployment capability by selecting the Azure Resource Group deployment project to a solution by adding it from the project templates search.

Note that the currently available .NET frameworks for the deployment project do not include any of the .NET Core versions. In this case, select the highest version available within your environment.

The next screen in the Wizard will show a selection of Azure Templates that are available. These include a blank template, which can be used as a starting point, which you can then subsequently add resources one by one until the entire template is constructed.

Unless you know which dependent resources are required for each Azure resource template, starting with a working Azure template, such as a Web App, Virtual Machine or Logic App is recommended. From here you can gain some understanding of each type of Azure template until their construction becomes more familiar.
To compare both approaches, I will select the Web application ARM template from the list.

After completion of the Wizard, you will see a new project created under the solution, with the following JSOM template files:

In the next section, I will explain the purpose of the ARM parameter and template script files.
Explaining the ARM Parameter and Template Files
The first file, WebSite.json is our actual generated ARM template file. The next generated file WebSite.parameters.json is a parameter file. The parameters file is used to provide input parameters into our ARM template file’s parameter section. The PowerShell script file, Deploy-AzureResourceGroup.ps1 is generated to provide a combined validation and deployment of the ARM template into Azure.
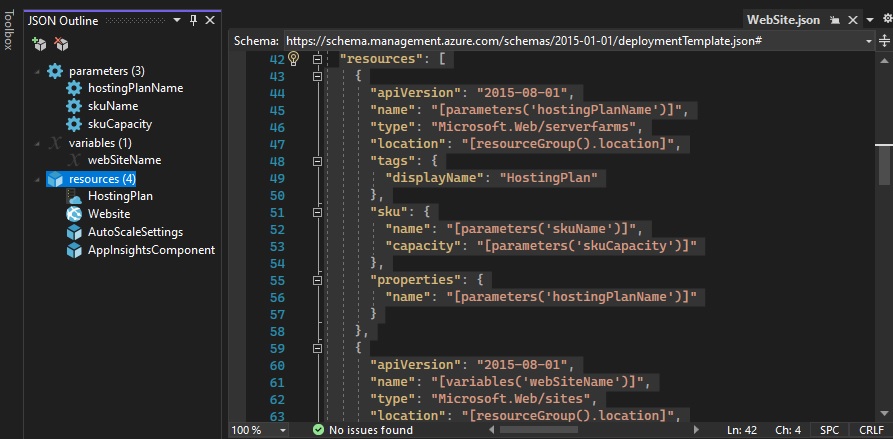
We can view the ARM template file WebSite.json and get an idea of the structure and the resources used in its construction. Below is a view of the file with a JSON Outline explorer to the left displaying the JSON elements for the parameters section:

As I explained, the parameters section contains the variables that are passed in from the parameters JSON file in the Azure Resource Group deployment project.
When we select the resources section in the JSON Outline, the resources will display in the source window:

Notice that the parameters section has a few parameters, with two of the parameters skuName and skuCapacity with default values. The first parameter, hostingPlanName has a required value.
  "parameters": {
    "hostingPlanName": {
      "type": "string",
      "minLength": 1
    },
    "skuName": {
      "type": "string",
      "defaultValue": "F1",
      "allowedValues": [
        "F1",
        "D1",
        "B1",
        "B2",
        "B3",
        "S1",
        "S2",
        "S3",
        "P1",
        "P2",
        "P3",
        "P4"
      ],
      "metadata": {
        "description": "Describes plan's pricing tier and capacity. Check details at https://azure.microsoft.com/en-us/pricing/details/app-service/"
      }
    },
    "skuCapacity": {
      "type": "int",
      "defaultValue": 1,
      "minValue": 1,
      "metadata": {
        "description": "Describes plan's instance count"
      }
    }
  },
The parameters file WebSite.parameters.json only shows the required parameters, which is hostingPlanName with a blank value. When validating or deploying the ARM template, value for the required parameters will need to be specified.
{
  "$schema": "https://schema.management.azure.com/schemas/2015-01-01/deploymentParameters.json#",
  "contentVersion": "1.0.0.0",
  "parameters": {
    "hostingPlanName": {
      "value": "hostingplan0203202320061"
    }
  }
}
As I mentioned, the validation and deployment of an ARM template within the Azure Resource Group deployment project is executed without having to run any scripts directly. You can now do this from the project’s context menu, with the Validate menu item below the Deploy menu item as shown:

When the Validate action is clicked, the following dialog pops out (some details redacted), where you first login to your Azure account, then select an existing resource group. Note that the ARM template file generated has resources and variables relative to an existing Azure resource group.

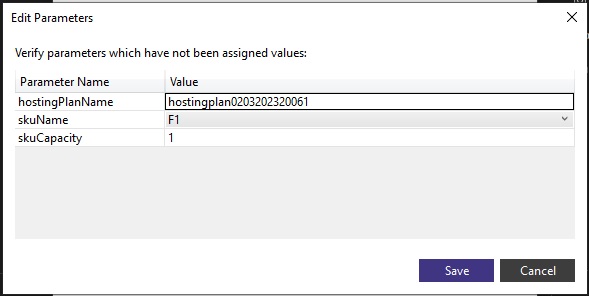
We will also need to provide the required parameter, which we can do so by clicking on the Edit Parameters… button.
In the Edit Parameters dialog, we will need to specify a unique hosting plan name for our template to validate. We then save the parameters.

In the generated ARM template resources section, the web site resource shown below:
    {
      "apiVersion": "2015-08-01",
      "name": "[variables('webSiteName')]",
      "type": "Microsoft.Web/sites",
      "location": "[resourceGroup().location]",
      "tags": {
        "[concat('hidden-related:', resourceGroup().id, '/providers/Microsoft.Web/serverfarms/', parameters('hostingPlanName'))]": "Resource",
        "displayName": "Website"
      },
      "dependsOn": [
        "[resourceId('Microsoft.Web/serverfarms/', parameters('hostingPlanName'))]"
      ],
      "properties": {
        "name": "[variables('webSiteName')]",
        "serverFarmId": "[resourceId('Microsoft.Web/serverfarms', parameters('hostingPlanName'))]"
      }
    },
The above script has properties that depend on the current resource group the script runs under. The required hostingPlanName input parameter, and the calculated webSiteName variable are generated from a concatenation of a fixed string and a unique string from the resource group identifier:
  "variables": {
    "webSiteName": "[concat('webSite', uniqueString(resourceGroup().id))]"
  },
The ARM template validation will then execute with the results displayed in the output window.

On completion, the result will be displayed with a Template is valid, or a Template is invalid message. In our template, the validation was successful.
From here, we can take the ARM template and use it to deploy and generate the resources in Azure for an Azure Web application from either PowerShell, Azure CLI Shell, or even from an Azure DevOps pipeline, where I showed in a previous post how to integrate an Azure ARM template into an Azure DevOps release pipeline.
That is all for today’s post.
I hope you have found this post useful and informative.
Andrew Halil is a blogger, author and software developer with expertise of many areas in the information technology industry including full-stack web and native cloud based development, test driven development and Devops.


