
Welcome to today’s post.
In today’s post I will show how we can deploy web applications to Azure using a method that involves using templates.
Most developers have relied on using several different methods to deploy ASP.NET Core web applications to the Azure environment. These include:
- Deployment of an Azure web application from an ASP.NET Core web application template from within Visual Studio (versions 2017 and onwards)
- Deployment of an Azure web application using PowerShell or Bash scripts from the Azure cloud shell.
- Deployment of an Azure web application using PowerShell scripts from a developer PowerShell command prompt.
- Creation of resources including the Azure Application Service Plan and Azure Web application from the Azure Portal.
What are ARM Templates?
The templating method of deployment uses what is known as ARM (Azure Resource Manager) template deployment. What makes ARM template deployment work in Azure is the ARM service within Azure that takes a JSON file, then applies the declarations within it to create, remove or update resources within Azure.
The principle of generating Azure resources from a template is also known as Infrastructure-as-Code (or IaC). With IaC we can deploy infrastructure cloud resources such as Virtual Machines, Storage Accounts, Application Services, and even Databases from a single template run from a command, which can then be automated as part of an DevOps Continuous Deployment automation.
Below is a diagrammatic depiction of the ARM service executing a deployment on an ARM template file to generate Azure resources:
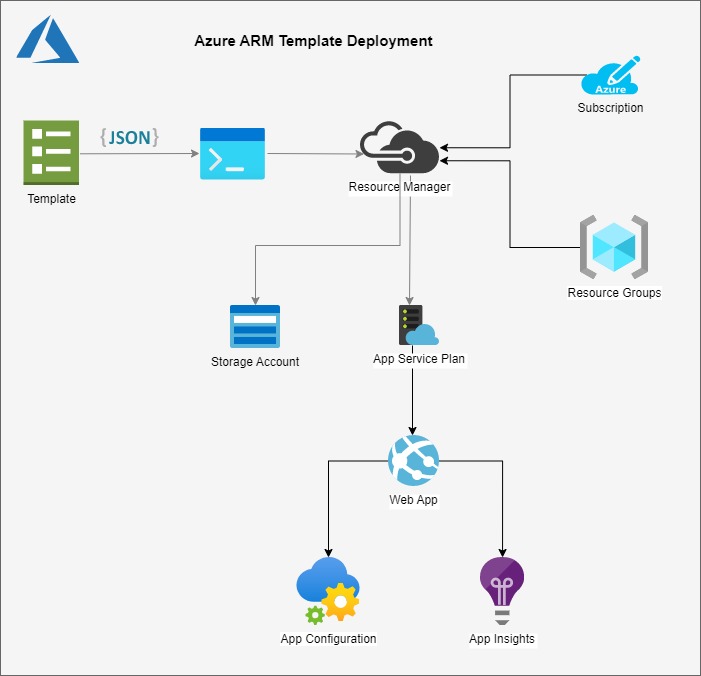
As we can see from the above list of manual and partially manual methods of deploying application artifacts to Azure, it is possible for the person who is creating and deploying the resources to make mistakes, or even overlooking a step. With a prepared and tested deployment template, we can minimize the likelihood of mistakes and be able to tear down and re-deploy the application artifacts and dependencies with more efficiency.
One of the important features of ARM templates is the ability to apply the entire deployment as an idempotent. What I mean by this is we can apply the deployment for each resource and ensure that the final state of the resource and its dependencies is the same if we re-apply the deployment of the resource. In this case, if the resource, such as a resource group, already exists, then the ARM deployment process will either remove and re-create the resource or will leave the resource intact. The same principle of idempotency applies when we deploy SQL scripts when deploying database schema objects and data to a target database.
Details on Azure ARM templating are on the Azure site:
More details on ARM Templates can be found on the Azure resource manager overview on the Azure site.
The initial dependencies of a resource are a subscription and a resource group. Once you are signed into a portal, you are within the context of a subscription. From here you can create or select an existing resource group, and then apply an ARM template. The template resources are then created within the context of a subscription and resource group.
The template starts off with a default header that contains the schema declaration and version as shown:
{
    "$schema": "https://schema.management.azure.com/schemas/2019-04-01/deploymentParameters.json#",
    "contentVersion": "1.0.0.0"
}
Next, we add the optional sections parameters, variables, and resources that we can populate with parameters, variables, and the resources that we wish to deploy. There are other sections that I have not included here such as functions, which I can explain in a separate post:
{
    "$schema": "https://schema.management.azure.com/schemas/2019-04-01/deploymentTemplate.json#",
    "contentVersion": "1.0.0.0",
    "parameters": {},
    "variables": {},
    "resources": []
}
The parameters section holds a list of the parameters that can be passed into the ARM template. These can include the location of the deployed resources (storage accounts, app service plans etc.), the pricing tier (plan) of deployed services.
The variables section usually holds values corresponding to resource names that are computed based on either a random integer, a random string, a resource group identifier, or string functions. When re-deploying the resources, generating resource names from randomised variables avoids the possibility of resource names clashing with existing resources within the same namespace.
When resources are deployed within a common resource group, when the resource group is removed later, all child resources under the resource group are removed. In this case, deploying resources under a common resource group makes managing the deployment easier for scenarios where the deployments are a test environment that is created, used for scheduled automated testing, then torn down later when no longer used to minimize resource charges. Even though resources can be created with random names within a deployment template, provided they are under a common resource group, finding them later and removing them is easier.
Before creating an ARM template, be aware that the recommended approach for creating ARM templates is to browse and take one of more sample ARM templates from the Microsoft Azure site then construct a template that meets the requirements of your infrastructure.
If you already have existing resources in the Azure portal that you wish to convert to ARM templates, you can download the JSON file of the generated ARM template of the resource. The resulting download will most likely have far more resources and properties than required and most will be output with default values. Note that the ARM template processor in Azure only requires a minimum number of parameters and properties to generate the default form of each resource. Parameters and properties that are defaults can be left out of the ARM template used for resource deployment.
Below is a sample web application ARM template I have constructed with dependent resources that include a storage account, web hosting plan, web site application, web application configuration and application insights.
Building an ARM Template File
I will show each section of the template that I have mentioned. The first section for parameters are shown below:
{
    "$schema": "https://schema.management.azure.com/schemas/2019-04-01/deploymentTemplate.json#",
    "contentVersion": "1.0.0.0",
    "parameters": {
        "pSKU_Name": {
            "type": "string",
            "defaultValue": "F1",
            "allowedValues": [
                "F1",
                "D1",
                "B1",
                "B2",
                "B3",
                "S1",
                "S2",
                "S3",
                "P1",
                "P2",
                "P3",
                "P4"
            ],
            "metadata": {
                "description": "The plan's pricing tier and instance size."
            }
        },
        "pSKU_Capacity": {
            "type": "int",
            "defaultValue": 1,
            "maxValue": 3,
            "minValue": 1,
            "metadata": {
                "description": "The plan's instance count."
            }
        },
        "pLocation": {
            "type": "string",
            "defaultValue": "[resourceGroup().location]",
            "metadata": {
                "description": "The location for all resources."
            }
        }
    },
Note: To specify a default parameter value, specify the key defaultValue. Below is a default value set to the Free tier for the pSKU_Name parameter:
"defaultValue": "F1",
Note: To specify a restricted set of allowable values, specify the key allowedValues then followed by an array of the permitted values. Below is the list of permitted pricing tiers:
"allowedValues": [
        "F1",
        "D1",
        "B1",
        "B2",
        "B3",
        "S1",
        "S2",
        "S3",
        "P1",
        "P2",
        "P3",
        "P4"
],
Below is the variables section:
"variables": {
    "vHosting_Plan_Name": "[format('hostingplan{0}', uniqueString(resourceGroup().id))]",
    "vWebsite_Name": "[format('website{0}', uniqueString(resourceGroup().id))]",
    "vStorage_Account_Name": "[format('storageacc{0}', uniqueString(resourceGroup().id))]"
},
Variables can be used to generate variables that are used for the storage account, app service plan and web site name. For example, the hosting plan above results in a host plan name with a random scramble of letters and numeric digits that represent the resource group id:
hostingplanh6y5j76ynokcw
The resources section shows the resources that are created. Below is the resource for the storage account:
"resources": [
    {
        "type": "Microsoft.Storage/storageAccounts",
        "apiVersion": "2022-05-01",
        "name": "[variables('vStorage_Account_Name')]",
        "location": "[parameters('pLocation')]",
        "sku": {
            "name": "Standard_LRS"
        },
        "kind": "StorageV2",
        "properties": {
            "supportsHttpsTrafficOnly": true,
        }
    },
The name of the resource is specified as a variable that has been auto generated from a variable, and the location is a provided or default parameter.
The resource for the hosting plan is shown below:
{
    "type": "Microsoft.Web/serverfarms",
    "apiVersion": "2022-03-01",
    "name": "[variables('vHosting_Plan_Name')]",
    "location": "[parameters('pLocation')]",
    "tags": {
        "displayName": "HostingPlan"
    },
    "sku": {
        "name": "[parameters('pSKU_Name')]",
        "capacity": "[parameters('pSKU_Capacity')]"
    }
},
With the sku property, we have specified the name and capacity from the pSKU_Name and pSKU_Capacity key/values.
The resource for the web site is shown below:
{
    "type": "Microsoft.Web/sites",
    "apiVersion": "2022-03-01",
    "name": "[variables('vWebsite_Name')]",
    "location": "[parameters('pLocation')]",
    "tags": {
        "[format('hidden-related:{0}', resourceId('Microsoft.Web/serverfarms', variables('vHosting_Plan_Name')))]": "empty",
        "displayName": "Website"
    },
    "properties": {
        "serverFarmId": "[resourceId('Microsoft.Web/serverfarms', variables('vHosting_Plan_Name'))]"
    },
    "dependsOn": [
        "[resourceId('Microsoft.Web/serverfarms', variables('vHosting_Plan_Name'))]"
    ]
},
The web site can only be created after the web hosting plan is created. This is specified by the dependsOn property as shown:
"dependsOn": [
    "[resourceId('Microsoft.Web/serverfarms', variables('vHosting_Plan_Name'))]"
]
The resource for the web site configuration is shown below:
{
    "type": "Microsoft.Web/sites/config",
    "apiVersion": "2022-03-01",
    "name": "[concat(variables('vWebsite_Name'), '/web')]",
    "dependsOn": [
        "[resourceId('Microsoft.Web/sites', variables('vWebsite_Name'))]"
    ],
    "properties": {
        "numberOfWorkers": 1
    }
},
The properties key contains key-value pairs that correspond to the configuration values of the web site.
Finally, the app insights resource is shown below. It is used for logging and diagnostics of our application:
{
    "type": "Microsoft.Insights/components",
    "apiVersion": "2020-02-02",
    "name": "[format('AppInsights{0}', variables('vWebsite_Name'))]",
    "location": "australiaeast",
    "tags": {
        "[format('hidden-link:{0}', resourceId('Microsoft.Web/sites', variables('vWebsite_Name')))]": "Resource",
        "displayName": "AppInsightsComponent"
    },
    "kind": "web",
    "properties": {
        "Application_Type": "web"
    },
    "dependsOn": [
        "[resourceId('Microsoft.Web/sites', variables('vWebsite_Name'))]"
    ]
}
In the next section, I will show how to deploy the ARM template.
Deploying an ARM Template
To deploy the above template, I will show how to do so using PowerShell script from a local on-premises environment. To do this you will need to open a PowerShell session on your machine and import the Azure and AzureRM.* library modules that you need in order to run the various cloud commands.
The first command we will need to run is:
Connect-AzAccount
This uses MSAL authentication, taking you to a login dialog, where you connect to your Azure subscription or tenant account. Once you are logged in, you can then apply scripts to deploy our ARM template to Azure.
Below is the section of the script to initialize parameter values:
$random1 = Get-Random -Minimum 100 -Maximum 1000
$random2 = Get-Random -Minimum 100 -Maximum 1000
$p_RG_NAME="BookLoan_Resource_Group${random1}${random2}”
$p_STORAGE_ACCT=”BookLoan_Storage_Account${random1}${random2}”
$p_LOCATION=”australiasoutheast”
Below is the command to create a new resource group to contain the resources that we will deploy from the ARM template:
New-AzResourceGroup `
  -Name $p_RG_NAME `
  -Location $p_LOCATION
Given the ARM template is stored in the following local folder:
C:\development\devops\ARM Templates\Web_App_Template.json
Then the following command is used to deploy the ARM template JSON file into the above Azure resource group within your Azure subscription (or tenant):
$p_TEMPLATE_FILE = "C:\development\devops\ARM Templates\Web_App_Template.json"
New-AzResourceGroupDeployment `
  -Name webapptemplate `
  -ResourceGroupName $p_RG_NAME `
  -TemplateFile $p_TEMPLATE_FILE
The above command does not include any of the parameters I mentioned in the parameter section. When no parameters are specified, the default parameters are used.
To validate the deployment of the template without deploying any resources, the following slight variation of the command can be used:
$p_TEMPLATE_FILE = "C:\development\devops\ARM Templates\Web_App_Template.json"
Test-AzResourceGroupDeployment `
  -Name webapptemplate `
  -ResourceGroupName $p_RG_NAME `
  -TemplateFile $p_TEMPLATE_FILE
The deployment command will apply BOTH validation and deployment, so I will skip to show how the deployment is run.
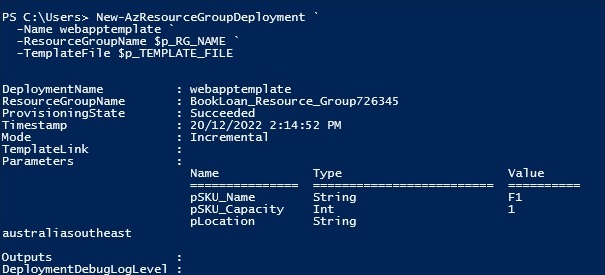
After you have run the deployment command, if there are no validation errors, you will get a result like the one below with the ProvisioningState output property as Succeeded:
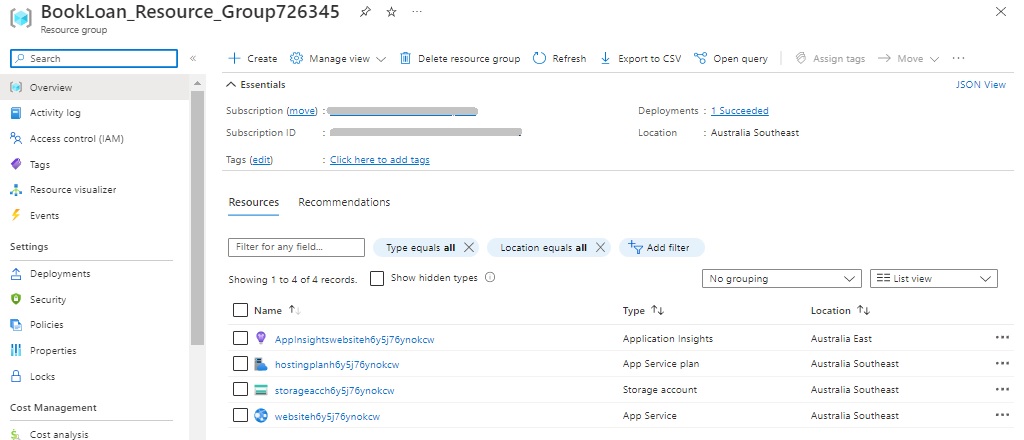
Within the Azure Portal, the created resource group will show with each of the child resources that were declared within our ARM template:
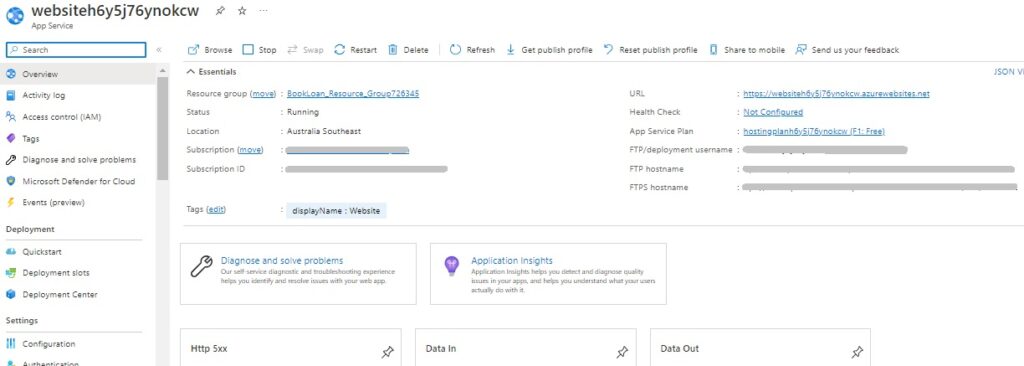
The web application, which is the deployed as an app service is shown with prominent properties including the URL. It is by default in the Running state:
By default, ARM templates are run under the Mode of Incremental, which means the method of resource deployment is idempotent. If we were to repeat the above deployment, then the resources will be created if missing, and updated with any changed properties within an existing resource.
Finally, to remove the above deployed resources, we apply the following command to remove the resource group within the same PowerShell session:
Remove-AzResourceGroup -Name $p_RG_NAME
To summarize, the scripting method, which is the imperative approach of deploying resources is the most common method used among cloud developers. It is an approach that emphasizes how the deployment is processed. One the other hand, the templated method, which is the declarative approach is not as common among cloud developers, but more commonly utilized among cloud infrastructure engineers and cloud administrators. It is this approach that emphasizes what the deployment will be. With more recent improvements in ARM template processing in Azure and many ready to use templates available, there will be more cloud developers and DevOps engineers embracing this approach in automated deployments of native cloud application resources.
That is all for today’s post.
I hope you have found this post useful and informative.
Andrew Halil is a blogger, author and software developer with expertise of many areas in the information technology industry including full-stack web and native cloud based development, test driven development and Devops.

