
Welcome to today’s post.
In today’s post I will be showing how to resolve a merge conflict that is flagged as part of a pull request in Azure DevOps Services.
In a previous post I showed how to action and approve a pull request and merge the changes into the main branch of a repository in Azure DevOps Services.
We have the case where the code we are attempting to merge conflicts with the same lines of code that has been committed and pushed from another branch, possibly from another developer. We may also have two branches of changes we have committed and pushed into the repository and the changes conflict with at least one line in the same source code file.
Conflicting code scenarios occur more often than we expect, so I will show how we can resolve a sample conflict experienced in a pull request.
Our sequence of tasks will involve the following:
- Create a feature branch. Make code changes. Commit and push changes to the remote repository.
- Create a bug fix branch. Make code changes. Commit and push changes to the remote repository.
- Create a pull request for the feature branch.
- Create a pull request for the bug fix branch.
- Complete and approve the pull request for the feature branch.
- Complete the pull request for the bug fix branch.
- Approve the pull request, observe merge conflict approval for the bug fix branch.
- Resolve the merge conflict. Apply resolution to bug fix branch.
- Commit merge of bug fix branch to main branch.
The above seems like quite an involved workflow. If I show each task in sequence, then it will make sense.
Create a Feature Branch, Commit, and Push changes to the Repository
To recreate a conflict for code within a repository we apply the following tasks:
First, we create another feature branch in the repository within Visual Code IDE:
git checkout -b feature/appFeature-2
Once the branch is created, make the source code change. In my previous post, I created a basic .NET Core web application I used for the basis for our work. You may use whatever code sample you wish for this exercise.
Below is an example of a typical change:
In the Index.html file, change the title from “Home Page” to “My Home Page!”:
@{
    ViewData["Title"] = "My Home Page!";
}

<div class="text-center">
    <h1 class="display-4">Welcome</h1>
    <p>Learn about <a href="https://docs.microsoft.com/aspnet/core">
        building Web apps with ASP.NET Core</a>.
    </p>
</div>
In Program.cs, add the comment “Program Class” above the Program class declaration:
using System;
using System.Collections.Generic;
using System.Linq;
using System.Threading.Tasks;
using Microsoft.AspNetCore.Hosting;
using Microsoft.Extensions.Configuration;
using Microsoft.Extensions.Hosting;
using Microsoft.Extensions.Logging;

// Web app startup
namespace BookLoanWebApp
{
    // Program class
    public class Program
    {
        public static void Main(string[] args)
        {
            CreateHostBuilder(args).Build().Run();
        }

        public static IHostBuilder CreateHostBuilder(string[] args) =>
            Host.CreateDefaultBuilder(args)
                .ConfigureWebHostDefaults(webBuilder =>
                {
                    webBuilder.UseStartup<Startup>();
                });
    }
}
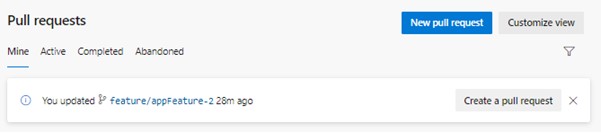
Save the source changes, then apply the commit and push changes to the repository using the standard git command sequence:
git commit -m "Change to index page."
git push -u origin feature/appFeature-2
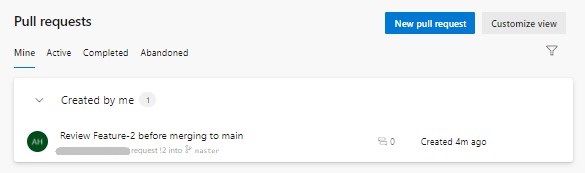
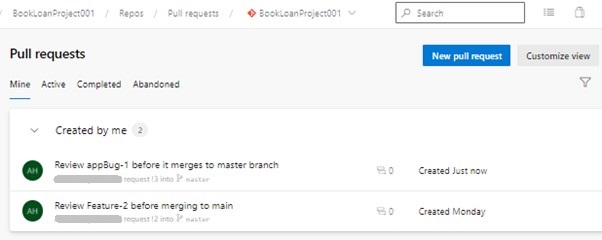
Following the commit and push into the repository, you will see the pull request prompted in the Azure DevOps Project | Pull request pane:
In the next section, I will show how to create a pull request on the Feature Branch.
Create a Pull Request on the Feature Branch
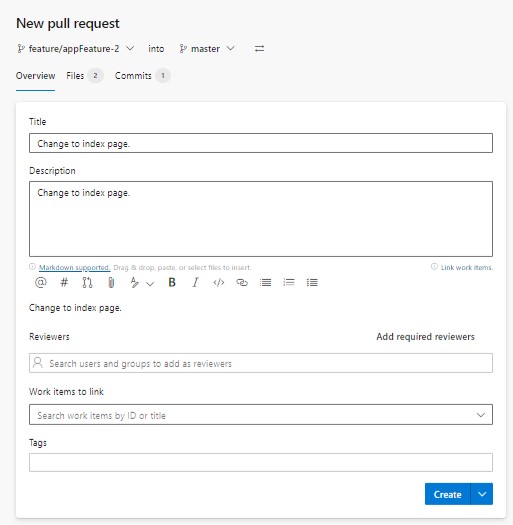
If you were to click on the New pull request option, the following dialog will show requesting the following details:
- Title
- Description
- Reviewers
- Work items to link
- Tags
To create the pull request in Azure DevOps CLI we can apply the following CLI command (substitute your own project and repository name where shown);
az devops configure --defaults organization=https://dev.azure.com/[your-organization] project="BookLoanProject001"

az repos pr create
--title "Review Feature-2 before merging to main"
--description "#Merge feature-2 to master"
--source-branch feature/appFeature-2
--target-branch master
--repository BookLoanProject001 --open
In one of my previous posts where I show how to link Azure Board issues to pull-requests, I showed how to create the pull request in Azure CLI and link the pull request to existing Azure Boards work issue item(s), we can apply the following: az repos pr CLI command (substitute your own project and repository names where shown):
az repos pr create
--title "Review Feature-2 before merging to main"
--work-items work-item 1[, … , work-item-N]
--description "#Merge feature-2 to master"
--source-branch feature/appFeature-2
--project BookLoanProject001
--target-branch master
--repository BookLoanProject001 --open
Where: work-item 1[, … , work-item-N] are comma-separated work items.
We could also create an issue in the Azure Board and link this to the pull-request:
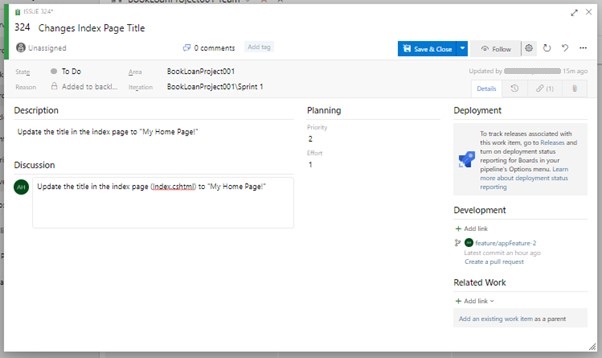
After running the command in the DevOps CLI, a new browser should open with the pull request details displayed in the Azure DevOps project with a link to the issue:
The new PR can be viewed selecting Repos -> Pull Requests:
To keep track of our merge into the main branch from the above branch, we can tag it. Below is the result after we have tagged the feature branch as release_appFeature1:

In the next section, I will create another issue that will conflict with the initial feature that was pushed with a PR to the main branch.
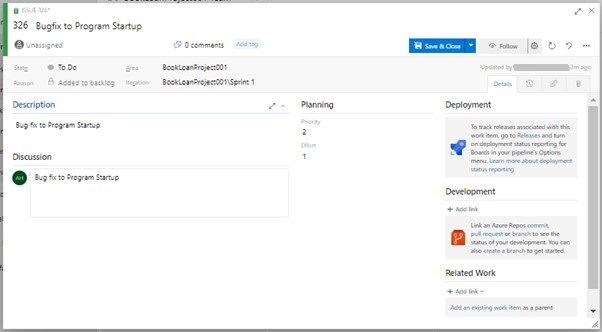
Create Conflicting Bug-fix Issue then Commit and Push Changes to the Repository
We can also create another issue to cover a bug fix:
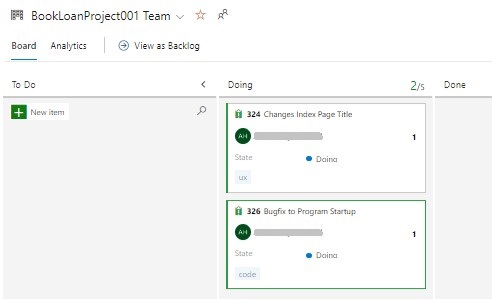
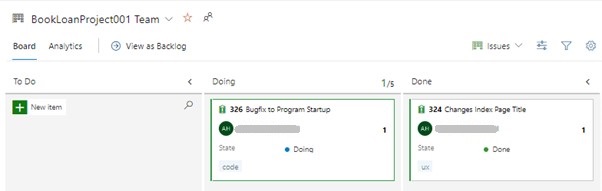
In our board, both feature and bug fix issues are shown in the DOING status:
Next, create a new branch for the bug fix change in the Visual Code IDE:
git checkout -b bugfix/appBug-1
We can also tag the branch we are creating as shown:
git checkout -b bugfix/appBug-1 release_appFeature1
In the Visual Code IDE, open the source file program.cs, add the following comment:
“Program class (with startup)”
The startup source is shown below:
using System;
using System.Collections.Generic;
using System.Linq;
using System.Threading.Tasks;
using Microsoft.AspNetCore.Hosting;
using Microsoft.Extensions.Configuration;
using Microsoft.Extensions.Hosting;
using Microsoft.Extensions.Logging;

// Program startup
namespace BookLoanWebApp
{
    // Program class (with startup)
    public class Program
    {
        public static void Main(string[] args)
        {
            CreateHostBuilder(args).Build().Run();
        }

        public static IHostBuilder CreateHostBuilder(string[] args) =>
            Host.CreateDefaultBuilder(args)
                .ConfigureWebHostDefaults(webBuilder =>
                {
                    webBuilder.UseStartup<Startup>();
                });
    }
}
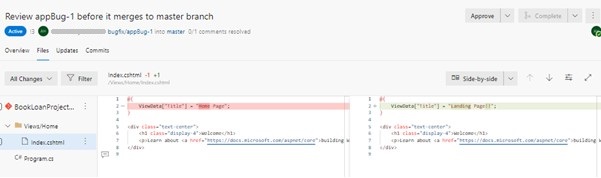
Open Index.cshtml and change the title to “Landing Page!!”:
@{
    ViewData["Title"] = "Landing Page!!";
}

<div class="text-center">
    <h1 class="display-4">Welcome</h1>
    <p>Learn about <a href="https://docs.microsoft.com/aspnet/core">
        building Web apps with ASP.NET Core</a>.
    </p>
</div>
Save the source file changes.
Stage and commit changes:
git add .
git commit -m "Bugfix Change to index page. Comment change."
Push changes to the repository:
git push -u origin bugfix/appBug-1
The pushed changes will show in the Azure DevOps branches as shown:
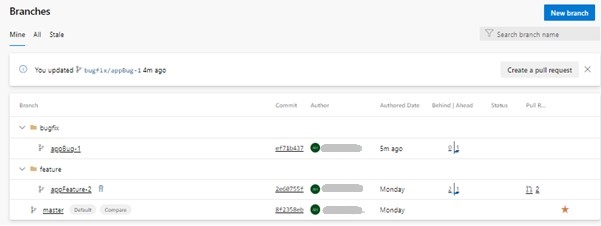
In the next section I will show how to create a pull request for the bug-fix branch.
Create a Pull-Request for the Bug-fix Branch
We then create a pull request for the change pushed to branch bugfix/appBug-1, linked to the work item on the Azure board:
az repos pr create --title "Review appBug-1 before it merges to master branch"
--work-items 326
--description "#Merge appBug-1 to master branch"
--source-branch bugfix/appBug-1
--target-branch master
--project BookLoanProject001
--repository BookLoanProject001
--open
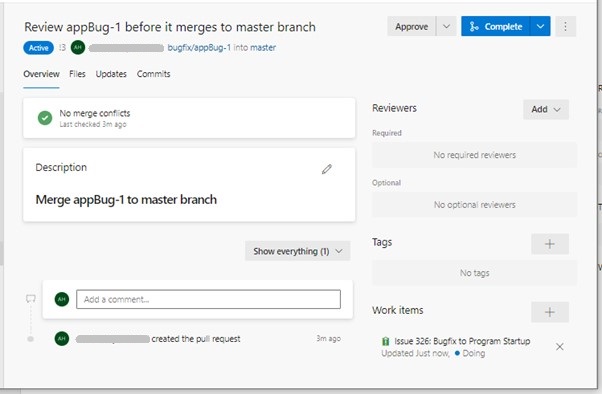
After running this pull request, the Azure DevOps Repo Pull Requests will show in the pull-requests pane:
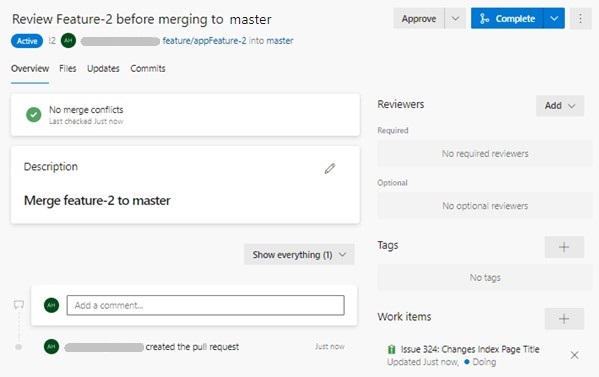
Review the pull request for the bug fix:
Approve Pull Requests for both Feature and Bug-fix Branches
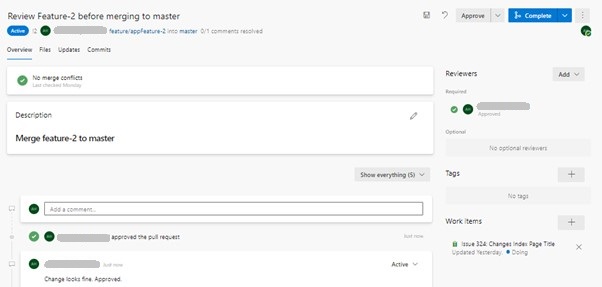
Add comments and reviewers to the feature pull request.
Approve the feature pull request:
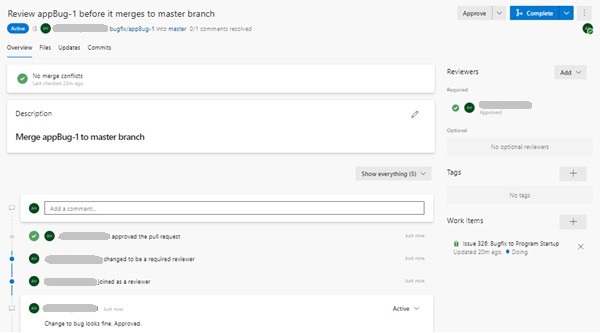
Add comments and reviewers to the bug fix pull request.
Approve the bug fix pull request:
Complete the merge commit for the feature pull request:

The status of the merge for the pull request for the feature branch is shown:

As the pull request has been successful, it has completed the linked work item and moved it to the DONE status as shown:
Complete the merge commit for the bugfix pull request:
Merge Conflicts caused by Pull Requests
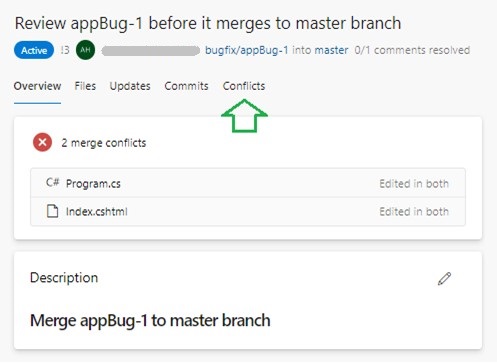
The status of the merge for the pull request for the bug fix branch is shown with a merge conflict.
There are two merge conflicts.
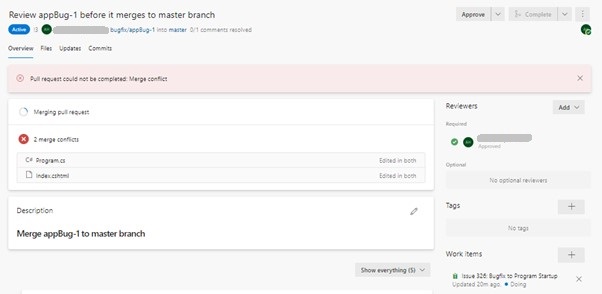
Because the bug fix pull request has a conflict, the linked work item is still in a DOING state. Unless we can resolve the merge conflict, the work item will remain in that state.
To review the merge conflicts in the source files: Program.cs and Index.cshtml, select the Files tab:
In the current File view, there are no options in the Azure DevOps default configuration of an organization to resolve a merge conflict. We could also ask our developer that authored the code to open the affected bugfix branch, pull the changes from the master branch, then resolve the conflicting lines in the bugfix branch using Git merge resolution, then push them back to the repository, which will resolve the conflict.
Resolving the Merge Conflict with an Azure DevOps Services Extension Tool
An alternative to resolving with the VS Code IDE is to use an extension of Azure DevOps Services.
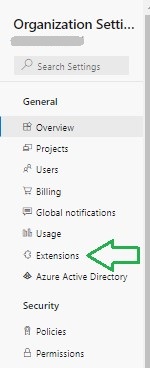
To fix a merge conflict within Azure DevOps UI, go to the Organization level.
Select Organization settings.
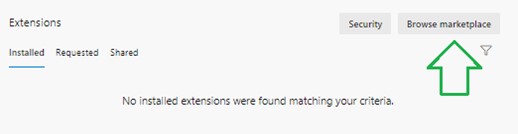
Next select Extensions.
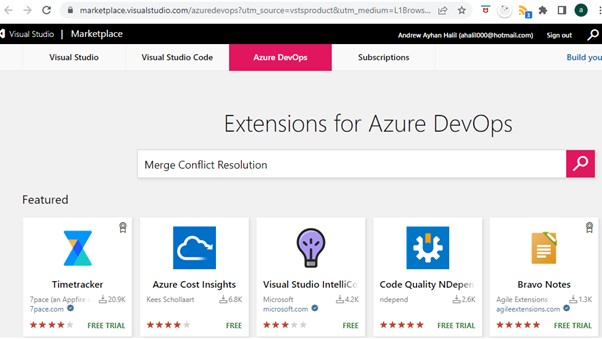
In the extensions pane, select Browse Marketplace.
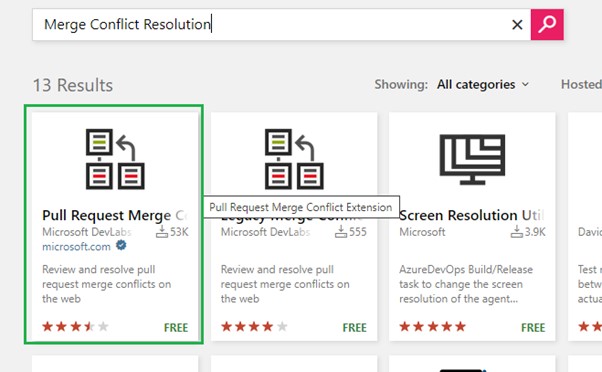
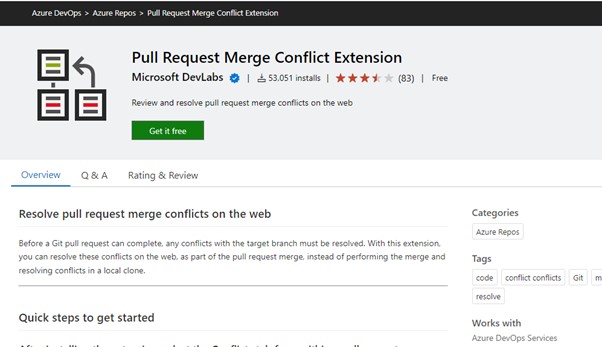
Search for “Merge Conflict Resolution”:
You will find the Pull Request Conflict Extension:
Click on Get it free.
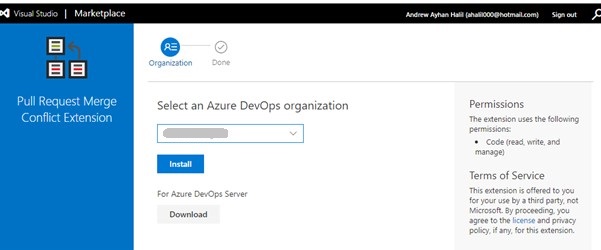
Select your Azure DevOps organization, then click Install.
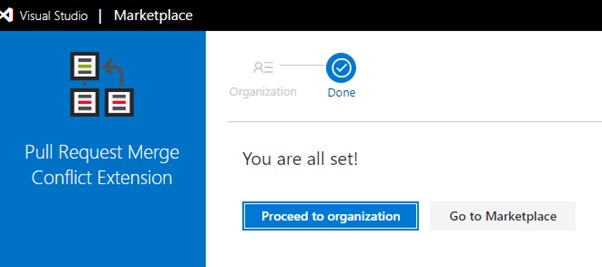
Once that is installed, click on Proceed to organization:
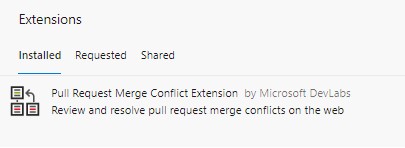
Back in DevOps, click on the Organization settings.
Select Extensions. You will see the pull request merge conflict extension showing in the extensions pane:
Resolving Merge Conflicts with the Pull Request Merge Conflict Extension Tool
Now go back to your pull requests in your project repository and select the pull request appBug-1 that has the conflict:
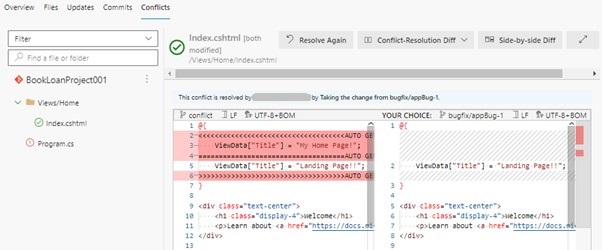
Notice that a conflict tab has magically appeared!
Click on the conflicts tab:
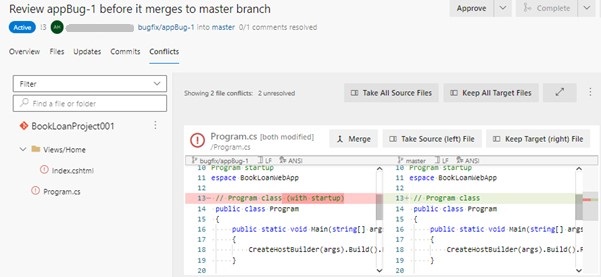
You can resolve the conflict by taking the left or right side of the source code.
To enable resolution, click on the file on the left. The editor will show:
In the submit merge button there are additional choices to resolve the conflict:
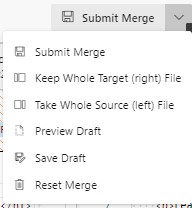
Select the conflict resolution option
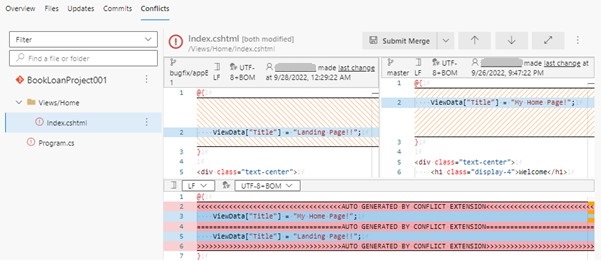
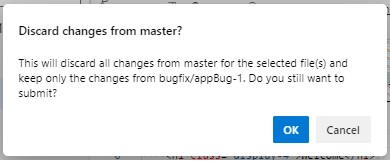
Take Whole Source (left) File. Say Ok in the confirmation dialog.
It will now tell you the conflict is resolve for the Index.cshtml file.
The conflict for Program.cs is still unresolved, so select that:
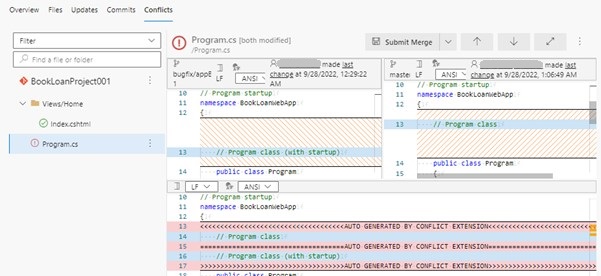
Again, choose the conflict resolution option Take Whole Source (left) File (as we did for the first conflict).
Say Ok in the confirmation dialog (as we did for the first conflict).
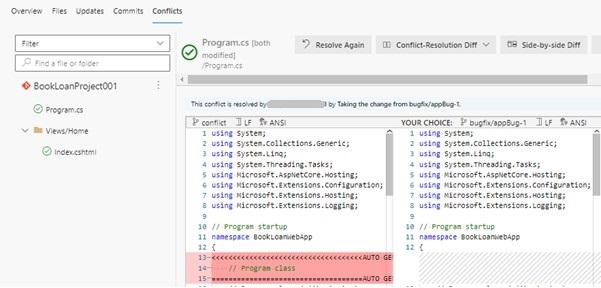
Both files are now resolved with green ticks:
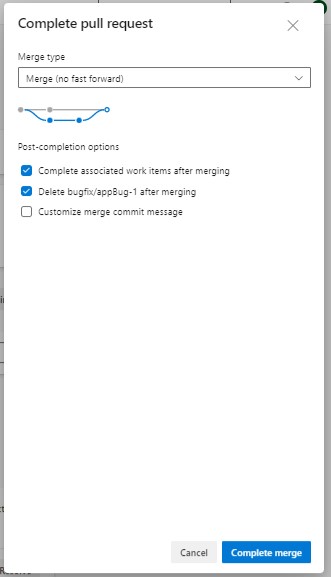
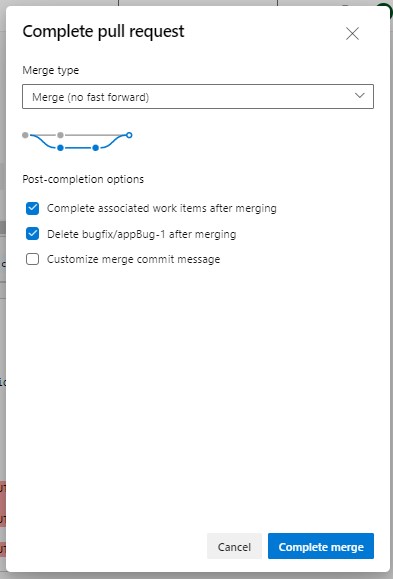
Next, click on the Complete action to proceed to the master branch merge:

As we did for the merge completion for the feature pull request, we tick the work item to transition to the DONE status and keep the delete branch option.
Now hit the Complete Merge action:
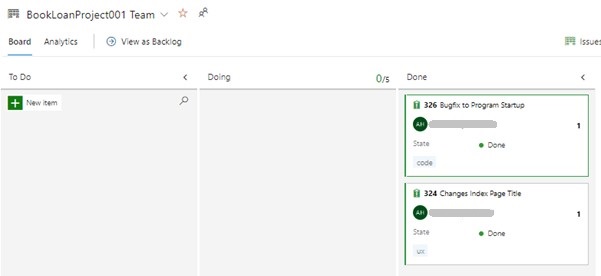
Open the Azure Boards to inspect the work items. They will both show in the DONE column:
We have seen how to resolve a merge conflict from a pull request using a useful extension within Azure DevOps. You can also resolve merge conflicts from pull requests using the Git extension within Visual Code, where you compare the committed branches side by side, make the changes then push them back to the remote repository.
Either method will work as both sets of changes will be merged into the master branch, however, in both cases, the necessary checks, such as a successful build and unit tests will need to be run before the resolution and pull-request is approved for merging into the main branch.
That is all for today’s post.
I hope you have found this post both useful and informative.
Andrew Halil is a blogger, author and software developer with expertise of many areas in the information technology industry including full-stack web and native cloud based development, test driven development and Devops.

