Welcome to today’s post.
In today’s post I will go over how you can add identity authentication to your .NET Core applications using Entity Framework Core and its Code First migration tool. This is the first step in providing full identity services to a .NET Core application.
As a starting point, you should be aware of how to use Entity Framework in a .NET Core application. An understanding of how to integrate data access for a backend database is detailed in one of my previous posts where I showed how to use Entity Framework Core in a .NET Core application.
In another post, I showed how to create an identity application using the project templates in Visual Studio. There is one obvious limitation that the templated approach to creating identity applications has in that it uses default structures for the user accounts that are registered within the identity application. The other not so obvious limitation is that the templated, scaffolded approach to generating the identity application is that the application itself and the identity functions are tightly coupled into one application that provides both identity services and a user interface.
The main benefit of the approach I will be covering today, will be that the identity authentication can be decoupled into a dedicated web API service that provides identity authentication services to a web client. This will be something that I will cover in a future post.
In the first section I will show how to setup identity authentication within an ASP.NET Core application.
Setup of ASP.NET Core Identity in .NET Core Application Startup
Before we can use the generated schemas in the SQL database for authentication purposes, we will need to associate the ApplicationUser table with the identity role within ASP.NET Core Identity.
Setting up the identity authentication role requires you to apply the following setups:
Include the following namespaces into your Startup.cs:
using Microsoft.AspNetCore.Identity;
using Microsoft.EntityFrameworkCore;
In ConfigureService() method add the code shown:
services.AddIdentity<ApplicationUser, IdentityRole>()
    .AddEntityFrameworkStores<ApplicationDbContext>()
    .AddDefaultTokenProviders();
Before the ASP.NET Core identity services can be used in any service classes that implement methods for identity related data access, we will need to include the following namespaces:
using Microsoft.AspNetCore.Identity;
using Microsoft.AspNetCore.Identity.EntityFrameworkCore;
After we have setup the identity role within the startup, we are ready to define the application user entity. I will show how this is done in the next section.
Define the ApplicationUser Entity
Before we can use the identity user from the SQL table ApplicationUser, we will need to subclass it from the IdentityUser base class.
Creation of the ApplicationUser for the ASP.NET Identity module is shown below:
using System;
using System.Collections.Generic;
using System.Linq;
using System.Threading.Tasks;
using Microsoft.AspNetCore.Identity;

namespace MyApp.Models
{
    // Add profile data for application users by adding properties to the ApplicationUser class
    public class ApplicationUser : IdentityUser
    {
    }
}
The sub-classed ApplicationUser can in future be amended to include additional user account properties that can be used for additional security claims to secure user accounts when generating authentication tokens.
Before we can define a data context within the application to allow us to integrate application classes (or DTO objects) to the database objects from the entity framework, we will have to setup a connection string to the backend SQL server data store.
We will also be required to setup Entity Framework Core Migration, where we will use Entity Framework Core to create the database based on the above definition. Without the connection string, our data context and the PowerShell data definition commands within the Visual Studio command shell will not be able to be mapped to the backend data store.
Open your appsettings.json file and enter the ConnectionString as shown:
{
    "ConnectionStrings": {
        "AppDbContext": "Server=(localdb)\\mssqllocaldb;Database= EFCoreDemo;Trusted_Connection=True;MultipleActiveResultSets=true"
    },
	…
}
Save the file.
In the next section, I will show how to setup the data context within the application so that data can be persisted and bound from the SQL data store into our application model classes.
Setup the Database Context
As a mentioned in the previous section, before any Entity Framework Core Migration commands can be used, we will need both a connection string and a data context mapped to the ApplicationUser database table. I will now explain how the data context is setup.
Create a \Data sub-folder under your project to store your Entity Framework Core data-related contexts and migrations.
Add a blank ApplicationDBContext.cs source file.
Enter the following code:
using System;
using System.Collections.Generic;
using System.Linq;
using System.Threading.Tasks;
using Microsoft.AspNetCore.Identity.EntityFrameworkCore;
using Microsoft.EntityFrameworkCore;
using BookLoan.Models;

namespace MyApp.Data
{
    public class ApplicationDbContext : IdentityDbContext<ApplicationUser>
    {
        public ApplicationDbContext(DbContextOptions<ApplicationDbContext> options)
            : base(options)
        {
        }

        protected override void OnModelCreating(ModelBuilder builder)
        {
            base.OnModelCreating(builder);
        }
    }
}
Save the file.
In the next section I will show how to setup the data context to use the SQL server connection string.
Setup the Db Context to use SQL Server with the Connection String
We now need to associate the above data context to the backend SQL Server data store that will contain our application users. We do this by adding the following lines within the ConfigureServices() method in Startup.cs:
services.AddDbContext<ApplicationDbContext>(options =>
    options.UseSqlServer(Configuration.GetConnectionString("AppDbContext"))
);
We will now create the initial database by using an Entity Framework Core Migration command.
First, open the PowerShell console within Visual Studio.
Run the following command:
Add-Migration InitialCreate
Next, run the command:
Update-Database
When completed, open the SQL Explorer or SSMS.
Open server localdb)\MSSQLLocalDB.
Expand the tables and you should see the identity tables created as shown:
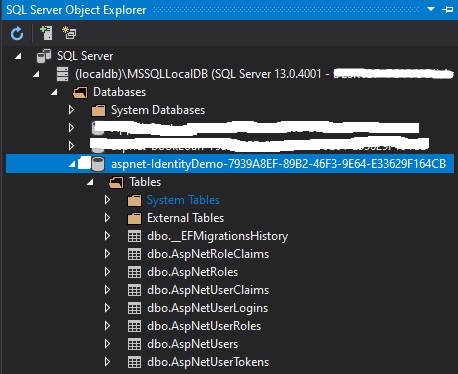
We now have the full schema for the starting point in the implementation of a custom identity service that has a backend data store.
In a future post I will explain how we can use the ASP.NET Core Identity API to register, update and authenticate user accounts, and later how to add roles and claims.
That is all for today’s post.
I hope you have found this post useful and informative.
Andrew Halil is a blogger, author and software developer with expertise of many areas in the information technology industry including full-stack web and native cloud based development, test driven development and Devops.