
Welcome to today’s post.
In today’s post I will explain what HTTP response compression is, why it would be beneficial to the performance of our web API or web application, and finally to show how to setup and use it in a web API service.
In previous posts I showed how to improve Web API applications using response caching and in-memory caching. What HTTP response compression does is to reduce the size of response content before it is sent back to a client.
When do we need Response Compression?
In web sites or web applications where there are low bandwidth requirements, such as pages that display mainly text and smaller images, it is unlikely to be beneficial to compress the content as the performance benefits would be negligible.
In web sites where there are higher bandwidth requirements, that include pages that contain larger images, video, and audio media resources. The need to load these higher bandwidth resources efficiently would benefit from the use of compression.
Response compression would be recommended whenever we need to reduce the size of frequently used large content such image, audio, video, and other media files. Moreover, when the most frequently used pages in your web site rely on downloading content and delays in downloading content is noticeable to the end user, then compression would also be a benefit. There is nothing worse for an end user than waiting for a page to load consistently.
The Benefits of Response Compression
The benefits of compression are dependent on the performance needs of our site, and include the following:
- Network bandwidth is reduced.
- Performance of site latency between backend services and client.
- Responsiveness of the end user client.
Response compression is beneficial in content types that can be further compressed, and these include types such as text, XML, HTML, JSON, CSS. Content types that cannot compress sufficiently to justify the time taken to compress include JPEG and PNG images.
Setting up Response Compression
Setting up response compression requires using the response compression middleware in the start up of a .NET Core application.
To use the compression library, we need to declare the following namespace:
using Microsoft.AspNetCore.ResponseCompression;
In configure services we setup the middleware for dependency injection in the service collection as follows:
public void ConfigureServices(IServiceCollection services)
{
    services.AddResponseCompression();
}
To allow different compression providers to be used within the API we can add compression providers within the middleware delegate closure as follows:
public void ConfigureServices(IServiceCollection services)
{
    services.AddResponseCompression(options =>
    {
        options.Providers.Add<BrotliCompressionProvider>();
        options.Providers.Add<GzipCompressionProvider>();
        options.MimeTypes =
            ResponseCompressionDefaults.MimeTypes.Concat(
                new[] { "image/svg+xml" });
            });
}
By default, the Brotli and Gzip providers are included by default within the providers collection even when not specified. If a client does not support Brotli, then compression will fall back to Gzip. The following browser clients support Brotli compression:
- Firefox
- Chrome
To add response compression to the application pipeline, we do this within the Configure() method within the startup:
public void Configure(IApplicationBuilder app, IWebHostEnvironment env)
{
    app.UseResponseCompression();
}
The compression providers Gzip and Brotli and supported by default in the compression package and the compression middleware.
For a client to request compressed content, it can add the value following values to the Accept-Encoding header:
| Value | Compression Requested |
| br | Brotl |
| gzip | Gzip |
With compression algorithms, the faster the algorithm, the least effective the compression is (larger output), and the slower the algorithm, the most effective the compression is (smaller output).
Configuring for faster compression can be done as follows with the Brotli provider:
public void ConfigureServices(IServiceCollection services)
{
    services.AddResponseCompression();

    services.Configure<BrotliCompressionProviderOptions>(options =>
    {
        options.Level = CompressionLevel.Fastest;
    });
}
The compression provider options are Brotli compression are:
| Compression Level | Description |
| CompressionLevel.Fastest | Compression is quick, but the output size is sub-optimal. |
| CompressionLevel.NoCompression | Content is not compressed. |
| CompressionLevel.Optimal | Responses are compressed optimally but compression is slower to complete. |
Note: The default compression level is CompressionLevel.Fastest.
In the next section, I will be showing how to test performance from an ASP.NET Core API application that is configured with compression optimization.
Testing Response Compression from a Web API
We will now test compression of Web API responses using a web client.
When we execute a Web API method within Swagger we see the following response header with the default compression being Brotli:
cache-control: public,max-age=30
content-encoding: br
content-type: application/json; charset=utf-8
date: Sat, 05 Jun 2021 11:41:58 GMT
server: Microsoft-IIS/10.0
xtransfer-encoding: chunked
vary: User-Agent, Accept-Encoding
x-powered-by: ASP.NET
x-sourcefiles: =?UTF-8?B?QzpcZGV2Z...rtcR2VucmVz?=
Run the Web API service from Visual Studio. Next open a Chrome browser.
Open the Web developer tools.
Select Network. Enter the URL of the API HTTP GET call:
http://localhost:25138/api/Book/Genres
For reference, I use an API method such as the one below:
[HttpGet("api/[controller]/Genres")]
public async Task<List<GenreViewModel>> Genres()
{
    try
    {
        var genres = await _bookService.GetGenres();
        return genres;
    }
    catch (Exception ex)
    {
        throw new GeneralException(ex.Message);
    }
}
In the next work tab observe the timings for the API request and response.
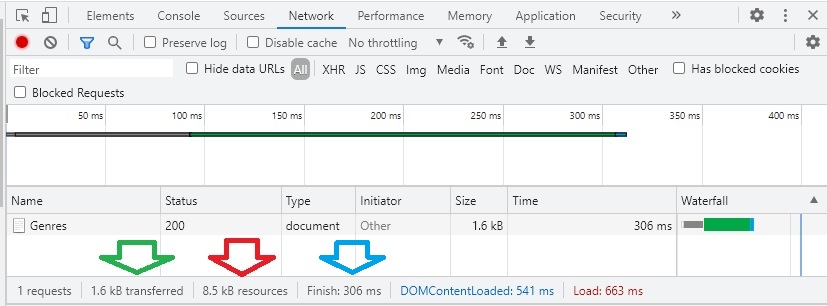
When we run the response compression with default settings, from an uncompressed response size of 8.5kb, we have Brotli compression with a compression level of fastest.
What this means is that the compression size is not the smallest, but the speed of generating the output is good at 306ms.
When we run the response compression with modified settings, from an uncompressed response size of 8.5kb, we have Brotli compression with a compression level of optimal.
From an uncompressed response size of 8.5kb, we have 1.1kb transferred (which includes the response body and header) with a higher processing time of 655ms.

When we run without response compression, from an uncompressed response size of 8.5kb, we have 9.0kb transferred (which includes the response body and header) with a higher processing time of 579ms.

As we can see, there are a few variations we can use for the configuration of our Web API in providing response compression. Where we require speed of compression, we sacrifice size of content response. Where we require smaller content response size, the compression algorithm takes longer. Where bandwidth is limited, we can optimize the size of the compression, and where bandwidth is not a concern, we can optimize for speed of compression.
That is all for today’s post.
I hope you found this post useful and informative.
Andrew Halil is a blogger, author and software developer with expertise of many areas in the information technology industry including full-stack web and native cloud based development, test driven development and Devops.

